|
|
|
|
|
|
Introduction to Digital PhotographyThere is still a lot of confusion surrounding digital cameras and digital photography. With all the new cameras and options it just seems to get more confusing instead of clearer. It is easier to approach something if you can take it in small bites. So in an effort to make digital easier to approach and understand I've grouped together everything you need to know to get started in ten easy to understand lessons.
Lesson 10: Using Your Digital Camera - Digital WorkflowIf you've read the rest of this series, then you know enough to decide whether or not to take the plunge...so if you're reading this section I'll assume you've done your research and bought a digital camera and all the related accessories you'll need. The following is the methodology I use and have found works well if followed routinely. The steps include: File Transfer, Image Processing, Image Storage, Digital Negative Storage, Image Backup, and Print Processing. Taken together these steps are called Digital Workflow. This assumes you want to do your own printing and archiving of images. If not the easiest option is to take your camera's memory card to a camera shop, drug store, or even a photo kiosk in the mall and have prints made from your digital images. This is certainly easier for beginners, but there are still a few things you need to know. See the sidebar The Digital Photo Lab - The Easy Printing Solution below for a complete explanation. Step
One: File Transfer All cameras provide you with a cable that can be plugged into your USB port. Your camera then appears as a drive in your Windows Explorer window and you can transfer files to your hard drive as you would move any files. There are a couple of problems with this approach. First it's slow, especially with today's big files and memory cards. Many computers, especially if they're a few years old, only have two USB ports on the back of the computer. Other devices may already be plugged into those ports and if your computer is under the desk it's a hassle to pull it out and connect the cable every time. USB card readers can be plugged into a USB or Firewire port and left connected. When you want to transfer your images you just plug the card into the reader and the card becomes visible in Windows Explorer as another drive. The problem with card readers is they can be fussy and the drivers they require may create problems with Windows. If you have a laptop you can get a PCMCIA (card slot) adapter that allows you to plug your camera's memory card directly into your laptop and read it as another hard drive. This is a nice clean approach, and like the USB cable that comes with your camera requires no additional driver to cause problems with Windows. A similar approach can be found on many new computers that include memory card slots for digital cameras built right into the front of the computer. This allows you to treat your camera's memory card like a floppy disk. When you want to download your image you simply slide the memory card into the front of the computer and read it like a disk. No matter how you transfer files onto your hard drive, you'll need to initially copy them into a "staging area" where they can be viewed and processed. In my computer I have a folder called "Digital Photos" and a subfolder under it called "Unprocessed". I simply copy (not cut) the photos directly from my card into the area called "Unprocessed" where they will wait for me until I begin Step Two.
Step
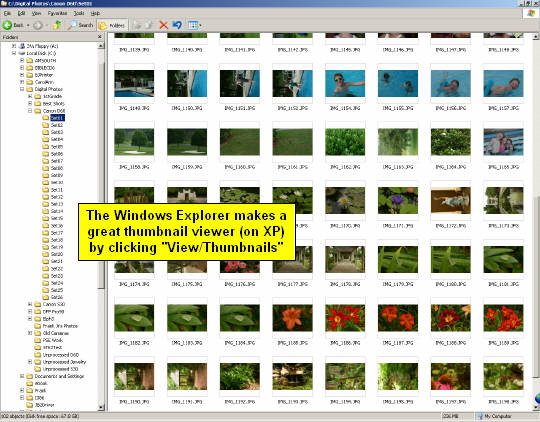
Two: Image Processing. To do this, you'll need some image editing software. Some version or another most likely came with your camera, but I personally like Microsoft Picture It! for beginners. I believe provides the best balance of tools and ease-of-use for a very modest price ($30 to $50). If you want something a little more advanced and powerful, try Adobe's Photoshop Elements or the advanced version of Picture It called Digital Image Pro, or Jasc's Paint Shop Pro. Each lists for around $99, but you can usually get them for significantly less if you watch the sales and rebates. When you start most image editors you have the option of previewing a "thumbnail" view of your photos, which is like a gallery of tiny photos so you can see what they look like at a glance. You can use this thumbnail viewer to sort your shots and to get an idea of which of your shots are the best. Starting with Windows ME, Windows Explorer also provides "thumbnail viewing" (but not editing). To see a thumbnail view such as the one below click on the View menu and pick Thumbnail.
Once you've chosen the shots you want to edit and print, your next step is to get rid of the shots you won't be using. You can either move them to your permanent "Digital Negatives" folder or delete them. Leave the ones you're going to edit in the "Unprocessed" folder. Once you start the actual editing of photos, it should take place in the following order: Crop, Color Balance, Brightness and Contrast, Resize, and Save As. You won't necessarily perform all of these actions on every photo. Also, please note that I used the phrase "Save As..." instead of "Save". I recommend keeping two copies of your best images. One an original "digital negative" and one in the form of a "final photo" for printing. That way you can always go back to the original later on if you want. Step Three: Image Storage Step Four Digital Negative Storage When you have finished processing your negatives and have saved them into your "Photos" directory under new names, then you simply do a "Cut and Paste" (a move) on the originals from your staging area (i.e. "Unprocessed") into your "Digital Negatives" folder. Please...never "throw away" any negative that was not an "accidental" shot...it's just too easy to simply keep them and you'll be surprised later on at what you find in those folders. One final (and significant to beginners) benefit of saving digital negatives is that if you do a bad job of editing a given photo, you can always go back to the original and do it over again. If you don't save the original in its original state, you'll never have that safety net. And I can promise you that after a year, when you're better at editing your photos you'll want to go back and re-edit some of your originals. Step Five Image Backup Step Six Print Processing Summary |
|
|
|
|
|
|
|
All
materials contained herein © Copyright Vivid Light Photography Magazine
2001, 2002, 2003, 2004 |
|
 Next,
if you're wise, you'll find some systematic way to backup your work, both
your
digital negatives and your edited photos. As a beginner, you may
find it easy to simply back up the files onto CD-R. But once you
Next,
if you're wise, you'll find some systematic way to backup your work, both
your
digital negatives and your edited photos. As a beginner, you may
find it easy to simply back up the files onto CD-R. But once you