
|
|
|
|
|
|
| Introduction to Digital
Photography by Frank Phillips There is still a lot of confusion surrounding digital cameras and digital photography. With all the new cameras and options it just seems to get more confusing instead of clearer. It is easier to approach something if you can take it in small bites. So in an effort to make digital easier to approach and understand I've grouped together everything you need to know to get started in ten easy to understand lessons. Here's goes lesson 2.
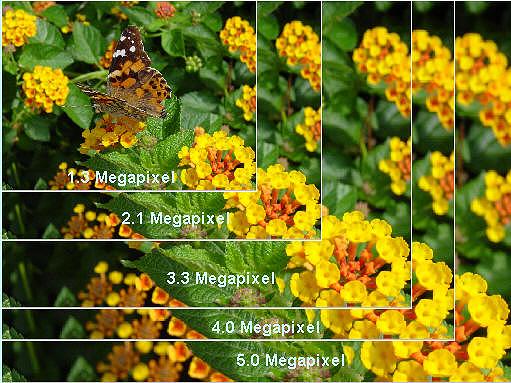
Lesson 2: Understanding Resolution A digital image, just like the image you see on your computer monitor or television, is made up tiny dots called pixels. The term "Resolution", when used to describe a digital camera refers to the size of the digital image the camera produces, and is usually expressed in terms of "megapixels" or how many million pixels it can record in a single image. The number of pixels a camera captures is called the camera's resolution. For example, a camera that captures 1600 x 1200 pixels produces an image with a resolution of 1.92 million pixels and would be referred to as a 2.0 megapixel camera. You get to 1.92 million pixels by multiplying the vertical and horizontal dimensions. That number is then rounded off to 2 for marketing purposes. The image below shows the relative image sizes of today's most common digital cameras. At their actual size even the smallest of them would likely be larger than your entire computer screen. Notice the tremendous difference between 2.1 megapixels and 3.3 megapixels. This is why you'll get better prints from a 3 megapixel camera when compared to a 2 megapixel camera. More resolution means better quality - up to a point. Both optics and the quality of the image capture chip play a role too.
The Advantage of Higher Resolutions An example of this is shown in the images here. The picture in back represents a 5 megapixel image with dimensions of 2560x1920 pixels. The picture in front of it represents a 4 megapixel image with dimensions of 2272x1704 pixels, the next image represents a 3 megapixel image with resolution of 2048x1536, the one in front of it a 2 megapixel image with resolution of 1600x1200, and the top picture a 1 megapixel image with dimensions of 1280x960 pixels. As you can see, the 4 and 5 megapixel photos are much larger than the 1 and 2 megapixel photos allowing for much greater detail in your prints and giving you the ability to crop, or "cut off", parts of the photo while still retaining enough pixels for a good print. Remember, you can produce a printout from just about any image, but the more you have to blow it up the more you degrade the quality. Doing the Math Computer monitors display images at 72 ppi (pixels per inch), meaning that there are 72 pixels for every 1 inch of linear screen space you see on your screen. Therefore, if you have an image on the screen that is 720 pixels wide, it will take up 10 inches of linear screen space (72 dpi x 10 inches = 720 pixels). This may look beautiful on the screen, but if you try to print this image on a printer at 72 dpi the result will look extremely choppy and jagged. To get a good looking print from your printer you'll need to print at 300 ppi (pixels per inch), which means that the 10 inches across the screen will be reduced to only 2.4 inches on paper (720 / 300 = 2.4, or 24% of the original 10 inches). The result is a smaller, but much cleaner, image on paper. So a good rule of thumb about how physically big an image will be on paper is that it will be about 25% or one quarter of it's size on your screen. It's important to understand the difference between ppi or pixels per inch and dpi or dots per inch. When we say to print an image at 300ppi a lot of people get confused because their printer is a 1,440 or 2,800 dpi printer.
1,200 pixels ÷ 72ppi = 16.6 inches
1,200 pixels ÷ 300ppi = 4 inches
2,800 dots per inch ÷ 300 pixels per inch = 9.3 droplets Going back a few years photo printers were capable of only 720dpi printing which gave you about 2.5 drops per pixel. The results were good but often looked a bit coarse. The big advance was when photo quality printers reached 1,440 dpi, which gives you around 5 droplets per pixel on the paper. At 1,440 dpi continuous tone areas such as blue skies look more natural. It's difficult to see the difference between current 1,440 and 2,800 dpi printers, though top of the line 2,800 dpi printers may have other features you want or need.
Beware of Imposters Summary My answer is "As many as you can afford." I'd recommend a minimum of 3.2 megapixels for general shooting. More if you want to do serious shooting or if you think you might want to print some of those images at 5x7, 8x10 or larger sizes. |
|||||||||||||||||||||||||||||||||||||||||||
|
|
|
|
|
|
|
|
|
 I'm often asked, "How many megapixels do I really need?"