|
|
|
|
|
|
| Introduction to Digital
Photography by Frank Phillips There is still a lot of confusion surrounding digital cameras and digital photography. With all the new cameras and options it just seems to get more confusing instead of clearer. It is easier to approach something if you can take it in small bites. So in an effort to make digital easier to approach and understand I've grouped together everything you need to know to get started in ten easy to understand lessons. Here's goes lesson 3.
Lesson 3: Editing Your Photos I you learn only one thing from reading this series of articles please learn this:
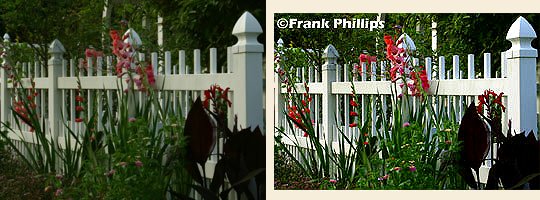
What is post processing? Simply put, it's the task of "tweaking" your photos until they are just the way you like them. You can spend seconds doing this with each photo, or you can spend hours doing this to each photo - it's up to you. There are almost as many software tools for post processing as there are models of digital cameras. In most cases your digital camera came with a tool that will allow you to edit your photos, though in most cases it won't be very robust and you'll outgrow it before very long. Doing it Yourself When you get the film processed there is (hopefully) a competent operator in the lab who either manually or automatically adjusts your images for color, brightness, and contrast when printing from your negatives. In other words, someone else handles all of the post processing. When you shoot digital you have a choice of dropping off your memory card at a lab for printing or you can print your own images. It's entirely up to you. Unfortunately digital printing is still something new for many labs and the quality of digital prints you receive can vary wildly. A common post processing tasks is red-eye removal. If you've ever shot photos of pets or kids you've seen the infamous Red-Eye; it's a problem that plagues both film and digital equally. See What is Red-Eye below. Once you have an image on film with redeye there isn't much you can do to fix it. But with digital you're in much better shape. A number of image editing programs have functions that automatically fix redeye automatically or you can do the touch-up yourself using the paint brush tool. Or maybe you've shot a photo that came out a little too dark for your liking. With film you're at the mercy of the photo processor to properly adjust the exposure for printing. But with digital you have a number of options from adjusting the overall brightness, adjusting the image gamma or spot editing to bring out specific parts of the image. In some cases you can use a single function such as the "Auto Color" function in PhotoShop. Sometimes a single tool goes a long way toward correcting an image's faults. In addition to the image editing programs themselves there is an amazing array of programs called plug-ins. These programs literally plug into your image editor adding functionality and becoming part of the editor. Plug-ins are designed to do only one or two specialized tasks, but do them exceptionally well. One example of post processing is shown below. The photo on the left is an original photo straight out of the camera. The photo on the right has been processed using Photoshop Elements to adjust color balance, contrast, saturation, cropping (to a 4x6 ratio) and to add a copyright. There are many more things I could have done to the original, but this is what most folks would do (minus the copyright) to get an image ready for printing. Notice that the colors are now richer, the whites are whiter, the photo is brighter, and it's now in a 4x6 ratio suitable for printing on glossy photo paper.
Converting the photo on the left to the photo on the right took me less than one minute to do (notice how dim and dull the original is). But I'll warn you there is a significant learning curve with Photoshop ($600) and even with Photoshop Elements ($99), but once you've climbed that curve there's nothing you won't be able to do to your photos using these tools. But let's say you want to "start small"; may I suggest exploring the software that comes with your camera. Most Canon digital cameras come with a product called "Zoom Browser". It provides enough tools to allow you to adjust color and brightness and crop your images. If you don't like the software that came with your camera and want an easy and intuitive program to start with, spend $30 on Microsoft's "Picture It!" program. When you want to stretch a bit more try Paint Shop Pro from Jasc software. The base program costs around $99 and is easier to learn than Photoshop.
There are so many different photo editing products to choose from that it can be quite confusing. My advice to newcomers is to first try the software that came with your camera. Once you've gotten your feet wet you'll be ready to move up to a stronger package and you'll have a better idea what you want. Products like Adobe's Photoshop Elements or Jasc's Paint Shop Pro are logical next steps. Then if you still can't get enough, you'll be ready for the full-fledged Adobe Photoshop, which is the industry standard for image editing. As you learn more you'll find that you can dramatically improve your photos. A side benefit of doing the post processing yourself is that it can make you a better photographer. It will teach you volumes about exposure, the color of light and about composition all of which helps improve the most valuable piece of photographic equipment you own - the one between your ears. |
|
|
|
|
|
|
|
|
|