
|
|
|
|
|
|
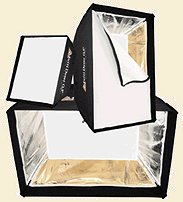
| Studio Lighting Accessories By Chuck McKern The essence of working in a studio is the control of light. Learning to consistently do so is the single biggest problem for people new to studio work. Controlling light refers to how much light reaches the subject, where the light is landing, and how contrasty that light is. There is a confusing range of equipment out there that can be awfully intimidating to the novice. This article discusses the different tools you can use to control light in the studio and what each can do for you. For information on types of studio lights and how to position them as a starting point check out my article Portrait Lighting from the June issue. Reflectors Reflectors are polished bowls (usually metal) that attach around the light source. A reflector takes light that would normally spill out to the sides, top, and bottom of the light and redirects it forward onto the subject. Without the use of a reflector a large quantity of usable light would be wasted. Reflectors are normally used with bare bulbs such as hot-lights (photofloods) and studio strobe systems. Softbox The softbox is a popular lighting accessory for most studio photographers. Many would refer to them as a required piece of equipment. A softbox attaches directly to a strobe head. They are available in different sizes to help control the contrast of the light. Smaller softboxes produce higher contrast light while the larger softboxes will provide a softer light. You can also move the light closer or farther from the diffusion panel in the softbox. The greater the distance between the light and the diffusion surface, the less noticeable and more diffused (softer) the effect. These features make the softbox extremely versatile in controlling light, shadow, and hot spots on reflective surfaces - which is why they are so popular among studio photographers.
Umbrellas are probably the most commonly used reflector for electronic flash. They come in many diameters, some as large as 6 feet, and have the unique ability of being a reflector and a diffuser at the same time. Umbrellas provide a uniform diffused light, but can create unnatural highlights on highly reflective objects, making a softbox a better choice for reflective subjects. Umbrellas are often used in portrait photography where the circular highlight they create in the subject's eyes provides a more natural look than the rectangular highlight created by a softbox. Umbrellas are available in white, silver, and gold, depending on the warmth of light you want to direct onto your subject. You'll get softer light with a white umbrella, harsher light from silver, or a warm light from a gold umbrella. Diffusers When using bare lights without a diffuser the light reaching the subject is stronger in the center and gets softer as you get closer to the edges. Placing a diffuser over a reflector spreads the light more evenly across your subject and softens the light. Diffusers can be plastic discs that attach to reflectors or can be different types of material attached in front of the reflector.
Scrims are translucent diffusion panels placed in front of a light source to soften the light. Scrims are usually attached to a frame support and can actually have multiple lights behind a single panel. You can control contrast by moving the scrim closer or farther from the light source. Cones and snoots
Barndoors are yet another attachment for the reflectors. They usually have 2 or 4 hinged flaps that move independently. Barndoors can be adjusted to control how wide or narrow an area the light covers. Reflector cards
A popular reflector among location photographers is the light disc. Light discs are flexible discs or frames covered with reflective material. They're lightweight and fold up into compact pouches making them easy to transport on location. A 42-inch light disc will collapse down to about 12 inches. Sizes, surfaces, and colors vary and some offer multiple colors in one disk. Gobos Gobo is derived from the words "go between". Gobos are usually black cards that are placed in front of the light source to block light and they're most often used to keep light from hitting a particular spot on the subject or to cast a shadow on the background. A gobo can also be used to block part of a softbox to create a smaller light source, producing a more contrasty light or to knock down bright highlights in reflective surfaces. Cookies These are not things you eat while shooting! A cookie in photographic terms is a card that, with cut-outs of a specific shape or shapes, when placed over your light will cast the shape(s) on to the background. Gels Gels are gelatin filter sheets used over light sources to either correct the light balance or create dramatic lighting effects. They are also used to change colors of backgrounds and there are diffusion gels to help with diffusing light. Gels can be taped to a reflector or placed in frames and mounted to the reflector or light stand. Taken individually, so that you can understand what each lighting tool does, makes working with these tools seem much less intimidating. You don't need all of these items to equip your studio. Choose a few that will work for your needs and concentrate on mastering those. Once you're comfortable with what you can do with those tools add new items one at a time and gradually you'll become the master of light in your studio. Next month we'll talk a look at different lighting techniques.
|
|
|
|
|
|
|
|
|
|
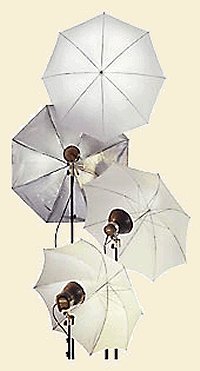 Umbrellas
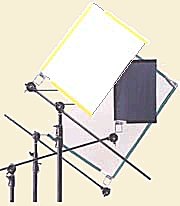 Scrims
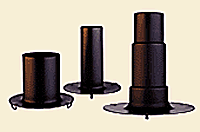 Cones and snoots are attached to the reflector and are used to narrow
light symmetrically to produce a round patch of light. Some snoots use a
honeycomb grid to make a smoother gradation to the edge of the light. This
would allow for a less dramatic drop off of the light. Some fancier snoots
have a focusing capability to allow you to control the spread of the light
beam.
Cones and snoots are attached to the reflector and are used to narrow
light symmetrically to produce a round patch of light. Some snoots use a
honeycomb grid to make a smoother gradation to the edge of the light. This
would allow for a less dramatic drop off of the light. Some fancier snoots
have a focusing capability to allow you to control the spread of the light
beam.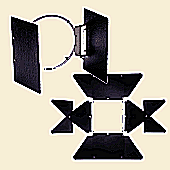 Barndoors
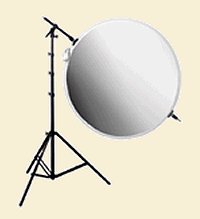 Reflector cards come in many shapes and sizes and are made from
numerous materials. This type of reflector is not attached to any light
source, but is used to reflect or bounce light back onto your subject.
They are placed to redirect light into shadow areas to help illuminate
details. Reflectors can be made from cardboard, metal, or fabric, and are
usually white, gold, or silver.
Reflector cards come in many shapes and sizes and are made from
numerous materials. This type of reflector is not attached to any light
source, but is used to reflect or bounce light back onto your subject.
They are placed to redirect light into shadow areas to help illuminate
details. Reflectors can be made from cardboard, metal, or fabric, and are
usually white, gold, or silver.