|
|
|||
|
page 9 of 23 |
|
|
|||
|
page 9 of 23 |
| Flash Photography Made Simple by Chuck McKern For some reason, flash photography is a topic that many people are deathly afraid of and many others do not fully understand. Flash units are tools that have been made to assist us in our picture taking and improve our photography. I am going to discuss flash photography in a manner that, I hope, is easy to understand and should take some of the fear out of using that "F" word. I will also cover several ways to use your flash to achieve better results. When most of us think about using a flash, we think of low light scenes such as indoors or outside at night. Granted, a flash is important in these situations. But it will improve your photographs in many other situations. Let's start at the beginning and talk about "direct flash". Direct Flash Direct flash is what most people are most familiar with. This is when the flash unit emits its burst of light directly at the subject. This is common to all cameras that have a built-in flash unit.
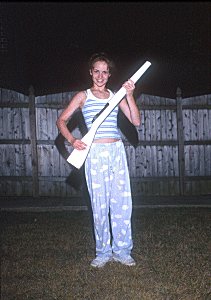
Some of these problems can be resolved with relative ease. Moving your subject away from the background, or raising the flash and angling it to drop the shadow down behind your subject, can allow you to loose the shadow. Angling the flash will also help prevent the flash from reflecting off of mirrors and glass. The biggest advantage of the direct flash is it can reach longer distances than any other methods of flash photography. Looking at the example here, one of the first things you'll notice is the distracting, harsh shadow on the fence in the background. To capture this shot without the shadow, we should have moved our subject further away from the fence. This would have allowed the shadow to fall to the ground directly behind the model. Fill Flash Whenever I tell people to use their flash outside on a bright day to improve their photographs, they look at me as if I were out of my mind. The midday sun is a very harsh light source and creates pictures that have high contrast. Highlights will be vivid and the shadows are usually deep. The brightness range from the highlights to the deep shadows will usually exceed what the film can capture. If you expose for the highlights, you will loose your shadow detail. If you expose for the shadow detail, you will blow out your highlights. Fill flash is used to add illumination to your foreground to help balance the light levels of your subject and the shadow areas so the film can capture both. Fill flash can also be used to brighten your subject when being lit from behind (backlight).
In the next two examples, the only light source would have been the sun coming in the window from outside. Without using the fill flash, we almost silhouette the model as the only parts being lit with natural light are the top of her right leg and back, and her right arm. Also, looking at this photograph, you will notice that the sky in the background is washed out (due to the longer exposure needed to properly expose the model). By introducing the fill flash, we were able to properly expose the model and still keep the sky from washing out.
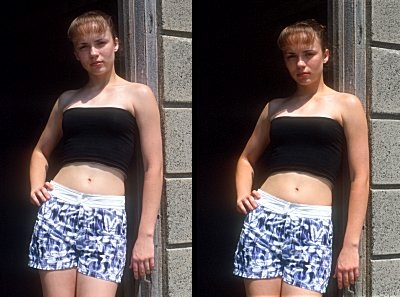
Bounce Flash The best way to avoid the problems of direct flash is to use a bounce flash. Bounce flashes are flash units that have the ability to angle the flash head in order to reflect the light off of a ceiling or reflector connected to the flash unit. This technique will give you a soft diffused light that is very flattering for portraits. Bounce will also prevent you from having "red-eye" and eliminates harsh reflections from mirrors and glass because the light is not being reflected directly back at the camera. There are a couple of things to keep in mind when using this method of flash photography. First is that you will have to "pre-visualize" the angle of the light. Light will reflect at the same angle it is transmitted, so you will have to look at where the light will hit the ceiling and follow the same angle to your subject. This doesn't have to be exact, but you want to make sure the light doesn't drop down too far in front of or behind your subject. The other important thing to remember is when bouncing off of a ceiling, you will loose some of the light being reflected. The typical amount of light being lost is about two stops. If you're using a dedicated flash on a camera with Through-The-Lens (TTL) metering, the camera will take care of the correction for you. If you're using a manual flash, you will have to open your aperture by the two stops to compensate for the light loss. If you're using a bounce attachment that attaches to your flash, read the documents that came with it for the correct exposure adjustment. Again, with a TTL set-up, the camera will make the correct adjustment for you. This is all easier than it sounds once you try it. In the examples here, notice that the straight flash causes the flesh tones to wash out slightly and there is some loss of detail. In the shot with the bounce flash, notice we did not wash out the flesh tones and there is still a lot of detail. Since I was shooting outside, I used a Lumiquest Pocket Bounce to provide the reflective surface for the flash.
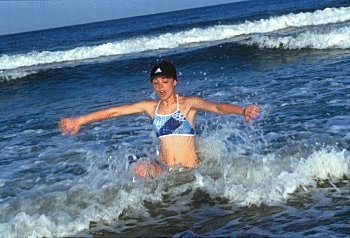
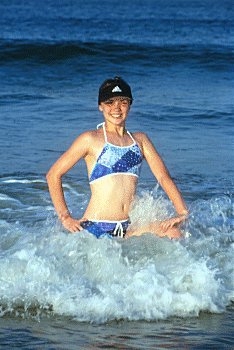
Front Curtain Sync Front curtain sync is the normal style of flash synchronization. This means that the flash fires when the shutter first reaches its peak opening. Front sync is used whenever you want to freeze motion at the beginning of the exposure. In our example at the beach, notice the water is suspended in mid air as it hits our model. You don't get a sense of the motion of the water.
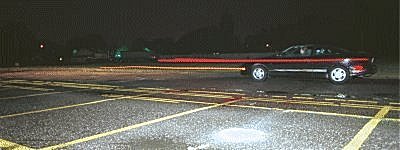
Slow Sync Slow sync is when you combine flash with a slow shutter speed (normally 1/30th or slower). This will allow you to expose for low light situations and correctly expose for a subject close to you in the foreground. If you are photographing a moving subject, with a normal front curtain sync, the flash will record the subject at the beginning of the frame (right side) while the ambient light will allow a "ghost like" image to "streak" while moving across the frame. The result is an unrealistic image with the motion in front of your subject.
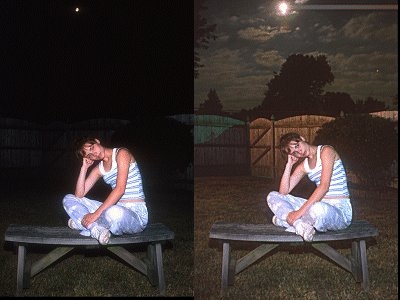
The first example here shows what the normal flash picture at night would look like. The subject looks fine but you have no sense of the surroundings. In the second example, we took the same shot with a shutter speed of 15 seconds (requiring a tripod). The result is, we were able to capture the model, but we can see the fence in the background as well as the clouds in the night sky. This shot has a lot more depth and it is more comfortable because the model doesn't appear to be in a black hole.
In the second example here, notice the car is frozen to the right side of the frame and the "streaking" caused by the lights and the ½ second exposure is in front of the car. It almost appears that the car was going backwards. Rear Curtain Sync
If you compare the beach shot here to the one above, you will notice you still have a feel for the movement of the water with the same exposure for the scene. Now compare the shot of the car to the one above. The taillights are still blurred but now they're behind the car, giving it the sense of forward motion.
Stroboscopic Some of the high-end dedicated flash units have a feature called stroboscopic flash. This is a mode that will allow you to fire the flash rapidly, several times, during one exposure as a subject moves across the frame. This would normally be used with a long exposure (usually ½ to one full second). The result would be a moving subject frozen several times in the frame.
So you can see that understanding flash really isn't that hard. All it takes is a little knowledge and practice for it to become second nature. So go out and try it!
Model: Sandi Lynne For additional information on flash photography and portrait lighting see our previous article on Portrait Lighting.
|
Flash doesn't have to be difficult
Use flash outdoors on sunny days to improve your photos
Slow sync flash can dramatically improve your night portraits
|
|
|
text and photography copyright © 2001 Vivid Light Publishing |
 For many years, flash attachments were designed as a direct flash
(many less expensive units are still designed this way today). The
characteristics of direct flash are easy to recognize. Images will
normally have harsh shadows directly behind the subject. The photos will
also have little depth to them. Many photographs of people made with
direct flash will have a problem with "red-eye". Also if you
have reflective surfaces behind your subject, such as mirrors, frames,
or glass, you will have a "hot spot" where the light is
reflected off of the surface.
For many years, flash attachments were designed as a direct flash
(many less expensive units are still designed this way today). The
characteristics of direct flash are easy to recognize. Images will
normally have harsh shadows directly behind the subject. The photos will
also have little depth to them. Many photographs of people made with
direct flash will have a problem with "red-eye". Also if you
have reflective surfaces behind your subject, such as mirrors, frames,
or glass, you will have a "hot spot" where the light is
reflected off of the surface. Our first example of the model sitting in the window, you'll notice
there's a distinct shadow line across the model's chest. Without the use
of a fill flash, her face would have been in a deep shadow and the front
shoulder and the part of her chest that is in the sun would have been
the only parts illuminated well. If we had exposed for the shadow area,
the front shoulder and chest area would have been completely washed out.
With the fill flash, we were able to illuminate the area in the shadow
and keep from blowing out the areas in the sun. The result: we get a
well-balanced, flattering look without loosing a sense of direction from
the sun.
Our first example of the model sitting in the window, you'll notice
there's a distinct shadow line across the model's chest. Without the use
of a fill flash, her face would have been in a deep shadow and the front
shoulder and the part of her chest that is in the sun would have been
the only parts illuminated well. If we had exposed for the shadow area,
the front shoulder and chest area would have been completely washed out.
With the fill flash, we were able to illuminate the area in the shadow
and keep from blowing out the areas in the sun. The result: we get a
well-balanced, flattering look without loosing a sense of direction from
the sun.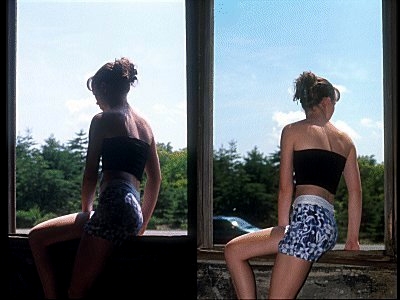
 Rear curtain sync will fire at the end of the peak shutter opening as
opposed to the beginning. When used in the above example with a slow
shutter speed, this will create a streak behind your subject with the
subject frozen at the end of the frame (left side). Providing a more
natural effect.
Rear curtain sync will fire at the end of the peak shutter opening as
opposed to the beginning. When used in the above example with a slow
shutter speed, this will create a streak behind your subject with the
subject frozen at the end of the frame (left side). Providing a more
natural effect.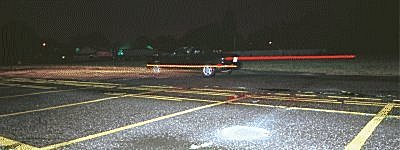
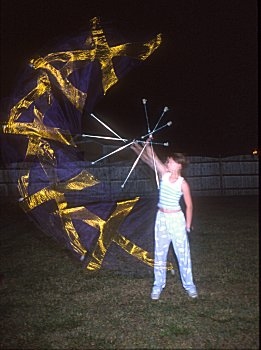 When we set up for these shots, we placed the camera ten feet away
from our model and manually set an exposure at f/2.8 for ½ second. We
set our flash unit to give us five bursts at 1/16 power. This allowed us
to have the flash fire five times evenly spaced during the ½ second
exposure. You can increase the power output to get more distance between
the camera and model, but you will not be able to get as many bursts per
frame. Refer to the documentation with your flash unit for more
information on this specialized feature.
When we set up for these shots, we placed the camera ten feet away
from our model and manually set an exposure at f/2.8 for ½ second. We
set our flash unit to give us five bursts at 1/16 power. This allowed us
to have the flash fire five times evenly spaced during the ½ second
exposure. You can increase the power output to get more distance between
the camera and model, but you will not be able to get as many bursts per
frame. Refer to the documentation with your flash unit for more
information on this specialized feature.