|
Portrait Lighting
by Chuck McKern 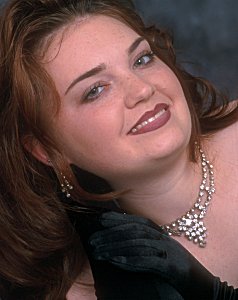 Lighting
is the key to shooting portraits, and a few simple steps will put you on
track to the proper lighting setup. But don't take these
suggestions as absolute. Experiment with different lighting setups
to find what you like. These suggestions will give you a good
starting point. Lighting
is the key to shooting portraits, and a few simple steps will put you on
track to the proper lighting setup. But don't take these
suggestions as absolute. Experiment with different lighting setups
to find what you like. These suggestions will give you a good
starting point.
We used a basic three light set-up to
illustrate this article. One light used as a main light, one for a fill light and one for a background light.
Other considerations are umbrellas for the main and fill lights (to
soften the light), and possibly a colored gel for the background
light. I recommend a filter suitable for portrait photography such
as diffusion, center spot or Soft F/X. For this shoot I
used a Tiffen Softnet Black #2 filter.
Main Light
Before positioning your main light, you will want to diffuse it.
Diffused light creates a softer, more flattering effect. For portraits, I
prefer to use umbrellas over softboxes. Softboxes are bulkier than
umbrellas and pass through less light. Umbrellas give you more
control over the direction of the light and more choices.
Umbrellas break down into two types: those that go between the light and
the model, diffusing the light, and those that you direct the lamp into
and reflect the light back onto the model. Reflective umbrellas
are available in different colors. White is neutral, silver
provides a more harsh light, and gold reflectors provide a warm light on
your subject. For these shots I used a 42-inch Photoflex white
umbrellas between the light and the model to provide an even diffuse
light.
Positioning of the main light can be a bit of an art, but the basics
will get you started in the right direction. Once you get comfortable with these tips and what they do, you will learn to find
the positioning that works best for you. Each photographer has his
or her own taste as to what lighting looks best, and this becomes part
of the portrait photographers photographic signature. A good starting point is to set the main light about 45 degrees from the camera to subject axis and raise it higher than the subject's head. You want to watch the subject's eyes for catchlights. Look at the subject from the camera angle and adjust the light until you get the catchlights in the desired position.
Catchlights in either the 1 o'clock or 11 o'clock position in the eyes of your
subject are desirable.
Adjusting the height of your main light will create different effects.
Lower the main light when photographing babies, small children, or older people when you want to minimize facial wrinkles and texture. A higher position
increases the emphasis on facial texture and is desirable for character portraits.
Just as the correct height is important, the correct angle from the camera to subject axis can be just as important. This positioning
will alter the apparent contour of your subject's face. If your subject has a narrow face, you can make their face appear to be slightly broader by moving the main light closer to the camera.
Fill Light
Just as we discussed with the main light, you want to diffuse the
fill light. If it is not diffused, you can get a double shadow and you may get a second catch light in the eyes.
Either will give your portrait an unnatural appearance. Again I used a 42-inch Photoflex white umbrella
here.
Your fill light should be about three or four times weaker than your main light. This will keep you in the neighborhood of a normal portrait lighting ratio of about 3:1 or 4:1.
A 3:1 ratio means that the difference between the main light and the fill light will be about 1 2/3 stops. A 4:1 ratio
will be a 2-stop difference.
Position the fill light at camera level or slightly higher. Avoid lowering the fill
light below camera height, as it will create an unnatural effect on the
model's face.
 |
|
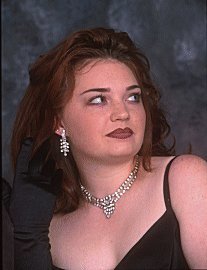
Here a
gold reflector is used to add
a little additional fill light to the
model's face. |
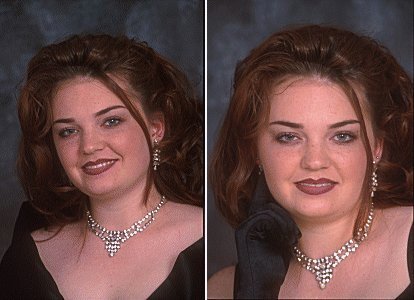 |
You can see
in the image on the left that the extra
fill from the reflector softens the shadow under
the chin and ads a slightly warmer tone to her skin. |
Background Lights
Background lights are used to create a separation between the subject and the background.
The background light should only illuminate a small area behind the
subject. I use a snoot (a tube like attachment to constrict the light to a smaller area) to help control
light spillage. Position the light facing the background and far enough away to create an arch
of light just around the subject. From the camera the light itself
should not be visible, just a softly illuminated area on the background
behind the model.
If you like you can use a colored gel over the light. Just be sure that the color you choose will compliment the portrait and not look out of place.
I prefer to keep my background light about the same output as my fill light. You may need to increase the power slightly if you are using a dark colored gel over the light.  Hot
Lights vs. Strobes Hot
Lights vs. Strobes
I've worked with both and I really prefer strobes. Strobes have a
modeling light that you can use to see the effect of your light
placement. When you
trigger the camera the modeling lights go out and the strobes flash
providing an even, controlled light.
Hot lights are just
that - hot. So hot that I've had them catch fire, and had gels and
cords melt when they came in contact with their covers. This means
that every time you move or adjust a light you'd better grab a towel or
you'll toast your hands. Better hot lights have insulated
covers. This cuts down on the chance that you'll burn yourself or
something else, but they don't solve the other problem with hot lights,
and that's how they make the model feel. Hot lights throw a
tremendous amount of heat onto the model, making sessions uncomfortable
and creating a need to touch up the models makeup because of sweating.
Filters
Filters can be used to effect the mood of the photo, smooth out skin
imperfections and to increase the perceived quality of a portrait. When
choosing a filter, think carefully about the effect you're trying to achieve
- you can't undo the filter's effect after the session. Some of the more common filters used in portraits are diffusers, center spots, and Soft F/X filters.
Diffuser or soft focus filters soften the image (these filters may
interfere with auto focus on some cameras). They are available in varying degrees
of softness allowing you to choose the amount of soft effect that you want.
Personally I feel that these filters tend to make the image feel "out-of-focus". This can limit the size of
your the image as the more you enlarge the picture, the more the effect is magnified.
Center spot filters are a variation on the diffusion filter. This filter is designed to leave the center of the frame sharp and diffuses the
edges of the image. This is something of a classic portrait
look. Just make sure that your subject is centered and fits within
the filter's clear
opening or you'll be unhappy with the results.
The Soft F/X filters are my personal favorites. These filters are designed to minimize facial imperfections but do not interfere with the over all clarity of the image. In other words, your subject's eyes will still be sharp. Soft F/X filters are also available in different degrees so you can get the effect that you want. This is the filter used in this series of photographs. Because this filter does not affect the overall clarity of the image, you can create
enlargements without loss of apparent sharpness.
 Metering Metering
Once you have your lights in place and have determined the correct lighting ratio, you have to get your meter reading. Have all your lights on and take a reading at the tip of your subjects nose. This will be the most accurate spot to get a good exposure reading. If you are using a handheld meter, be sure to figure in your filter factor if you're using
filters. The filter factor (number of stops of light lost to the
filter) will be in the documentation included with your filter. During the session, if you move your lights,
even slightly, be sure to take a new meter reading. Connections
If you have a higher end camera it will have a PC socket to connect the
camera directly to the flash heads. If your camera doesn't have a
PC socket you can use a flash slave. A flash slave is a trigger
that connects to the strobes and triggers them when your on camera's flash
fires.
Things to Watch
While shooting, pay close attention to details that may detract from the image you are trying to create. Watch for stray hairs either sticking out or falling into the face of your subject. Watch for any tags from clothes or clasps on jewelry that are showing. Make sure your subject doesn't squint or slouch their back.
Keep an eye out for any minor details that may pop up while you are shooting that could take away from what you are trying to create.
Your eye for detail will improve with experience. Each time you
find a problem on the light table that makes a shot a throwaway, you'll
learn to watch for that problem in the future. Pay
particular attention to your subjects eyes. When we look at a
person we tend to look at their eyes first. So it's crucial that
the eyes are in sharp focus.
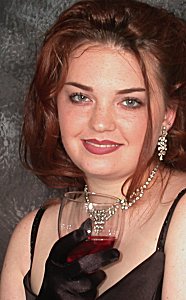 |
The skin tones
are a bit
blown out, see the 995
article for details on
using the 995 inthe
studio |
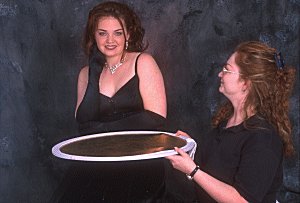
Props
Clothing, jewelry, gloves, a glass of wine, or a cigarette are all
examples of props that you can use during a portrait shoot. Props
add interest to an image, and can make it stand out from the "usual
portrait". Just remember that the props you use should be in
character for the model and it's easy to overdo it. Getting
Started
By now you may have pulled out your photo catalog and noticed how
expensive a good lighting setup can be. Fear not. Many
camera stores, and camera clubs have lighting setups that you can use or
rent. As an example the rental price list for a store near my home
lists the following:
Dynalite kit with power
pack, 2 heads, slave, power and sync cords, in a hard sided case for
$45 Lumedyne
portable kit with power pack, 1 head, battery, charger, sync cord,
shoulder strap, and case. $30
The rates quoted are full day rates. If you're
renting it's a good idea to reserve the equipment well in advance so
that you're sure you'll have it on the day you want to shoot.
If you follow these guidelines, you can create a quality portraits yourself.
Keep in mind, these are general rules of thumb. You can experiment with any of these elements
to achieve the results you find most pleasing. So now grab your gear, and a friend or significant other, and go shoot some
portraits!
Model: Laura
Makeup Artist: Patty Peterson
Equipment: Nikon F4, Nikon 35-70mm f2.8, and Nikon 80-200mm f2.8
(film), Nikon 995 (digital - final image)
 Subscribe to
Vivid Light
Subscribe to
Vivid Light
Photography by email
|
|
Lighting
is the key to shooting portraits
Lower the main light for babies, small children, or older people when you want to minimize facial wrinkles
You can't undo the filter's effect after the
session...
You can rent a
complete lighting setup for $45 per day
|