|
|
|||
|
page 13 of 23 |
|
|
|||
|
page 13 of 23 |
| Close-up Photography by Chuck McKern Shooting close-ups can be easy and fun if you understand some basic information. Key elements are subject, lighting, exposure, and focus. Yeah, I know we all know these things, however, when shooting close-up photographs, these elements are even more important.
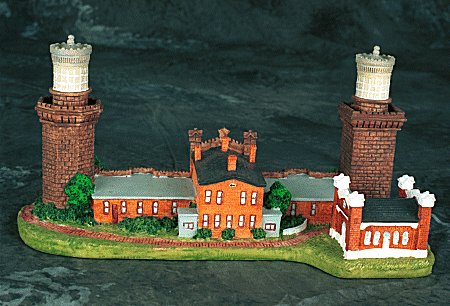
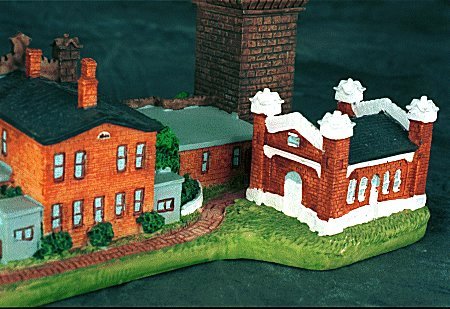
Your subject can be almost anything. A small ceramic collectable, a part of a larger object, or even your collection of empty film cans. The backgrounds do not need to be elaborate but they need to provide enough contrast to properly define your subject. When shooting in "macro", your background will usually fall far enough out of focus that it will not distract from the object you are shooting. Your subject will determine how you need to light it. Objects that have a high shine or polish to them can be a little trickier to light. If you have too much shine or reflection, you will loose detail; and let's face it, detail is what makes macro shots interesting. To evenly light your subject and cut down on reflections, you may have to create a light "tent" or "dome" around it. Take some diffusion material, either fabric or gel style will work, and create a cone around the piece. Don't forget to cut a hole large enough for the front optic of your lens. Next, place your lights around the dome to create even light. When looking into your dome, look to make sure you do not have multiple shadows. Multiple shadows are an indication that your lights are not evenly placed or may be too strong for what you are shooting.
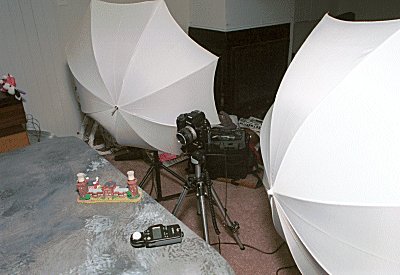
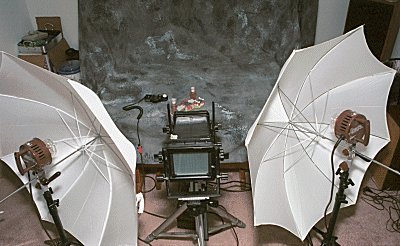
Another method of lighting is diffusing your lights using soft boxes or umbrellas. They are easier to use when shooting larger objects since you don't have to contain your object within a dome. I used umbrellas for the examples shown here. Once your subject is set up, you have to ensure that the lighting is even. This will help bring out the details. Double check again to make sure you don't have any multiple shadows. Once you think you have the lights set up properly, take meter readings across your subject. A hand held meter works best. If you don't have a hand held meter, use your camera's spot meter. Take at least three readings; one at the far left side of your subject, one at the center, and one at the far right. Take more readings for larger subjects. The object here is to ensure that you have equal amounts of light falling across your subject. When taking your readings, pay close attention that you're not blocking any of your lights. This can happen easier than you think when shooting in tight quarters and will give you false meter readings. Now that your lights are set-up and balanced, here comes the fun part. Set up your camera. Don't forget to use your tripod, I repeat, don't forget to use your tripod. The closer you are to your subject, the less margin of error you have in focus. The slightest heartbeat can be enough to loose your shot. So use your tripod and don't forget the cable release. If you don't have a cable release or have a camera that can't use one, use your self-timer. Set your camera on your tripod and move it into place. Before you go to the trouble of focusing, step back and look at your set-up. Is your camera going to block any light? If it is change your light/ camera arrangement. If it does not block any light, now you can get down and focus. Take your time focusing. If you are using auto-focus, make sure your critical points of interest are in focus (remember, it/they may not be centered). Once you got everything in focus, you are almost home. At this point, I will usually double-check all the lights to make sure I didn't bump anything. Check your subject positioning. Re-check your focusing and take your final meter reading. Remember that the best sharpness in most lenses comes in the middle apertures. You don't have to shoot completely closed down. I usually prefer to shoot my macro shots at f/16 (my macro lens goes down to f/32). Set your desired exposure settings and shoot. I recommend standing back away from your camera/lights as much as possible to avoid accidentally blocking any light. It's not a bad idea to bracket the first few times. Experiment with other angles to the subject. Change your camera position slightly, this close to your subject slight position changes can give you a dramatically different look and feel for your subject. Play. Have fun with it. For these shots I used two white 36" Photoflex umbrellas with Speedotron Brown Line strobes at half power, a Nikon F-4s with Nikkor 55mm f/3.5 micro, and a Minolta Auto Meter IV-F onFuji Reala color print film. This technique can be used with just about any 35mm camera set-up. If you don't have a true macro lens, you can use close-up filters to shorten your minimum focusing distance. Also check your current lenses. Some of them may have macro capabilities. With most of these lenses, you will physically have to move the camera closer and further away from your subject until it is in focus. With close-up filters and zooms that have a macro function you'll sacrifice some edge to edge sharpness compared to a true macro lens but these are much less expensive alternatives and can give you good results while you experiment and learn. These lighting techniques will work with either strobes or hot lights. Be careful trying to substitute high power flash units for the strobes. Since there is no constant light emitted from flash units, you will not be able to check for shadow control. With these basics explained, you should be able to get great results shooting those interesting small items around the house. Have fun and be creative with it. After all, isn't having fun what it's all about? The Setup
|
Close-ups can be very easy if you understand some basics
When doing this, pay close attention that you are not blocking any of your lights
Don't forget to use your tripod, I repeat, don't forget to use your tripod
|
 |
|
text and photography copyright © 2001 Vivid Light Publishing |