Getting that 4x5 look from
your 35mm Camera
by Gary W. Stanley

If you're like me, you no doubt enjoy being out in nature. You've probably photographed everything from mushrooms to barns, sunsets to flowers and most everything in between. At some point, however, your heart leads you to those beautiful images you see produced in coffee-table publications or in calendars showing landscapes by photographers like David Muench. While you may still do macro and that occasional rustic old barn door, landscapes seem to capture the wanderlust, that desire to photograph those places yourself.
While this article won't tell you how to finance that dream trip, it will cover the equipment and the techniques involved to captures that 4x5 look on film. Do you need to rush out and purchase a medium or large format camera system in order to get high quality images? No! Just look at the work of people like John Shaw, Galen Rowell or Art Wolfe, all done with 35mm. If you remember nothing else, remember that 'good technique and average equipment will beat the best equipment and poor technique every time.' Let's first take a look at some of the equipment I use to get that 4x5 look.
Tripod: Yes, I live and die by the tripod. Whether you are a beginner or advanced photographer, nothing will help you capture that 4x5 look any better than using a tripod. Because using a tripod is directly connected with using good technique, you will be forced to slow down, take your time and examine all the essential elements in your composition to assure that you aren't making any major mistakes.
Camera: Your camera should be equipped with some basic features. A depth of field preview button, and a way to focus and set your exposure manually. If your camera has spot metering, so much the better. Mirror lock-up used to be a big issue; however, the mirror dampening on most of today's cameras seem to be much better.
Lenses: The old saying still applies, 'buy the best lenses you can afford.' Computer technology has been a big help in the development of today's lenses, especially zoom lenses. Stick with the major brands and you'll be fine. I happen to use zoom lenses because they offer me more flexibility when composing my shot. For that 4x5 look, I'll use wide-angle lenses starting at 17mm, but generally use the 20-35mm or 28-80mm f/2.8 zooms the most.
Wide-angle lenses are most often used to help create that 4x5 look for two reasons. First, they expand the apparent distance between objects. Second, they allow you to get close to your foreground subject, yet have enough depth-of-field to keep everything sharp from front to back. Oh, and by the way, a 4x5's biggest advantage is its film size, and as a result need their tilt function to get maximum depth-of-field. In the 35mm format, a wide-angle lens has more inherent depth, so in most cases they don't need this feature.
Film: Use the finest, sharpest grain film you can buy, whether it's print film or slide film. My personal preference is Fuji's Velvia or Provia 100F.
These slide films are extremely sharp and have great color saturation. For print film, try Fuji Reala 100.
Filters: My stable of filters is quite simple: a polarizer, an 81A warming filter, two graduated glass neutral density filters (1 and 2 stop grads). I also use the 'Moose' filter from Hoya. This is a combination 81A and polarizer thus eliminating the need to stack two separate filters, increasing the risk of vignetting when using very wide lenses.
I'm going to assume that you have a good basic understanding of how your camera works, the rule of thirds, good compositional techniques and how to get correct exposure (see my article on
'Back to Basics' in last month's issue). Probably the most important element in getting that 4x5 look has to do with making choices within your composition and understanding depth-of-field.
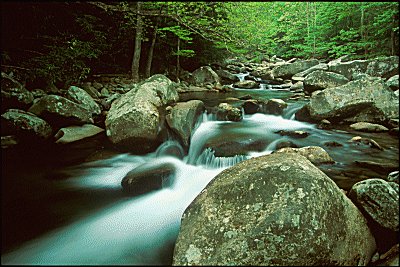
First of all, I'm very big on finding a great foreground subject such as a big rock in a mountain stream
to serve as a point of entry into my composition. Your eyes will naturally see that subject, then move across the rest of the composition. This makes you feel as though you're right there in the middle of that stream seeing what I'm seeing and experiencing what I experienced right at that moment. This also ads a three-dimensional quality to your image and is a technique used by many 4x5 shooters.

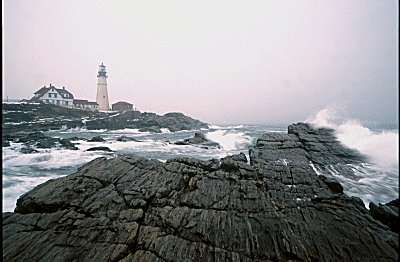
There are a few basic approaches to this technique. You can have a very large dominant foreground with a complimenting background,
such as a large rock framing or leading you to the smaller appearing lighthouse in the background. You can balance the foreground and background subjects by keeping them similar in size.
Then, finally, a smaller leading foreground subject to a larger more dominant background such as the small rocks in Lefforts Pond Vermont leading back to the much larger mountains in the distance.

There are of course many ways to compose your subject. Often I will compose my foreground and background in such a way that I create diagonal or direct lines from one to the other.

The shot of Bass Harbor light in Maine (above) has the foreground rock and the background lighthouse both on the same side, yet, the fog and the rest of the rocks help to make this a balanced composition. Notice also how close the rock in the foreground appears. A 20mm wide-angle lens positioned only about 14 inches away along with maximum depth-of-field ads that 4x5 look to the shot.
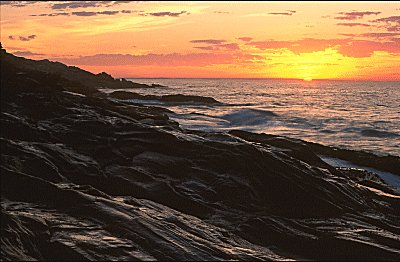
In the sunrise shot at Pemaquid Point I've used the diagonal composition to create a dominant foreground and the sun as the supporting background. Even though this diagonal line does not lead to the sun, they still compliment each other and are very well balanced.

The photograph of Stonington Harbor in fog uses a strong diagonal leading line to take you across the composition, but not to a specific subject. Your eye can now enjoy the boats in the foggy harbor, starting with the right side where I lead your eye, then back to the left.
This article would not be complete without explaining how to get maximum depth-of-field. In landscape photography, we are trying to have everything from foreground to background tack sharp in our photograph. I stop the lens down to a small opening say, f/16 or f/22 as needed.
 One easy way to assure maximum depth in your photograph is to focus a third of the way into the scene.
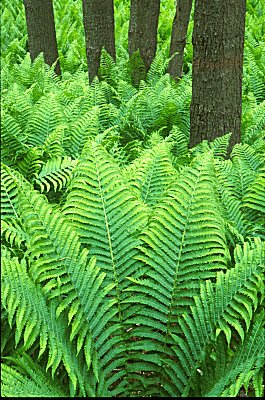
Not the actual distance of the closest object in your picture to the farthest, but a third of the way into your frame as you look through the viewfinder. Use your depth-of-field preview button to stop the lens down to its taking aperture to visually check and see if everything looks sharp. Take your time and allow your eye to adjust to the darkened image in the viewfinder. A 'dark cloth' or coat can be handy to shield the sun as you look into the viewfinder. Depth-of-field and critical focus, are very important when you're working with more intimate landscapes like the ferns I photographed in Vermont. One easy way to assure maximum depth in your photograph is to focus a third of the way into the scene.
Not the actual distance of the closest object in your picture to the farthest, but a third of the way into your frame as you look through the viewfinder. Use your depth-of-field preview button to stop the lens down to its taking aperture to visually check and see if everything looks sharp. Take your time and allow your eye to adjust to the darkened image in the viewfinder. A 'dark cloth' or coat can be handy to shield the sun as you look into the viewfinder. Depth-of-field and critical focus, are very important when you're working with more intimate landscapes like the ferns I photographed in Vermont.
 Practice makes perfect as they say, so in conclusion, ask yourself the following questions before you take your next photograph and I'm sure you'll reach that goal of 'Getting that 4x5 look with your 35mm.'
Is my horizon line straight? Do I have any junk in my frame that I didn't notice when I first set up this shot? How is my depth-of-field and my focus? Is everything sharp front to back? Is there anything in this composition that allows me to use the basic design elements of line, shape, texture and form? How is the lighting? A hazy day or harsh midday light won't help give you that crisp sharp image you need to get that 4x5 look. Am I using any foreground subjects to ad that three-dimensional look to the composition?
Photographic locations:
1. Great Smoky Mtns, Tennessee
2. Annasquam Light, Massachusetts
3. Portland Head Light, Maine
4. Smoky Mtns, North Carolina
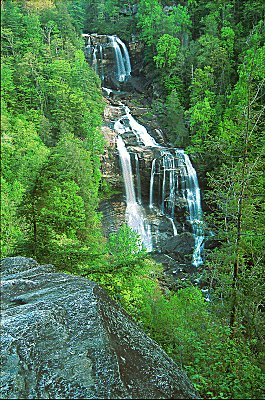
5. White Water Falls, North Carolina
6. Lefforts Pond, Vermont
7. Bass Harbor Light Mt. Dessert Island, Maine
8. Pemaquid Point, Maine
9. Stonington Harbor, Maine
10. Acadia NP, Maine
11. Quechee, Vermont
Note: All the photographs taken in this article were with either the Nikon N-90S or F100 bodies and Fuji Velvia slide film. Tokina's Pro series lenses were used, along with Hoya multi-coated filters. I have been working for the past two years with carbon fiber tripods from Hakuba USA Inc. and I'm very pleased with their performance.
You can check out Gary's Web site at www.garywstanley.com
garyw@garywstanley.com
 Subscribe to Vivid
Light
Subscribe to Vivid
Light
Photography by email
|

    |