Bird Photography:
A Passion of Time Part I
by B. Moose Peterson
 I don't know of any place where bird photography can't be enjoyed! The highest mountain peak, the driest desert, the loneliest rock face, the greenest pasture, all have one thing in common, birds. I've been enjoying and studying birds for nearly thirty years, photographing them only twenty and I can honestly say they are a passion with me. When I found I could combine two loves, birds and photography, I thought I was the luckiest person alive. That's until I got my first images back and I had to put them in a projector and project them to the size of a billboard to find what it was I had photographed. The rewards of bird photography come with more than their fair share of frustrations but this shouldn't stop you from mastering this truly unique aspect of wildlife photography. I don't know of any place where bird photography can't be enjoyed! The highest mountain peak, the driest desert, the loneliest rock face, the greenest pasture, all have one thing in common, birds. I've been enjoying and studying birds for nearly thirty years, photographing them only twenty and I can honestly say they are a passion with me. When I found I could combine two loves, birds and photography, I thought I was the luckiest person alive. That's until I got my first images back and I had to put them in a projector and project them to the size of a billboard to find what it was I had photographed. The rewards of bird photography come with more than their fair share of frustrations but this shouldn't stop you from mastering this truly unique aspect of wildlife photography.
 One common theme to all of my writing is the combining of biology with technology, which first came to me when I started out twenty years ago, photographing birds. That's exactly what this two part article is going to bring to light to you (I know, bad pun), biology and technology. There are lots of myths out there in bird photography like you need a 400mm lens minimum or fast film to succeed. You'll find that's not true; you'll discover when it comes to bird photography, as the photographer, you are the greatest and most important asset!
In Part I of this article, I want to discuss the technical side of bird photography. I'm doing this because I think the most important part of bird photography begins before you even head out the door. The gear you take with you and how well you know it and can apply it makes all the difference in successfully photographing birds. Let me explain how lens selection, basic equipment handling techniques and flash can make your bird photography much more rewarding.
Bird Lens Selection
"You need a minimum of 400mm to do bird photography." I've read this in so many magazine articles and photography books that it makes me wonder why there are so few 400mm lenses on the market! The only 400mmAF lens on the market right now is made by Canon, the 400f5.6 Ultrasonic. It's a beautiful lens indeed, but not the only lens for bird photography by any stretch. So what then is the best lens for bird photography? Well, that all depends on just what you're going after.
I should warn you that bird photography is not an inexpensive hobby or passion! If you want to do it right, have the greatest amount of fun and rewards, you're going to have to spend some bucks. I truly wish there was some way around it, but in twenty years I've seen them all and they just don't work out. I'm suggesting you do it right from the beginning, get the pain over with, and then just enjoy. The alternative is to be constantly spending money as you "progress" only to end up at the same place I'm recommending where you start.
 I have two "bird lenses" at this time after owning countless others in the pursuit (expensive pursuit) of finding the right ones for my bird photography. I started off with the customary bird photography wisdom, a 400mm lens; in my case, it was the Nikon 400f5.6 EDIF lens. There is no doubt in my mind that this lens was the best lens for me to start out with. Why? For many reasons, primarily its small size so I had to perfect handholding and panning. With its "small" focal length I had to learn how to get close physically and finally, I learned that I wanted more lens! I typically used the 400f5.6 with a 1.4x, giving me a 560f8, handholdable lens and for the first five years, I got by.
This combo was my bird photography setup for over five years until I had saved up my pennies to buy what I knew was the ultimate bird photography focal length for me, 800f5.6. The 800mm focal length not only delivered the image size I required, but also the isolation power I needed for my feathered subjects. I need to explain these two concepts before moving forward.
The vast majority of the time, I'm within 60 feet of my subject, often quite a bit closer. This is important to comprehend because our subject is the size of your fist. To see how important focal length is, have someone make a fist, back up 60 feet from them and focus on their fist. What size is it in the frame? With anything less than 800mm, it fills up less than 15% of the frame. Do the same thing again but get within 20 feet of your subject. How much of the frame is now filled by the subject? It's a dramatic difference--a dramatic difference you'll see in your images!
 Next, focus on the fist again but focus your attention on the background. Watch what happens to the background when you move from 60 to 20 feet. You'll find that at 20 feet, you can move left or right, up or down by only inches and dramatically change the background, especially compared to 60 feet. When it comes to bird photography, you'll find background selection comes in second in importance right behind the subject. This is why focal length is so important! Because of these two factors, image size and background control, I switched from the 400mm lens to the 800mm lens.
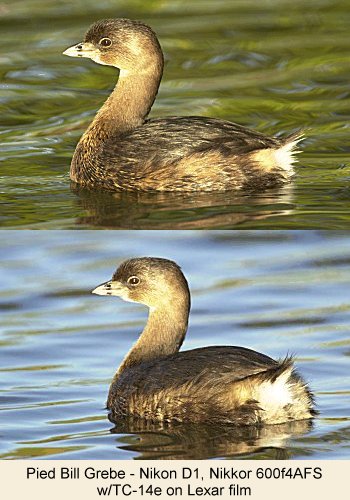
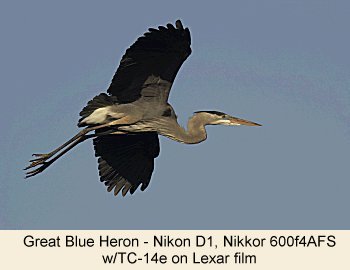
When the F5 came on the market, it forced me to shelve my trusty friend, the 800f5.6 and switch to the 600f4AF lens (longest AF telephoto available). Since the 600mm does not have the same narrow angle of view as the 800mm, I use it with a 1.4x to achieve the same image size and background control I had with the 800mm. This lens/teleconverter combo basically puts me back at my original focal length with a slight addition, equaling 840mm f/5.6. But there was an added benefit of the switch from manual focus to autofocus, a much better minimum focusing distance.
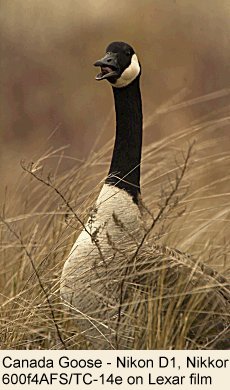 Minimum Focusing Distance or MFD is an essential element in lens selection. MFD simply refers to how close a subject can be and the lens can still focus on it. Right now with Nikon's AFS II series and Canon's current IS series, both these manufacturers are providing the best MFDs of any telephotos in history! This is to say that the 600f4 AFS II or 600f4 IS are the best two bird lenses on the market right now in my humble opinion. I have no doubt someone out there is saying, "ouch!" And you should be, as these are not inexpensive lenses. All I'm saying is that having the best long lens for birds comes at a high price! These lenses with their matched teleconverters deliver the best results for any type of bird photography you want to go after.
By searching the web you'll find that all of my peers are using the same combo. If you Canon shooters want to hear about Canon from a Canon guy instead of a Nikon guy, head to
Artie Morris' website where you'll read tons on the Canon 600f4 IS!
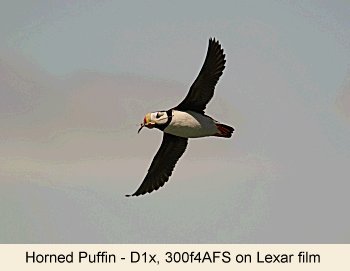
I mentioned that I have two bird lenses right now, which are the 600f4AFS and the 300f4AFS. A 300mm lens, that seems short? What do I know that you don't know? The missing piece of this puzzle is that this is not my primary bird lens, but my lens for photographing birds at feeders (and birds in flight). It's also because I'm using this lens on a D1H. The 300f4 AFS has a MFD of just five feet! This factor in combination with the D1H seeing only 50% of the image in affect increases the focal length by 50%, making the 300f4AFS a 450f4AFS lens that focuses down to 5 feet! This is a killer combo for birds at my feeders, which I'll fully describe in Part II of this article.
The 300f4AFS for non-D1/x/H shooters can be a great first lens, if used in conjunction with the TC-14e. This makes a very fast, very sharp 420f5.6 lens, and a better option than my original Nikkor 400f5.6 EDIF. But like I said, a good place to start only!
 Are there other options for bird photography lenses? Sure there are, just not ones I'd recommend or for me. You have the option of the Tokina 400f5.6 (now discontinued and only available used), Nikon and Canon 400f2.8 or the Nikon 500f4AFS II or Canon 500f4IS. Why not these lenses? Their focal lengths even with teleconverters are just too short for image size and background isolation. As my good friend Artie says, "If you don't go out with your longest lens, you'll come back short!" (You can always add teleconverters to these lenses to make their reach greater or switch to shooting digital, which gives you even more reach without any loss of aperture.) That's why I don't recommend or use these lenses for bird photography because they are short to start with, the loss of effective f/stop when using a teleconverter and the knowledge that some day you'll want to buy longer.
You should be aware that when using teleconverters, you lose either one or two stops of light when you use a 1.4x or 2x respectively. This is light that is just gone, sucked up by the optics of the teleconverters. At the same time, while the teleconverter increases the focal length of the lens, it does not change the size of the hole at the rear of the lens. This combo of longer lens with the same exit hole diameter means you have a slower lens but with less depth of field. It's a simple rule of physics; you have a longer lens but less DOF. With small to medium sized birds, DOF is critical and if you have to fight your lens/teleconverter to gain DOF, you're in a losing battle. So while 400f2.8 or 500f4 might seem like smaller and lighter options to the 600f4, you will have to work harder and longer to get the same killer images.
One final thought on lenses, and that concerns tripods/heads. Whatever you do, don't buy an expensive long lens and then buy a cheap tripod to support it! That ten thousand dollar investment is going to deliver five hundred dollar lens performance unless you give it the stability to deliver its full potential. I've always gone with Gitzo tripods and am currently using the Carbon Fiber 1548 for my 600f4AFS. I also depend on the stability yet flexibility of the Wimberley Head. When it comes to bird photography, I haven't found a better tripod/head combo!
Basic Techniques for Using Your Bird Lens
There are many, many techniques you can apply to successful bird photography. I can't begin to cover them all here, but here are some basic equipment techniques I recommend adopting.
Basic handholding and proper long lens technique are a must! These techniques were covered in the
first issue of Vividlight, but here they are in a nutshell. For handholding, bring elbows in and press your forehead against the camera by utilizing an eyecup. For long lenses (any lens connecting directly to the tripod), rest hand on the lens barrel while pressing forehead against the camera's eyecup.
With these two fundamental yet essential techniques down pat (because you practice, practice, practice them), you can successfully pan. Panning is the technique of moving your camera in conjunction with the subject to freeze its motion. This is a technique that can render a moving subject's eyeball perfectly sharp no matter the shutter speed in use. This is accomplished by moving the camera with the subject, which also means taking advantage of Nikon or Canon's focus tracking.
Panning success starts with being sure you're using proper long lens or handholding techniques. With that established, "test" yourself by looking through your lens and actually panning, to check the background (if you have the luxury of time). With that established you're ready for the subject. Ideally you want to track the subject in the viewfinder as it travels by and photograph it coming up to you until it's right in front of you. Then continue to follow the subject but cease shooting once it's past the "front profile" view.
As an example, let's say you're photographing Horned Puffins from a boat. They're flying circles clockwise so you're tracking them flying left to right. I personally select the center AF sensor and lock that onto the eye of the subject, so there's more space in front of the bird than behind. I prefocus the lens on an object that approximates the distance I think the puffin will be and wait. When the puffin begins its approach, I bring the lens up to my eye (using proper handholding technique), place the center AF sensor on the bird's eye and depress the shutter release so the camera locks on. I follow the puffin as it flies left to right, firing as it approaches and discontinue shooting but still track it until the camera is no longer firing.
 How do you know you're panning correctly? Two things, the most noticeable is your images come back tack sharp. Not so apparent is the performance of your AF system. If your camera is "searching" for focus, that means your panning is not as smooth as it should be; the AF sensor is not remaining on the subject and the camera searches. Once you have this well mastered, turn your camera vertical and take vertical flight shots.
One feature that's less understood for bird photography is the camera's frame per second rate. Obviously you know birds have wings and they must beat them to stay in flight. To repeatedly capture birds in flight with their wings over their heads requires a camera that fires 5fps or more. Yes, you can capture the "wings overhead" with a camera that fires slower than 5fps, but not time after time, which is what I'm personally after. With 5fps, more than likely if you start shooting with the bird's wings overhead, then all the frames will have that same pose.
 Another important technique in bird photography is the use of extension tubes. Not to confused with teleconverters, extension tubes are hollow tubes that attach between the lens and camera body. These simple and inexpensive pieces of equipment can make a world of difference! What they do is permit your lens to focus closer, which means you can be physically closer to the subject and get a bigger image size. Canon users have the advantage of being able to use Canon extension tubes. Nikon users must use Kenko tubes, which work but are not as robust as an original Nikon product. I have the 10mm tube in my bag all the time, which when attached to my 600f4 permits me to focus at a distance of 14 feet instead of 18, a big difference!
There are a lot more techniques, which I will discuss in connection with specific birds in the next part of this article.
Birds and Flash
Birds were made to be flashed! That might sound funny, but it's true. Bird feathers are made to reflect light primarily in order to grab the attention of other birds but they grab ours as well. Their very color comes to life because of light and color is what makes birds so exciting to photograph. Quite often though the light we find birds in is not beautiful sunlight but rather muted shade. In this type of light we must use flash to bring out the bird's color but most photographers are either afraid or unsure of how to make flash work with birds. Here's a quick primer. (Flash cannot be learned in a flash; it takes time so be patient!)
I'm going to assume you have TTL flash capabilities. If you don't, then you might as well not even read this section on flash because for you it just isn't realistic. Next, you're using a long lens that's attached to a tripod (which means you're using either the
Wimberley Flash Arm
or Really Right Stuff Flash Arm. Lastly, you're using a
Better Beamer on your flash.
 After this, flash photography for birds is a snap. You must be within forty feet of your subject to have an f/stop of f/8 or greater (for depth of field). You need to have an auxiliary power source like the Nikon SD-8a (powered by
PowerEx ) for the Sb-28/28dx. Lastly, know your system. For example if you're shooting with the F5/F100/D1/x/H, flash photography is a no-brainer. If you're using a D1, you need to understand how quirky a flash system it has.
After this, flash photography for birds is a snap. You must be within forty feet of your subject to have an f/stop of f/8 or greater (for depth of field). You need to have an auxiliary power source like the Nikon SD-8a (powered by
PowerEx ) for the Sb-28/28dx. Lastly, know your system. For example if you're shooting with the F5/F100/D1/x/H, flash photography is a no-brainer. If you're using a D1, you need to understand how quirky a flash system it has.
TTL makes flash photography for birds soooooo simple, but in case you want more control and understanding head to my
website. Grab the Teddy Bear Exercise for flash. This exercise gives you a simple guide for creating your own master set of flash images so you can determine just what are the right combos for ambient light and flash fill for your taste, camera and flash. I'll discuss the rest of flash application in Part II of this article as we apply it to specific birds and situations.
 A couple of very common questions are: does flash bother birds and do I use multiple flash when photographing birds? The first question is simple to answer, no. Birds do not equate the burst of light from a flash as a bad thing so flash doesn't bother them. Keep in mind that the burst of light from the flash is going at 1/2000 - 1/20000sec; that's lightning fast. If you do some jerky body movement when the flash goes off, that combo might upset the bird. But the solution to that problem is really obvious.
The question about using multiple flashes is not so quick to answer. The vast majority of the time I have just one flash attached to a flash arm and connected to the camera via a TTL cable. The flash arm permits me to shoot either vertical or horizontal with the flash always remaining above the lens axis. This means the shadow created by the flash as it lights the subject, falls below the subject. In this situation, the flash is a fill light. The flash is filling in for deficiencies in the ambient light so our film can see all the information we need to communicate. When the flash is no longer filling the role of fill flash but rather serving as the main light is when I normally use one or more extra flash units to create a lighting pattern that imitates the missing ambient light.
 With this equipment primer, you now have one month to go out and buy it all and practice so you're ready for Part II of this article. Nah…I'm just kidding. Hopefully this gives you food for thought, a place to start and perhaps saves you from buying the wrong equipment in the beginning. In the second part of this article, I'm going to write about how to specifically photograph hummingbirds, birds at feeders, wading birds, owls and raptors. There are over 600 species of birds in just California; that's one heck of a lot of subjects. With this start, you should be easily able to add species after species, great image after great image to your files. Until next month, may the feathers be with you!
 Subscribe to
Vivid Light
Subscribe to
Vivid Light
Photography by email
|
|


I don't know of any place where bird photography can't be enjoyed!
bird photography is not an inexpensive hobby

Minimum Focusing Distance is an essential element in lens selection

Flash doesn't bother
birds
|