|
|
|
|
|
|
Create Great Digital
Prints
Adjusting The Image: Okay, the image is in the computer, staring you in the face by way of the monitor, now what? We are now at the point where we can tweak and fine tune the image prior to printing. There are several areas you need to pay attention to if you want to create great digital prints. They are: shadow and highlight detail, grain or noise, saturation, contrast for luminosity, and sharpness.
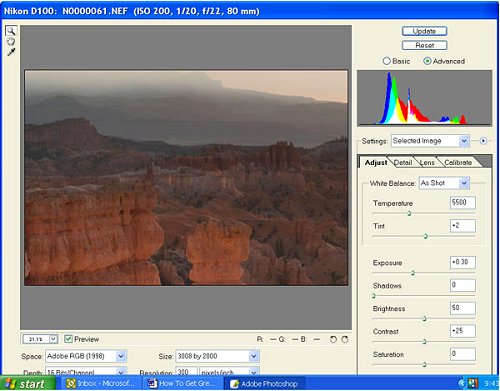
When I bring the RAW image into the computer via the Adobe Camera RAW software, I make some exposure adjustments being careful again not to blow out highlights (my sky usually). I then send the image into Photoshop CS (click OK) so that I can now start my final adjustments. Keep in mind that there are probably a thousand other ways to go about this and a thousand reasons why you might do it differently, but this is the workflow that has given me consistent results.
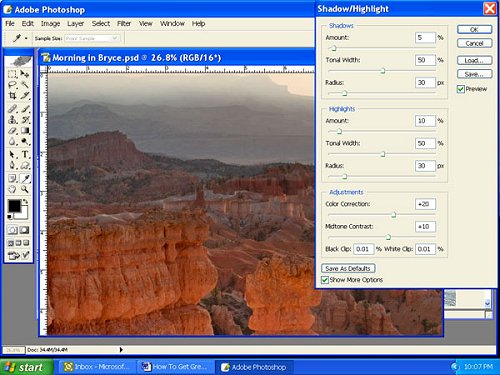
First, I look at my Levels settings or Histogram to see where the overall image is with respect to shadows and highlights. If I feel that I need to bring up shadow detail without blowing out my highlights, I'll use Photoshop CS, Image -> Adjustments -> Shadow/Highlights. For those of you who haven't upgraded to CS, you can use Kodak's Digital SHO Pro (see Valuable Photoshop Plug-ins).
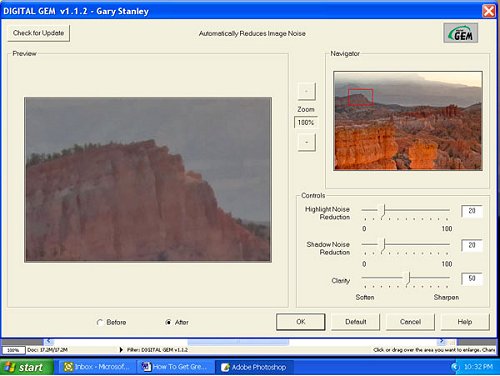
Next I adjust Color Balance as needed, then Saturation (don't overdo it! not over 15), then I will add some Contrast (between 6 - 9) to give luminosity to the image (very important when trying to make your print look like your slide). At this point, I enlarge the image to 100% and check for Noise or Grain. If the image has a fair amount of digital Noise, I open my Kodak Digital GEM plug-in (must be in 8 bit, not 16, to work) and adjust the Noise level (using the slider bar) down to a tolerable level (usually 35 -35- 50 or less, you'll understand these numbers when you open GEM). Once I'm satisfied with the look of the image I'll sharpen it and size it for printing.
I'll use one of three sharpening methods depending on the image. One is the simple Unsharp Mask. Go to Filter -> Sharpen -> Unsharp Mask, and start with Amount 150% - Radius 0.8 to 1 and Threshold at 1, then, vary the Amount slider back and forth until it looks sharp, but not overdone. The next way is to immediately go back into Unsharp Mask, and reset your three settings Amount 20% - Radius 50 - Threshold 0. This will sharpen a bit more but mostly adds some contrast. I generally will back off that setting to around 15 - 35 - 0. You can use this without the first sharpening method as well.
|
|
|
|
|
|
|
|
|
|
|