|
|
|
|
|
|
Create Great Digital
Prints
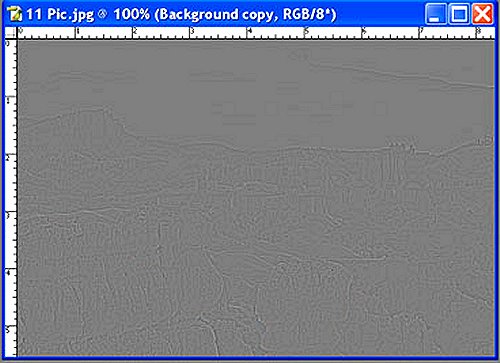
The third method is the go to Layer -> Duplicate Layer (click OK) then select Filter - Other - High Pass. Your image will become totally gray (see below) and you will see a radius slider bar. Adjust the slider until you can see slight outlines of the image (1.5 - 3.5). Again, don't over do it. Click okay, and then open your Layer window in the upper right of your Photoshop window. Look for where it says Normal (if you hover your mouse cursor over it, it will say "Blending Mode") and open the drop-down menu. Select one of the following: Overlay, Soft Light, Hard Light, or our favorite here at the magazine, Vivid Light. There are subtle differences in each.
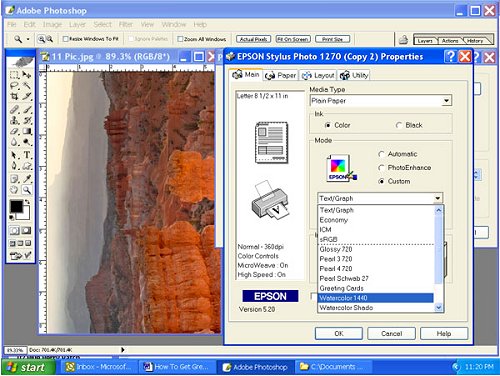
The image will again look normal and sharper. You can now adjust the Opacity slider bar by backing off 100% until the image looks good. Go back to Layers, flatten the image and continue on. You can still use the 20 - 50 - 0 technique if you need any additional sharpening. This all sounds harder than actually doing it, and may not be necessary if you've started with a very sharp image. Get Ready to Print: As I said at the outset of this article, if you've taken the time to exercise good overall technique from the capture of the image, and have made proper adjustments prior to the print, you're now at the point where you are ready to print. Before you Begin: Here are a few words of advice concerning monitor and printer calibration. If you are already getting prints from your printer that look just like the image on your monitor, fine, ignore this section. Most people have issues with color calibration because they don't really understand what is going. First, the monitor should be calibrated so that it gives you accurate color rendition. There is software/hardware out there that will help you do this, such as Color Vision Spyder. The calibration will allow you to adjust your monitor to meet established industry standards. This is especially important if you outsource any of your work to a lab. If you are just doing your own printing at home, the most important thing is getting your prints to match what you see on the monitor (not the other way around). For years, I have calibrated my monitor by just using Adobe Gamma, found within my own existing software (in your computer, go to Control Panel open Adobe Gamma and follow the instructions). It's a simple way (but crude by today's standards) to calibrate your monitor relying on your own eye to determine the best settings. Once that's done, the next step is to get your printer to match your monitor. Again, there are profiles out there to help folks along. I just simply save the settings that I have created for a particular paper, right on my Epson printer settings. Bring up an image on your monitor and adjust it to your liking. Select Print with Preview under your File menu, then, under Page Set-Up select the paper size to be used. Now select Print, and under Properties, select Custom, then, Advanced. You can select Paper and DPI settings, Brightness, Contrast, Saturation and so on in this box and then save it as, for example, Glossy 720, or Watercolor 1440 etc. Each of these settings would be saved using the particular adjustments for the paper in use and your own custom setting preferences. Granted, this initially took quite a bit of trial and error, but now I rarely have to print an image twice because it didn't come out the way I wanted the first time. Hint! You may want to try the auto setting on the printer the first time to see just how close you are. Then make a few adjustments (lighter or darker, contrast up or down, saturate more or less etc.) try it again, then if it looks good to you, save those settings. Obviously use a small paper first (8 1/2 x 11) to keep waste to a minimum. If you wish to dive in all the way with the profiling steps, check out Tim Grey's site and books for profiling recommendations.
Size your print using the crop tool and set the image dpi to 300. Crop the image then rotate the image to vertical. Now follow the steps I mentioned above, selecting Print with Preview, Page setup, then Print, then Properties, choose your custom setting, then select the Paper Tab at the top and check the box that says Center. Finally click OK and admire your beautiful work! This method has worked well for me. Now that everything is set up I could have printed twenty 13x19 prints in the time it took me to write an article explaining how to do it. If you take your time and follow my suggestions, I believe you too will be able to create great digital prints.
Related Links
|

|
|
|
|
|
|
|
|
|
|