|
|
|
|
|
|
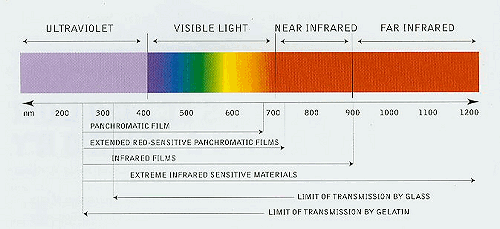
| Color Infrared Photography by Chuck McKern In Understanding & Using Black & White Infrared Film I covered the quirks and characteristics of shooting with black & white infrared film. With the basics out of the way lets take a look at what we can do with color infrared film. If you haven't read the article on black and white infrared in issue #29 you'll want to click on the link above and read it first.
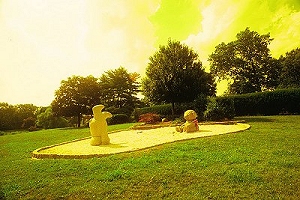
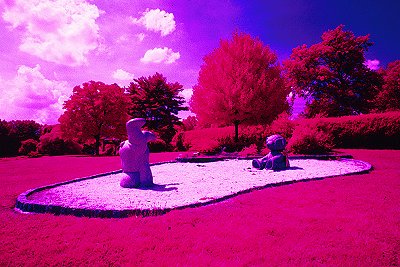
Kodak is the primary manufacturer of color infrared film. As a matter of fact, they make three films. One type is made for the movie industry. It is the same emulsion as the film you would buy at your high-end camera store, but it in bulk lengths and modified to work in motion picture cameras. This film mostly used for special effects. Another variety is designed for aerial photography and is available in two versions. Then there is Ektachrome Infrared. This is the film most commonly used by photographers and is the film that we'll concentrate on in this article.
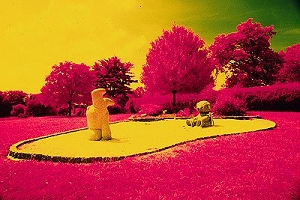
You can refrigerate EIR for up to a month, longer than that and it's best to freeze it. You'll want to make sure to let it warm up to room temperature before opening the package. One hour will do it for refrigerated film. Allow two hours for frozen film. When choosing an E-6 lab be sure to pick a lab that does processing on site. I find it best to talk to the people who will process the film and explain its light sensitivity to them beforehand. They will need to turn off any infrared sensors in the processor and their infrared goggles will be off limits for the lab folks loading the machine. When talking to a "counter person" you have to worry whether they will properly relay the information to the lab. If you want to use the AR-5 process you'll have to send it away. I know of only two labs in the United States that offer this process (they're listed at the end of the article). Film speed settings for EIR will vary depending on your light source and if you'll be developing in E-6 or AR-5. See the chart below. This film is a typical slide film. By that I mean that the exposure latitude is very narrow, +/- ½ a stop. So be sure to bracket. The recommended filter for use with this film is a deep yellow. When using this filter and a daylight light source, the recommended ISO for E-6 process is 200, and for Process AR-5 use ISO 100. Orange filters will also work well with EIR. A polarizing filter can be used to help darken blue skies. Just be careful stacking glass filters with wide angle lenses as this may cause vignetting. You may want to limit filter stacking to longer focal length lenses to avoid this problem. With this film, green foliage that is alive and healthy will appear red in your photos. Adding color-compensating filters can help you control color shifts to get close to a desired look. See the chart below.
One advantage of this film over the black & white IR films is no focus adjustment is needed. You can focus visually or use autofocus with no problem. A Unique Look
|
|
|||||||||||||||||||||||||||||||||||||||||||||||||||||
|
|
|
|
|
|
|
|
|
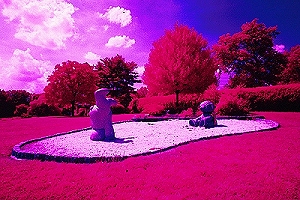
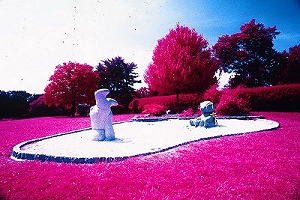
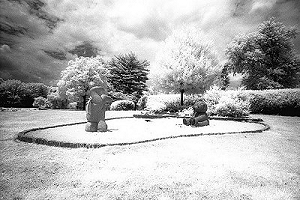
 Color
infrared film is not as popular as black and white for pictorial use, but
it does have its place. Color infrared film is sometimes referred to as
false color. This is because this film is designed to differentiate
between colors rather than reproduce them accurately.
Color
infrared film is not as popular as black and white for pictorial use, but
it does have its place. Color infrared film is sometimes referred to as
false color. This is because this film is designed to differentiate
between colors rather than reproduce them accurately.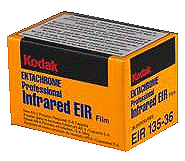 Kodak
Ektachrome Professional Infrared EIR Film is a fine grain film that can be
developed in Process E-6 or AR-5. The AR-5 process produces a more
accurate infrared rendition while the E-6 process produces more color
saturation and higher contrast. The sensitivity range spans 380 to 900
nanometers (near ultraviolet to infrared). Because this film's sensitivity
extends to the infrared spectrum, you want to follow the same precautions
as with the Kodak High-Speed Infrared for loading and unloading. In other
words, complete darkness. Also follow the same precautions in selecting or
preparing the camera you are going to use. See the black and white
infrared article in the last issue for more detailed information on how to
do this.
Kodak
Ektachrome Professional Infrared EIR Film is a fine grain film that can be
developed in Process E-6 or AR-5. The AR-5 process produces a more
accurate infrared rendition while the E-6 process produces more color
saturation and higher contrast. The sensitivity range spans 380 to 900
nanometers (near ultraviolet to infrared). Because this film's sensitivity
extends to the infrared spectrum, you want to follow the same precautions
as with the Kodak High-Speed Infrared for loading and unloading. In other
words, complete darkness. Also follow the same precautions in selecting or
preparing the camera you are going to use. See the black and white
infrared article in the last issue for more detailed information on how to
do this.