|
|
|
|
|
|
| Understanding &
Using Black & White Infrared Film by Chuck McKern You can shoot some incredible and dramatic photographs using infrared film. So why don't more photographers use it? Because infrared is difficult. It's difficult getting the film, difficult shooting with it, and difficult processing it. But a proper understanding of infrared film and how to handle it simplifies its use dramatically and some films are much easier to use than others. In this article I'll discuss the differences in various infrared films, what kinds of results you can get with a variety of filters, and how to handle the film after shooting. The results can be impressive. This is definitely a film worth mastering. Black & White vs. Infrared
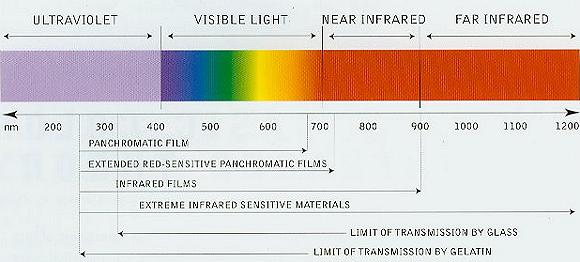
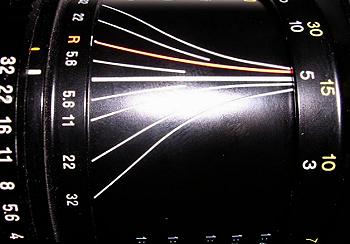
The largest natural source of infrared radiation is the sun. What gives IR film its main characteristic, and what makes it different from conventional film, is how it records reflected infrared energy. The effect is most obvious in leaves and green foliage, especially in the spring and early summer months. Rapid growth occurs in plants in these months and photosynthesis rates are high; the higher the rate of photosynthesis the greater the amount of infrared radiation. These high levels of infrared radiation cause the leaves to record as white to light gray in infrared images. Plant life is not the only place where we will see distinct differences between conventional and IR films. Many dyes and pigments will record differently as well. The military has even used infrared photography to distinguish between plant life and camouflage! IR films show these differences in a way that conventional films cannot. Infrared skies tend to be dark, almost black. Contrasted against the white foliage and white clouds the effect can be especially dramatic. Establishing a Baseline Kodak HIE (High-Speed Infrared) HIE is still considered to be the only true infrared film. This film does not have an anti-halation backing which gives this film a characteristic unique unto itself. HIE also has sensitivity to 900 nanometers (nm); well beyond the visible light range. It goes farther into the infrared spectrum than any of the other IR film The lack of an anti-halation backing alone attracted photographers in search of a different look. Lacking this layer HIE film is prone to flare. This is not necessarily a bad thing. You can get great visual effects using flare that you can't get otherwise. The effect is most noticeable where you have a highly reflective area adjacent to a low or non-reflective area. Overly contrasty areas shot with this film will produce negatives with poor definition. Better definition will be achieved when tonal qualities are somewhat even as in light gray to darker gray. You have to be extremely careful in how you handle this film. Loading and unloading the camera must be done in total darkness. Your best bet is to use a darkroom but if you have to load your camera on location you can use a good changing bag. Make sure that the material of the bag is in good shape as the black liners can break down over time and allow infrared radiation to penetrate. Even when using a changing bag you may still have some slight fogging of the film leader. This is speculated to be leakage from around the wristbands and through the zippers. When shooting for this article I even used a changing bag in my darkroom since I know my darkroom has some low level light leakage! The sensitivity range of the HIE film ranges from 250nm (ultra violet) into the infrared spectrum up to 900nm. This film, however, is not very sensitive to the green and yellow-green portions of the light spectrum. The best infrared effects will be achieved by filtering out radiation below 600nm; this would be the violet, blue, green, and yellow light. As expected with high-speed films Kodak HIE has a course noticeable grain structure. Kodak refers to this grain structure as "moderately fine". In my opinion, and the opinion of several photographers that I know that shoot with this film, that statement is a bit optimistic. If you choose to develop this film yourself, you can experiment with different general-purpose developers to achieve a finer grain texture. When shooting you'll get your best results when using a red, deep red, or opaque filter to optimize the IR effect. You can use orange filters with this film but the result will be much less noticeable in the final image. Focusing with infrared film is a little different than most of us are used to. We normally focus visually because we are dealing with light in the visual spectrum. Infrared film is beyond the visual spectrum and focuses on a different plane. In order to focus for infrared you will need to focus visually and then readjust your point of focus by taking the distance that is in front of your focus mark, and aligning it in front of the infrared focus mark (see images below). This is not completely accurate though. These IR marks are calibrated for 800nm and in this case of HIE you're using 900nm film. To allow for this difference, it is important to shoot with smaller apertures to maintain depth of field to offset focusing errors.
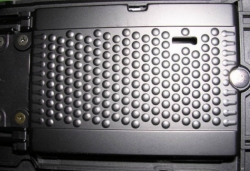
It has been reported that some APO lenses do not require focus readjustment for infrared films. If you are using APO type lenses and are unsure about the need to readjust focus check the spec sheet that came with your lens. If the information isn't published in the data sheet contact the lens manufacturer. Sharpness can be controlled as part of the development process. A slower developer will produce finer grain in the negative. One of the more common developers for HIE is Kodak D-76. This developer dissolves the edges of the silver grains giving you a fine grained image but may produce muddy looking prints on some papers. Kodak has recently changed the recommended developing time for D-76 to 7 ½ minutes at 70 degrees F from 10 minutes. Hardware Limitiations Your best bet for working with Infrared film is still a manual camera with TTL metering since many modern cameras have features that interfere with infrared photography. Probably the most problematic is the infrared film counter. Many of today's cameras use an infrared beam to detect the sprocket holes in the film. This allows the camera to count them as the film passes through the camera and accurately. This information is used to control how far the film is advanced, an important feature given the high frame rates of some of today's cameras. But this infrared counter beam can fog some infrared films. Only Konica and Ilford films can be used safely in modern cameras, as the wavelength of the counters is longer than their sensitivity range. If you are unsure whether your camera uses an infrared counter consult your owner's manual or contact the manufacturer. The pressure plates in some cameras can also pose a problem for Kodak HIE. When using HIE (or any film without the anti-halation backing), you want a camera with a flat smooth pressure plate. Some cameras have pressure plates with small bumps which will show up as a pattern in your photographs.
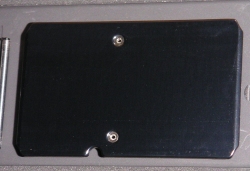
Another problem with pressure plates comes into play with cameras that have, or are available with Quartz Date features. In order for the LEDs that expose the date to work, a small rectangular opening in the pressure plate is made to allow the light from LED to expose the date on the film. Some camera models have this feature available as an option however; the non Quartz Date model may have the same pressure plate as the Quartz Date version. This small opening can cause the same problem as the bumps and expose a ghost image of the opening onto every frame of the film.
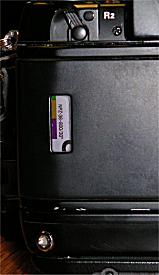
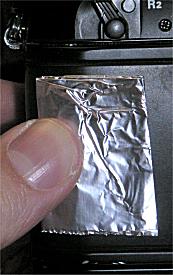
Film windows can also cause a problem. Modern SLRs typically have a small, clear window in the film door so you can identify the film you have loaded. A black foam gasket surrounds this window. When the back door is closed the gasket forms a seal that prevents visible light from reaching the film and fogging it. These gaskets do a good job with visible light but often leak enough infrared light to cause fogging of infrared film. To eliminate this risk take some aluminum foil and place it over the window and cover it with black electrical tape. While not particularly attractive, this patch will eliminate the risk of infrared radiation fogging your film.
There have been some concerns about using different types of shutters with infrared film. Cloth shutters in particular have raised some concerns. If your camera has a cloth shutter it is recommended that you change lenses in subdued light - something that is not always convenient to do. The concern is that IR radiation may penetrate the cloth shutter and cause fogging of the film. Is this a legitimate concern? The first camera I used to shoot infrared film had a cloth shutter and I have never experienced any problems when changing lenses. Virtually all newer camera designs incorporate metal shutters made up of several blades. While more delicate than cloth shutters fogging is of no concern with a metal shutter.
Lets talk some more about handling film. IR film is very sensitive so we want to pay a lot of attention to film handling. We already discussed loading and unloading but it doesn't stop there. After you take the film out of the camera (in total darkness), you MUST put it back into the black film can it came in to protect the film until processing. Processing Pick a lab carefully. Most places don't do even do traditional black and white processing anymore so you can forget about any of those labs doing infrared. You'll have to find a lab you trust to either do it correctly, or send it out to a lab they know is competent enough to handle the special needs of this film; including the fact that this film cannot be taken out of the can in anything but complete and total darkness. Another factor is the tank or machine used to process the film. Most processing machines use infrared sensors that must be turned off when processing infrared film. Another issue is the fact that many labs outfit their darkroom workers with infrared goggles to aid in loading film and working with the machines. Workers can't use these goggles around infrared film. Because of these restrictions most labs charge a special handling fee to process infrared film. With the sensors in their machines turned off they can't process any film other than yours and that translates into costs in time and manpower. These handling fees can be up to 100% of their normal processing charge. If you choose to develop infrared film yourself you should be aware that some plastic tanks can leak IR radiation - ruining your film. Patterson plastic tanks will be fine as long as you process the film as soon as you load it. I've used plastic tanks for years with infrared film and personally have never run into a problem. When loading your film into the tank, if you have any question as to the light integrity of your darkroom (remember we are dealing with light that is not visible to your eye), you should consider using a changing bag in the darkroom. Also pay close attention to reflective items around your darkroom. Day-glow labels, bottles, timers, even your watch face can cause unwanted reflections that can fog IR films. Another problem you may run into while getting ready to develop IR film is getting the film onto the plastic developing reels. Kodak HIE film is made from a thinner film base than most other films on the market. These thinner film bases can buckle when you're trying to load them into the reels. The problem is caused by moisture on the reel. The thin base of the film absorbs the moisture and swells the gelatin layer of the film, causing the film to stick to the reel. To prevent this problem dry the reels thoroughly with a hair dryer prior to loading. Just don't hit them with high heat for too long - you don't want the plastic to melt! One way to avoid these problems is to use stainless steel reels and tanks. They don't have the same problems with moisture that plastic reels have, but many people find these reels more difficult to load. With stainless reels, you have to clip one end of the film into the center of the reel and while keeping the film slightly curved, feed the film into the tracks on the reel. The most common problems people have when loading stainless steel reels are kinking the film by bending it too sharply (keep in mind you are doing this in total darkness so you can't see what you are doing), and wrapping film in the same track twice, causing the film to stick together while developing. You should also check your reels for chemical build-up. These deposits can interfere with the film as it is being loaded into the reel. To avoid this problem get into a regular habit of taking the reels apart for a thorough cleaning after each use. Doing so will not only prevent problems with IR films but with normal negative films as well. Film Speed and Exposure Film speed can vary a slightly with slight differences in developer, processing times, and developing conditions. The important thing is to find a consistent developing style. This eliminates one of the variables and helps when you're trying to judge exposure in the field, bracketing will help reduce the effects of some of the other variables (such as the ratio of visible to infrared light). You may want to bracket by up to 2 stop when metering through red or orange filters. Trial and error will show you how your camera's meter works when shooting infrared. In poor light conditions try exposures around 1/15 at f/11. HIE can be used under artificial lighting with exposures down to 2 seconds. Kodak HIE is available in 35mm 36 exposure rolls only. Konica Infrared 750 Because of the low sensitivity in the 500nm to 640nm range (yellow, orange, and orange/red), the filter that you choose to use is not as important to achieve dramatic effects as with other infrared films. If you choose to not use a filter with this film, your results will be similar to traditional black and white films. Recommended filters for this film are red and orange. This film also has an anti-halation backing to reduce flare (unlike Kodak HIE). This film works best for landscapes. When photographing people details are somewhat waxy and pasty creating a somewhat mysterious feel. The slow relative speed and the adjustment for focusing makes this film a bit difficult for photographing people. One trade off that has to be made for the fine-grain structure of this film is the slow recommended ISO of 50. The recommended exposure for a bright sunny day with a red filter is 1/15 at f/11. The film has good exposure latitude but bracketing one stop over and under is still recommended to ensure a good negative. Again, I would recommend bracketing by adjusting you shutter speeds. If you are using an opaque filter, an additional 2 stops of exposure will be needed. The recommended exposure for a bright sunny day would be ¼ second at f/11. Konica suggests rating the film at ISO 32 when used without a filter. To maximize the IR effect in photographs, you should use an orange or red filter to eliminate wavelengths below 520nm or 640nm. A deep red filter increases the effect even more. Opaque 87 filters should not be used with this film because they only transmit light above 800nm, which is beyond the range of the film. You should use the infrared focus marks to focus on the infrared plane, as with the Kodak HIE. Again, small apertures are recommended to help correct for focusing errors through depth of field. Konica 750 can be used in most cameras. Cameras with infrared film sensors do not pose a problem because their wavelength is beyond the range of the film. Thanks to the anti-halation backing, you can load and unload this film in subdued light. Konica Infrared 750 can be developed in most general-purpose developers allowing you more control over grain and contrast through your choice of developer. The downside to this film is a short shelf life. The film tends to have short expiration dates and as the film ages it's performance will degrade. Maco IR 820c You'll get the most dramatic image with this film using an opaque filter and red and dark red filters both work well. Orange filters can be used but you'll need to adjust the film speed (compared to opaque and red filters). Due to the infrared sensitivity of this film observe the same precautions you would use with Kodak HIE when loading and processing. Maco IR 820c does however have an anti-halation backing that will reduce problems with flare and reflected light from the pressure plate. Focusing is as discussed with the previous two films. All the same caveats apply when developing this film as with Kodak HIE. Maco recommends stainless steel tanks or wrapping the tank in aluminum foil. I used a plastic tank to process the Maco IR 820c and didn't bother with the foil. There were no signs of light bleed. Because the anti-halation backing Maco uses is water soluble, it is recommended you start with a pre-wash of water for one minute to remove it. The color of the water when drained from the tank will be blue - this is normal. When using an opaque filter, ISO 25 is your recommended starting point. As with the other IR films, bracketing your shutter speeds is recommended. If you are not using a filter the recommended ISO is 100. Where the Kodak and Ilford films are limited to 35mm (Kodak & Konica) and 120 (Konica) Maco IR 820c is available five formats: 35mm 36 exposure, 120, 4x5 25 sheet, 5x7 25 sheet, and 8x10 25 sheet. For short-term storage refrigeration is recommended. Long-term storage requires freezing. Either way, be sure to let the film adjust to room temperature before opening the film can. The last thing you want is condensation to form on the film - remember it has a water-soluble backing. Poor storage can lead to fogging. The manufacturer also states that this film can produce quality transparencies when processed in reversal chemistry. I didn't get a chance to try this technique, but when I find out the specifics I'll pass on the results. Ilford SFX 200 Ilford originally designed this film for speed enforcement cameras with infrared flash units. Use of red and dark red filters will produce infrared effects similar to other IR films. Ilford has developed it's own gelatin filter for use with this film that fits Cokin P series and similar filter holders. Ilford's SFX filter produces similar results to deep red filters from other manufacturers. A major advantage when using this film is that it can be loaded and unloaded in subdued light like standard negative films and it can be used in cameras with infrared sensors as the wavelength of the sensor is outside the range of the film's sensitivity. Because this film has a gray acetate base that provides adequate halation protection it can be used in cameras with any style pressure plate. SFX has a wide exposure latitude that makes it more forgiving of exposure problems than most other IR films. Due to the wide latitude of this film, you should bracket over and under 2 full stops. Ilford recommends using an ISO setting of 200 with this film when used in cameras with TTL metering and a red filter. This produces fairly consistent results. If shooting without a filter, it is recommended that you use ISO 800. Focusing can be a little different with this film. Because this film is sensitive to near infrared, when using short to mid range lenses, stopping down to a small aperture should provide enough focus compensation. Other lenses will need to be corrected to the infrared focus mark. Ilford SFX can be developed in most universal developers. The dyes that are used to produce the anti-halation backing will cause the film to have a gray appearance. This gray appearance does not seem to effect exposure times when printing. Conclusion In future articles I'll discuss shooting with color infrared film, the unique aspects of shooting people with infrared and how to shoot infrared digitally. |
|
|
|
|
|
|
|
|
|
|