|
|
|
|
|
|
| Get Ready to Print! by Gary W. Stanley One of the great things about printing our own images at home is that they're good, I mean really good. I had always been frustrated when shooting slides. The labs that I used were unable to capture that special luminosity that my slides had captured. I would spend large amounts of money for a scan or an internegative and even after that the print was more the lab's interpretation than mine. Now, in the comfort of my own home I am able to produce prints that are a nice representation of my work, and I'm doing it cheaper, with less hassle, and with a much truer representation of the original image.
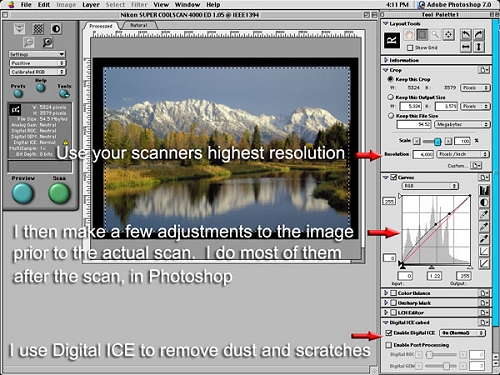
Certainly there are some limitations: I can't make prints larger than 13x19. But, then again I don't need them any larger. If you are familiar with some of the custom printing processes out there, one of the nicest ones in terms of a classy, rich looking print, is one called an Iris print, or more recently a Giclee print. This basically is an inkjet process applied on a watercolor type paper. While they certainly are recognizable as a photograph, they seem to have a very rich looking, almost painterly, quality to them. I have paid about $250 for a drum-roll scan and a sample print of my slide prior to the actual printing of a Giclee print, and then done my own scan on a Nikon Coolscan III and printed that on Epson's Heavy Weight Matte paper, with my print looking better. The point being that I don't mean any disrespect to the lab and their quality of work, but more about the control that I can maintain by doing it myself. It stands to reason that the person who needs to be satisfied with the final print has to be the maker of that print. Because I am in control now of the total process, I have no one to blame but myself if I don't like the results. I recently made a call to a friend of mine in Arizona who runs a very successful Photo Gallery out there. He too had spent a lot of money having a custom lab print his Iris and Giclee prints for him only to realize that he could do his own printing up to 13x19 and save a lot of money in the process. While I don't claim to have all the answers for all your printing needs, you may want to try doing some of the printing yourself. If you're shooting slides you'll need a decent scanner. There are several good quality scanners available that will do a very good job for the dollars invested. If your budget limits you to be somewhat conservative, I recommend the Nikon Coolscan IV. Canon makes a FS 4000 that also does a great job, and Minolta has their Dimage series. If your budget allows you to spend a little more I recommend the Nikon Coolscan 2000 or the new 4000 for great scan results. For printers, I happen to use the Epson 1270. It is now discontinued, so you'll need to go with the 1280 for about $499. There is also the new Epson 2200 for $699 with individual inks. Canon, HP and others are working hard and producing some very nice printers as well. You'll want one that can print up to at least 13x19. While I have been using Ilford's Classic series of inkjet papers, I really like the Epson Water Color paper for a very rich Giclee look. If you are shooting digital, the scanner is of no concern, but the printer and paper will still be an important part of the printing process for you. By way of illustration, I'll try to take you through the process of scanning, then setting the image up to print, and the basic printer set-ups to get you the desired results. Okay, let's start with the scanning process. Make sure your slide is clean and free of any dust. Insert the slide into your scanner and do a pre-scan of the image. Once the pre-scan is up and visible on the monitor, I make a few adjustments using the scanners curves and levels program, but without getting too critical at this point. I preset my scanner to clean the image using Digital ICE with the sharpening feature turned off.
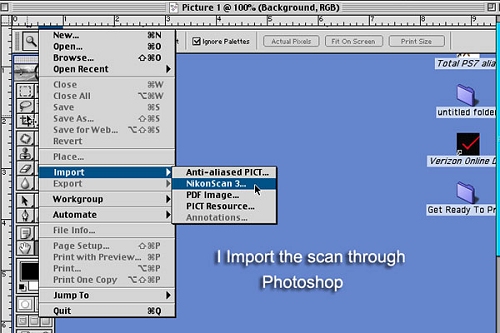
I don't sharpen or make many adjustments to the image in the pre-scan until after it is in Photoshop. I do rely on the scanner to get as much information as possible at the time of the scan, so that there is a good balance between shadow detail and highlights. (Please note: I open my Coolscan program through Photoshop using the Import/Export feature instead of opening the Nikon Coolscan program on the desktop, you may do it differently.)
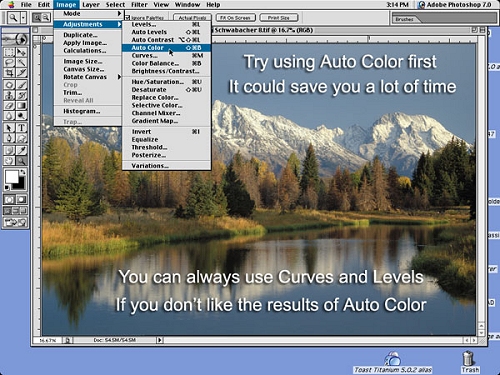
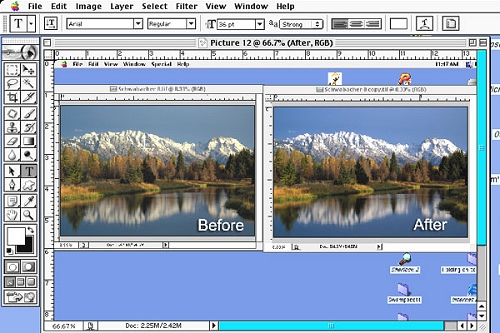
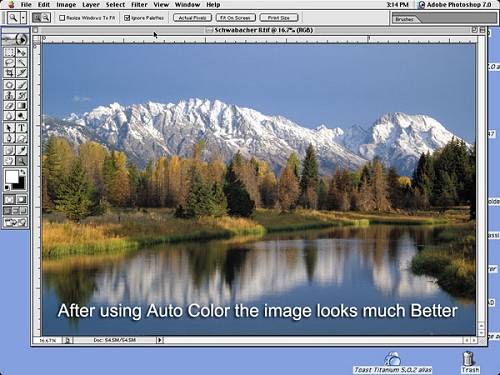
Once the image scan is complete and the image is in Photoshop, I can then use the tools available in Photoshop to make adjustments needed to the image prior to sizing and sending the image to my printer. Depending on the image and how well it scanned, I'll use Levels to make the easy adjustments to the image and Curves (See Curves and Levels Part I and Part II) to fine-tune the image prior to printing. I'm going to also give you one other useful tip for those of you now using Photoshop 7.0 If the image scans well without a big contrast difference between whites and shadow areas, try using some of the Auto- adjustment features such as Auto-color, Auto-Levels and Auto-Contrast.
Yes I did say the word Auto, and I probably have now upset a few of you purists out there who believe nothing beats doing it the hard way. Well I can't begin to tell you how many times I've over-worked an image trying to make it look like my original slide only to get frustrated with the end result. Lately, I've been trying the Auto-Color feature first, and have been blown away at how accurate it can be in the color correction process.
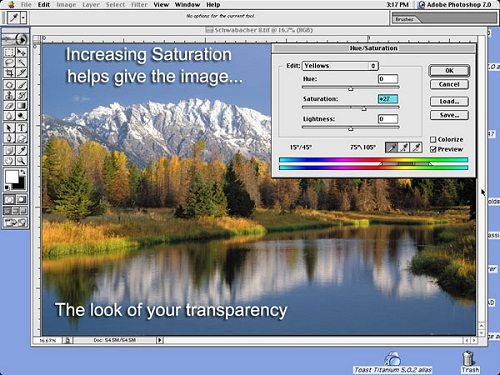
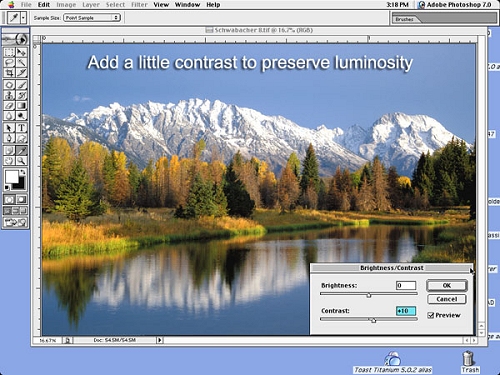
The folks who design these programs aren't stupid. They continue to find ways to make our lives easier, so why not at least try it. Yes there still is merit in those four letters; "KISS" "Keep It Simple Stupid." The only other trick that I will do is to pump up the saturation and contrast a little to increase the luminosity of the image, making it look more like the original slide.
Now that we have made all the necessary adjustments to the image, we are ready to size the image and get it ready to print. Because my printer can't print to the full 13x19, I size my prints to 12x18 at 300 dpi.
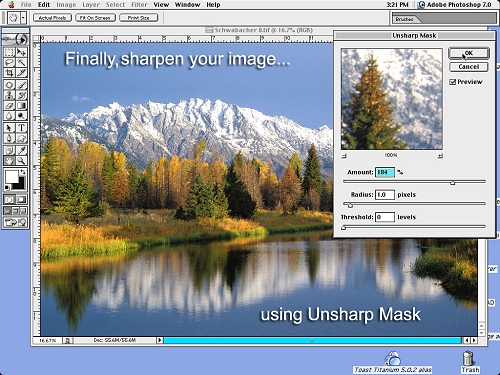
You might read in certain publications that you may not need the full 300 dpi depending on the size of your final print. I do it because I know it works for me. Remember, don't confuse the scanning or input resolution (i.e. 2700 or 4000dpi) with the sizing output to your printer (300dpi), or with the printer's own printing dpi (i.e. 360, 720, 1440, etc.), they are all different. Once my image is sized, I select the Sharpen-Unsharp Mask feature, to sharpen the image.
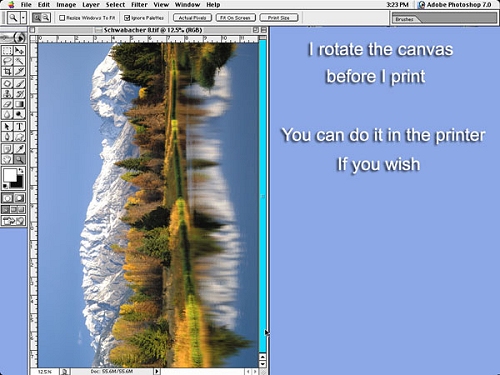
Keep in mind this isn't done to sharpen an image that isn't already sharp. It is there to get the image as sharp as your original slide or digital file. Now I turn my print to the vertical printing position.
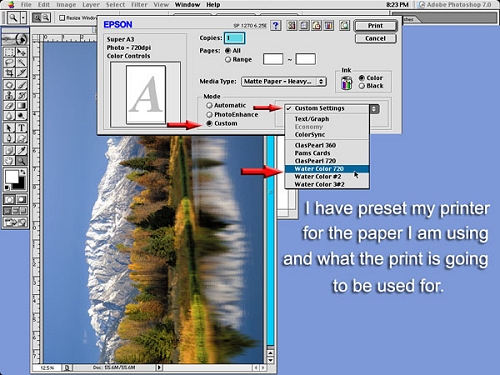
Yes you can do that with the printer settings, but I do it here because I can easily tell which of my images are ready to print when I use Photoshop 7's browser. The final step for me is setting up my printer and saving these settings for the type paper in use and the final use of the print.
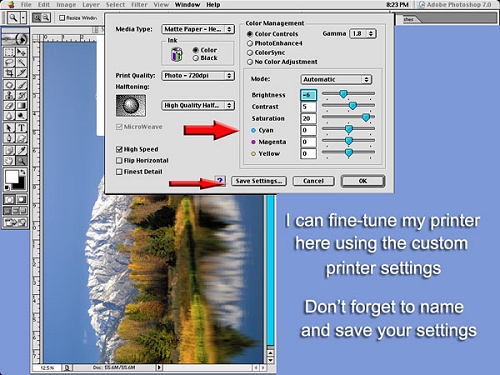
If I am making a print to use as a demo print, I may only need to print at say 360 dpi or 720. If I want to make a gallery print for sale, I will use more ink and print at say 1440. Any settings that affect the final print such as contrast, brightness, or saturation, can be custom set at the printer.
I save these settings so that each print is consistent no matter what paper I use, or what image I print. This will save time when producing multiple prints. Well, now it's up to you. Put some of these tips to use, try it and see if this doesn't help you "Get Ready To Print." |
|
|
|
|
|
|
|
|
|