page 2 of 23 |
page 2 of 23 |
| The Ultimate Equipment Bargain: Dramatically
Improve Your Images for only $200 by Jim McGee
First I'll lay out some absolutes: Great photographers, not great cameras make great images. I really believe that. But for beginners stepping up to better gear can help them make better quality images. My first "real", non-consumer, lens was a 50mm f1.4. I had started shooting slide film and when I got the first roll of Kodachrome back that I had run with this lens I was blown away! My images could look that sharp! So that's what they've been talking about in the magazines! For pros great equipment is a necessity. They could make great images with lesser equipment but having the good stuff allows them to create great images consistently. As your equipment addiction gets worse either your wallet or your back will reach critical mass. When you reach this point you have a lot of very good equipment; but you suddenly realize that it can be too much of a good thing and all that bulk is getting in the way. You become selective about what you take out on a given day. But you still haven't silenced that monkey on your back. Great equipment ain't cheap. Today the street price on that 50mm 1.4 is around $270. Frankly a bargain for a pro quality lens which is why I chose it at the time. But for high quality optics you can expect to spend over $300 for most prime lenses and over $500 for most zooms. Pro level telephotos start in the thousands. Not cheap at all. Now what if I told you that there was one piece of equipment you could buy, one piece you could drop in your camera bag, that would dramatically change your photography forever once you master it. It works at all focal lengths, in every kind of light? What if I told you that it costs under $300? Would you be interested? That piece of equipment is film. Mastering it is where the cost comes in, and mastering it is so simple. But most photographers never do it. Here's how you can. Mastering Film Most slide films are around $5 a roll mail order and $6.50 to $7 a roll retail. That gives you a spread of $100 to $140 for film. A quick couple of calls to local labs put slide processing at $7.50 to $9.00 per roll for E-6 (slide) processing, bringing the total cost to between $250 and $320.
Mailers are pre-paid processing for your film. After you shoot it, drop your film in the mailer and send it in. A couple of days later the postman drops your mounted slides in your mailbox Using EliteChrome 100 and mailers gives you a total cost of $150, Getting it processed locally would bring the total to around $240.
So now that you've bought those 20 rolls of film and your notepad how do you master film? Over a period of about two weeks or so (so everything stays fresh in your mind) you're going to shoot all 20 rolls. Lets start with a landscape, preferably using a tripod, and preferably a scene with a good range of colors. Click off your first shot at the meter reading on your camera. Next set the exposure compensation on your camera to under expose by 1/3rd stop, then 2/3rds, a full stop, then a stop and a third. Now overexpose in the same increments. Make sure that you're recording the frame number and exposure setting for each shot. When you're done take a moment to reset your exposure compensation back to zero. If your camera's exposure compensation is in half stop increments no problem. Next set your zoom to a wide angle setting. 28mm is a good starting point. Set your f-stop to f22 (or the smallest aperture for that lens). Switch to manual focus and pick a focus point about 1/3rd of the way into the scene. You want to focus manually so the focus doesn't change between shots. Shoot at f22, then at each f-stop until you're wide open. When you're done do the same at 50mm, 100mm and 200mm. On the light table set up these slides side by side so that you can see the differences. In the shots where you changed the exposure compensation look at the differences in color saturation and detail. People are often shocked at how much difference a third or half stop can make in how an image looks. Many slide films tend to favor a bit of underexposure - but remember this is subjective. I tend like the look of EliteChrome underexposed by 1/3rd of a stop. Not everyone does and no one is right or wrong. It's all in what you like. The idea here is to learn the subtle changes that occur as you over and under expose film. This will help you to see at a glance if the exposure is off for an image - a crucial learning tool as you master your equipment.
Your depth of field also changes as you go from wide angle to telephoto. Differences in sharpness throughout the image will be much more noticeable in images shot at 200mm than they will be in images shot at 28mm. Understanding those differences, when, and how much you can compromise, can be the difference between getting a shot and not getting it. If for example the shutter speed at f22 is to slow can you still get acceptable sharpness, and a fast enough shutter speed, if you shoot at f8? The answer is there in your slides. Next pick a place where there is a lot of motion. In my area there is a jogging path along the river that is always chock full of joggers, in-line skaters, and bicyclists. Set your camera on shutter priority and auto focus then throw a blanket out on the ground and get comfortable. Shoot the bikers and joggers as they cruise past. Experiment with different shutter speeds making sure to record the fame numbers and speeds in your notebook. When you get back to your light box look at the images. I found it helpful to write the shutter speeds on the slide mounts to make it easier to compare. What shutter speeds stopped the runners motion? What speeds showed a bit of blur that would allow you to show motion? What speeds were so blurred that the image was unusable? How much difference was there in the speeds that would freeze joggers versus the shutter speeds that would freeze the bikers? Getting a feel for shutter speeds will allow you to control the look of your photos. Once you have a good feel for shutter speeds it gets easy to estimate the speeds for different kinds of subjects.
Back at your light table you may be amazed at the difference in the colors of your slides at different times of day. The same scene will look dramatically different two hours after sunset compared to mid afternoon. Understanding how film reacts to light at different times of day is a critical difference between capturing what you want on film versus accepting what you get on film. Next go out in the late afternoon or early morning. Find a spot under the trees where there is a lot of mixed light and shade. Take a shot at the recommended meter reading. If you camera has a spot meter turn it on. Shoot at the spot meter reading for the brightest parts of the scene, then for the darkest parts of the scene. Next looking at the brightest and darkest areas try and find what you think is a middle tone between them and shoot. Finally looking at the scene decide what you think is most important in the scene and spot meter for that subject. Make notes in your notebook about what you spot metered on so that you'll have a reference later on. Back at the light table look at your slides. Look at the detail in the shadows and highlights. Now look at your notes. What were you metering on in each image? What were the results? Our eyes can see and adjust for a much wider range of light than film can. If you understand what the film can capture and hold you can make intelligent decisions about what parts of the scene you want to expose for rather than just trusting the meter to get it right. Next go out at night with your tripod. Anywhere will work for this one. First take a shot at the camera's recommended exposure with no flash. Next increase your exposure time by one, two, and three stops overexposure. Next set up an object or person in front of the camera. You can even jump into the picture if your camera has a self timer. Take a photo with the flash at it's default setting. Next set the flash to rear curtain sync (or slow sync). This will tell the camera to expose the scene normally and only trigger the flash at the end of the exposure. Finally, if your camera has flash compensation try setting your flash exposure to over and under expose in increments up to one and a half (or one and 2/3rds) stops. Back at your light table you'll see some interesting things happening in your night shots. Skies will brighten and details will emerge as your exposures increase. At night building lights often confuse meters so it's a good idea to learn how you camera exposes night scenes. You should see a big difference between your shots using basic flash and rear curtain sync. The former will have the subject lit clearly against a black hole, the latter will show good detail in the background as well as with the subject. Flash compensation, if your camera has it, adjusts the power of the flash. In my opinion many flash systems are too "hot" and create unnatural skin tones and bright, blown out, highlights. Being able to dial the flash down a bit may give you more satisfying images. Finally pick a location to shoot in the early morning or late afternoon and pick a subject. Buildings work well for this experiment. Walk around. Shoot you subject from different angles, and from each angle shoot at several different focal lengths. Start wide and zoom in to details. Back at the light table you'll see the scene in many different ways from the one or two shots you'd likely have taken. How do the perspectives differ? How is the light different from different angles. How do these things effect the mood and the impact of the image? Lay all of the images out on the light table. Which one or ones have the greatest impact? Are they the shots you would have taken or are they something different? As you reach the end of your experiment you'll have a greater understanding of your equipment, of what your film can capture, and how it captures light. You may also have some new opinions about composition and flash. The bottom line is that you'll be a better photographer for the things that you now understand in a more intuitive way. This allows you to create images rather than take pictures.
|
For $300 you can be a better photographer
|
|
text and photography copyright © 2001 Vivid Light Publishing |
 Ok
every photographer reading this who is an equipment junkie raise your
hand. Now everybody who's an equipment junkie but doesn't want
to admit it raise your hand. Cool now that everyone reading this
has their hand up put 'em down and we can get started.
Ok
every photographer reading this who is an equipment junkie raise your
hand. Now everybody who's an equipment junkie but doesn't want
to admit it raise your hand. Cool now that everyone reading this
has their hand up put 'em down and we can get started.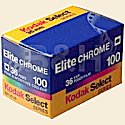 But
wait. There is a real bargain out there. Kodak EliteChrome
100, which is the consumer version of the old standby EktaChrome 100 can
be had for an average of $3.70 mail order or $4.70 retail. One
mail order house we checked was selling USA film with mailers for only
$7.50!
But
wait. There is a real bargain out there. Kodak EliteChrome
100, which is the consumer version of the old standby EktaChrome 100 can
be had for an average of $3.70 mail order or $4.70 retail. One
mail order house we checked was selling USA film with mailers for only
$7.50! 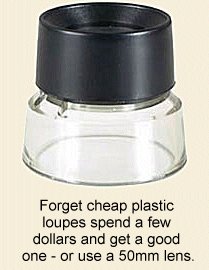 But
you still need a couple of other items. First a small notepad for around
a dollar. You may already have a light box, but if not you'll want
to get an inexpensive one to start with. An 8x10 light box will
allow you to lay slides out side by side. Tundra makes a good
little 8x10 light box for around $40 (some shops carry this box under
the ProMaster name). Get a decent quality loupe to view your
slides. Forget the cheap plastic ones in the camera store for
$5. Better quality loupes can be had starting at around $30.
For general viewing a 4x or 8x will work fine. If you have a 50mm
lens you already have a great loupe that costs you nothing! Set
the lens to it's widest aperture, hold it just above your slides, and
look through the front of the lens. If you don't have one old
manual 50mm lenses can be had at swap meets for as little as $5.
The reason you want a better loupe is so that you can see detail and
accurate colors.
But
you still need a couple of other items. First a small notepad for around
a dollar. You may already have a light box, but if not you'll want
to get an inexpensive one to start with. An 8x10 light box will
allow you to lay slides out side by side. Tundra makes a good
little 8x10 light box for around $40 (some shops carry this box under
the ProMaster name). Get a decent quality loupe to view your
slides. Forget the cheap plastic ones in the camera store for
$5. Better quality loupes can be had starting at around $30.
For general viewing a 4x or 8x will work fine. If you have a 50mm
lens you already have a great loupe that costs you nothing! Set
the lens to it's widest aperture, hold it just above your slides, and
look through the front of the lens. If you don't have one old
manual 50mm lenses can be had at swap meets for as little as $5.
The reason you want a better loupe is so that you can see detail and
accurate colors.  Now look at the shots you took
at varying apertures. Start with the extremes. Look at the
images shot at f22 vs. f3.5 (or whatever your widest aperture
was). The differences in sharpness in the foreground and
background should be obvious. Where it gets interesting is at
f8. How sharp, foreground to background, is the image at f8
compared to f22? Differences should be especially noticable in the
foreground.
Now look at the shots you took
at varying apertures. Start with the extremes. Look at the
images shot at f22 vs. f3.5 (or whatever your widest aperture
was). The differences in sharpness in the foreground and
background should be obvious. Where it gets interesting is at
f8. How sharp, foreground to background, is the image at f8
compared to f22? Differences should be especially noticable in the
foreground.  Next pick a lazy sunny Saturday. I know if you have kids
there's no such thing, but try to steal some time out of the
day. Pick a spot you can reach easily throughout the day and get
there a half hour before sunrise with your camera and tripod and pick
three views: one that includes the rising sun, one at 90 degrees to the
sun, and one facing away from the rising sun. Set up your camera
and shoot each scene. Go get a cup of coffee and come back a half
hour after sunrise and reshoot the same three scenes. Go get
breakfast and come back around two hours later and shoot the same three
scenes. Do this throughout the day at two to three hour intervals
and then a half hour before and a half hour after sunset (there is a
surprising amount of ambient light both before sunrise and after
sunset). While you're doing this pay conscious attention to the
color of the light. It's also not a bad idea to shoot each of
these shots at the recommended meter reading and at a third or a half
stop underexposed to more deeply saturate the colors.
Next pick a lazy sunny Saturday. I know if you have kids
there's no such thing, but try to steal some time out of the
day. Pick a spot you can reach easily throughout the day and get
there a half hour before sunrise with your camera and tripod and pick
three views: one that includes the rising sun, one at 90 degrees to the
sun, and one facing away from the rising sun. Set up your camera
and shoot each scene. Go get a cup of coffee and come back a half
hour after sunrise and reshoot the same three scenes. Go get
breakfast and come back around two hours later and shoot the same three
scenes. Do this throughout the day at two to three hour intervals
and then a half hour before and a half hour after sunset (there is a
surprising amount of ambient light both before sunrise and after
sunset). While you're doing this pay conscious attention to the
color of the light. It's also not a bad idea to shoot each of
these shots at the recommended meter reading and at a third or a half
stop underexposed to more deeply saturate the colors.
