
|
|
||
|
page 3 of 23 |
|
|
|
||
|
page 3 of 23 |
| It's the Light! by B. Moose Peterson
Light and Exposure When it comes to light, what our mind sees and communicates to us is not what film sees and can communicate. Tattoo this fact in your memory and never forget it! I was told once that the average person could see detail in approximately twenty-seven stops of light (half of that is probably closer). It's hard for me to imagine that there are that many stops of light out there, but I know that if we can see even half that many, that's four times more than film can see. I've written many times that film can only see, record, hold or show detail in three stops of light, and digital, five! Film has a three-stop latitude for holding detail, that's it! And while digital has five, we still work within the three-stop limit because that's what our minds are accustomed to. Let me define what I mean by the three-stop factor so you can better understand this point before moving on.
As defined by the Encyclopedia of Photography, 3rd edition, "The correct exposure for a photograph can be defined as an exposure that produces an image with the tonalities and colors the photographer desires…" Sounds like what I've said for nearly twenty years; yet within this definition lies an acceptable range or standard of exposure we as a community of artists established as being pleasing. More importantly is the standard of acceptable exposure for the selling and printing of images established by the profession and photographic buyers. In reaching any of these standards and succeeding, light is where it all begins. "Seeing" light the way our film sees light takes practice and sorry for the pun, but it takes an eye for seeing light. Looking out my office window at the wildflower meadow in my front yard, I can see the range of light being about five or six stops. When I take a meter reading, I can see that I'm right on. How did I train my mind to see that? I'm telling you straight out, I'm a student of light! I constantly analyze light to see it, understand it and be able to manipulate it to make my photographs work. One tool I use, which I carry with me all the time, is my hand. Obviously, I never leave home without it and it has helped me learn light. Anyone ever watching me must think I'm nuts because I constantly stick my hand out and look at the light falling on it. I do this in every imaginable lighting situation I can find. What I look for is the detail in the highlights and shadows on my hand. Can I see the lines in the palm of my hand or the lines between my fingers that are in shade? I take the answer to this question and then look at the scene around me. Over the years, I've learned to see light the way my film sees it. I guess you could say I have a three-stop hand. Another old trick to seeing light the way film sees it is to squint at the scene you want to photograph. When you partially squint, those highlights that are going to burn up and those shadows that are going to go jet black become apparent. Now you have to learn to start honestly seeing these areas where the light is deficient to make this work, but with practice, you can pick it up. The bottom line though is simple: to start capturing the perfect exposure, you need to understand light. Gray cards, matrix metering or variable speed films can't make up for not seeing and understanding light when you want to capture the perfect exposure. When you can see light, your exposure problems disappear, totally and completely! There is no magic to it; it's simple physics that work in your favor. But photography is so much more than the perfect exposure! That million-dollar piece of advice, "shoot early in the morning or late in the afternoon for the best light" while widely practiced is rarely understood. The reason this is promoted as the best light is because the range, latitude or contrast of the light is so slight that film can capture detail in the highlights and shadows with little effort. (This does not include photographing the rising or setting sun.) Any meter can take the right reading in this kind of light. These hours of shooting offer very little contrast, little in the way of dark shadows. For some reason shadows have been made out as being bad and like anything in too great a quantity, shadows can be bad. But the lack of or the profusion of shadows is an essential element in my own photography and I urge you to look at those images you enjoy; shadow plays a big part in why you like them. It's all about communicating. Light and Communication
The total lack of shadow say early in the morning or on a very overcast day creates an almost monochromatic image even though color is present. This type of image easily evokes a very tranquil, serene emotional response to an image. The light is so even that you can take this type of lighting as is or play with it, depending on what you want to communicate. Let's say we're photographing an early morning meadow in this type of light. As is, it's a beautiful scene. But if we frame the meadow right with a bright red flower in the foreground, we can communicate something totally different, evoking a totally different emotion. The key to this flexibility is the light, permitting us to take photography beyond the perfect exposure to really communicating. The other extreme is hard shadow. Shadows have so many different meanings and depending on what you want to communicate, they can be manipulated to your desire. Take the same meadow we photographed in the early morning light. If we were to photograph that a little later in the morning, then the grasses that previously blended together to create a beautiful carpet would now individually stick out as each blade is defined by a shadow. Shoot a little later in the day and that gorgeous early morning scene is nothing but black and white lines because the shadows are so dark. But what if there was a tree on the edge of the meadow and you wanted to communicate the "late afternoon of summer?" You then would work the scene to incorporate the shadow of the tree, waiting until it was stretching across the meadow as far as possible. All of a sudden those shadows aren't so bad and in fact help us communicate. It all depends on what it is we want to communicate. In that early morning light, communicating shape or texture is nearly impossible. We need shadow to do so, but how much shadow? Ah, the answer to that question is what makes your photography stand out from the next person's. How you deal with shadows, including them, excluding them, flash filling them a little or a lot, all directly determine just what your final image will look like, and say to others! But to make all of this work, you've got to see light the way your film sees it! A note on exposure when it comes to communicating with light: the general rule of thumb is to expose for the highlights to maintain detail in them and let the shadows fall wherever they may. Do I use a spot meter then to accomplish this? NOPE! While that's a possibility, it's way too slow a metering method for me. This is the main reason I relied on the F5's RGB meter since it understands these things and I understand light and film; it delivers the correct exposure, every time. (This is not the case with the D1/D1x!). While you will have a nice photo when you've captured the correct exposure and you'll have an even better photograph when you add light that communicates, you'll hit the top of photographic potential when you use light to bring drama to your images.
When Mother Nature presents us with dramatic lighting, hopefully you recognize it when you see it. That's something that simply can't be taught. The elements of dramatic lighting though are something you can look for even when it's not all around and at times, it's something you can create. Dramatic lighting requires that you understand the first two points of this piece, exposure and communication. The best way I know of explaining this is by relating a story to you. One May I was in Custer State Park, SD with folks on our day shoot from our Walk Softly Seminar. There were a bunch of baby bunnies, bouncing about. One came out in the beautiful spring green grasses and started to munch. It was sitting right in front of a bush with all of its branches, a tangled horrible mess for a background. I instantly plopped down my 600f4 and started to shoot. Now the student standing beside me asked why I would take such a shot with that horrible background. I said the film would never see the tangled background. The student gave me a queer look and said I was nuts since it was as plain as day in the viewfinder. I then said to look at the scene the way the film sees it, the bunny out in the light, the tangled background in the shadow; it was a four to five stop range. The film would never see the tangled mess. Understanding light, how film sees it in regards to exposure and communication is how we bring drama to our images. The spectacular drama that light can bring on its own is rare and when those events do occur, every photographer stops to marvel and record it. But it's in the everyday scheme of things that we need to seek or create drama in our photographs by using light. The bunny example above is just one way to look for the drama, putting a lit subject in front of a dark background. There are lots more examples that by understanding light, exposure and communication, one can find them nearly at every turn.
Attach your flash to your camera or by the way I do it, using the Really Right Stuff Flash arm. I dial in minus 1 stop on the camera body via its exposure compensation dial and then I dial in plus one on the flash. The camera's computer sets the meter in the body and on the flash to underexpose the whole scene by one stop. But by dialing in plus one on the flash, it now exposes correctly, the plus one canceling out the minus one. This underexposes the ambient light by one stop, cutting down or neutralizing the highlights from the sun that are streaming through the canopy. The flash pumps up the shadows and properly exposes for the subject. In this very simple way, you've brought drama to the lighting where there was none before.
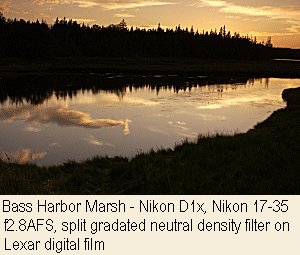
Are you into scenics? That dark storm cloud off on the horizon is a natural way to bring drama to any scenic, but you can't always find a storm when you need one. Many folks like to use a polarizer to darken the sky but the problem with that is often it mutes the rest of the colors in the scene, as it doesn't polarize the right elements. There are other ways of bringing drama to a scenic when there are no clouds, such as, a split gradated neutral density filter. I like the two and three stop models, which I find are enough to darken a sky while still permitting detail to appear in any clouds that might be present. The filter performs a simple function, it holds back the light in the sky effectively darkening, creating drama. There are so many ways to bring drama to your images through light that I should write a book on the topic. I don't though because understanding light and all of its complexities is best done out in nature, not by reading a book. Shooting, shooting and more shooting, hunting light and then recording what you see is the best way to learn to really see light, see light as your film does! The cornerstone of what we do is the light. Whether you shoot conventional or digital, this holds true. If you want perfect exposures every time, learn light. If you want to always be successful in communicating through your photographs, learn light. If you want drama in your images so when folks see them, they can't help but ooh and aah, learn light. Light comes in so many flavors, in so many ways and at so many different times of the day, I don't think I'll ever learn them all. Some of my favorite light is when there is no "light" at all during overcast and stormy days. One of the best investments you can ever make in photography is mastering light, seeing light as your film does and then, sharing that with the rest of us. Learn to see light, and you will become a master of your photography!
|
To master photography is to master light
If the image has that "blue wash", it conveys a psychological cold feeling
The polarizer is a filter designed to remove reflections
This filter's sole purpose is to "compact" the light so it fits within the three-stop range of the film
|
|
|
|
text and photography copyright © 2001 Vivid Light Publishing |
 I'm
sitting here at my light table, viewing images. They're not my own, but
those of another photographer seeking help. The problem, exposure! The
photographer, had seen the Bald Eagle images in our
I'm
sitting here at my light table, viewing images. They're not my own, but
those of another photographer seeking help. The problem, exposure! The
photographer, had seen the Bald Eagle images in our 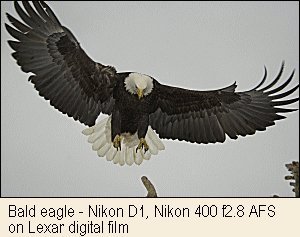 Photography is all about the capturing of light! It has been since
the very beginning. This quintessential element is what brings life to
an image, communicates moods and emotions, and makes it physically
possible for others to see your vision. Yet this key ingredient to
photographic success is the least understood and hardly ever taught. But
make no mistake, without the right light, you can't capture the perfect
exposure, communicate and evoke emotions or capture the drama present in
our wildlife and wild places!
Photography is all about the capturing of light! It has been since
the very beginning. This quintessential element is what brings life to
an image, communicates moods and emotions, and makes it physically
possible for others to see your vision. Yet this key ingredient to
photographic success is the least understood and hardly ever taught. But
make no mistake, without the right light, you can't capture the perfect
exposure, communicate and evoke emotions or capture the drama present in
our wildlife and wild places!
 When looking at a scene, any scene with any colors you want, a
three-stop range means that to capture detail in the highlights and
shadows, the lights and darks, the physical meter reading between those
values is only three stops apart. This means that with a constant
shutter speed, if you meter the highlights (with whatever metering
system you'd like) and get an f/stop of f/16, then you meter the shadows
and get f/5.6, you have a scene with a three-stop range (for digital it
would be f/32 to f/5.6). (You don't necessarily use these exact f/stops
to measure the range of light in your scene.) This means that if you
were photographing a Bald Eagle in this scenario, you would see details
in the feathers in both the white of the head and the black of the body.
If you go past this three-stop range in either direction, you'll start
losing detail, the ability to see information, in the highlight or
shadow areas. There are no ifs, ands or buts about it! This holds true
for every metering system, including the F5's RGB as well as any
exposure compensation you want to dial in.
When looking at a scene, any scene with any colors you want, a
three-stop range means that to capture detail in the highlights and
shadows, the lights and darks, the physical meter reading between those
values is only three stops apart. This means that with a constant
shutter speed, if you meter the highlights (with whatever metering
system you'd like) and get an f/stop of f/16, then you meter the shadows
and get f/5.6, you have a scene with a three-stop range (for digital it
would be f/32 to f/5.6). (You don't necessarily use these exact f/stops
to measure the range of light in your scene.) This means that if you
were photographing a Bald Eagle in this scenario, you would see details
in the feathers in both the white of the head and the black of the body.
If you go past this three-stop range in either direction, you'll start
losing detail, the ability to see information, in the highlight or
shadow areas. There are no ifs, ands or buts about it! This holds true
for every metering system, including the F5's RGB as well as any
exposure compensation you want to dial in.
 The play of lights and darks, highlights and shadows in our images
bring the subject to life and what it is we want to communicate. Most
photographers don't realize it, but it's this play of lights and darks
that originally grab our attention to a scene to photograph it in the
first place. Our minds really grab hold of these light values and in
them we see potential. Now the lack of or the concentration of
highlights and shadows directly determines the mood, emotion or other
quality we want to communicate in our images.
The play of lights and darks, highlights and shadows in our images
bring the subject to life and what it is we want to communicate. Most
photographers don't realize it, but it's this play of lights and darks
that originally grab our attention to a scene to photograph it in the
first place. Our minds really grab hold of these light values and in
them we see potential. Now the lack of or the concentration of
highlights and shadows directly determines the mood, emotion or other
quality we want to communicate in our images. 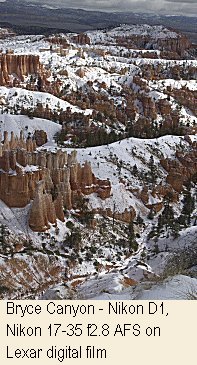 Light and Drama
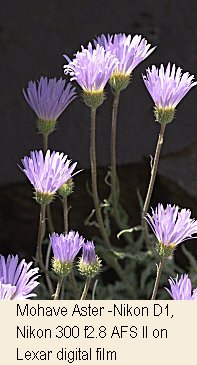 Are you into photographing wildflowers? If you are, you might wonder
how you could bring drama to them through light. Let's say you're out on
a bright sunny day, no wind and you have in front of you a killer
blossom. The flower is great, but the light is hard and contrasty.
Furthermore, the background is lit just like the blossom. This is a no
win scenario, or is it? First, can we do something about the background?
Let's say you've tried all the traditional ways of changing your angle
of approach, gone high and low, even switched lenses but with no luck.
What if you created your own shadow on the background either with a
flat, person or even your camera bag? Does this take care of the
background and bring a little drama to the image? But still the light
falling on the blossom itself is burning hot, can that be diffused? I
always carry a large Ziploc bag that I use to diffuse light in such a
situation. And with little effort on a bright sunny day, we've taken an
otherwise unlikely photographable scene and made it possible, with
drama!
Are you into photographing wildflowers? If you are, you might wonder
how you could bring drama to them through light. Let's say you're out on
a bright sunny day, no wind and you have in front of you a killer
blossom. The flower is great, but the light is hard and contrasty.
Furthermore, the background is lit just like the blossom. This is a no
win scenario, or is it? First, can we do something about the background?
Let's say you've tried all the traditional ways of changing your angle
of approach, gone high and low, even switched lenses but with no luck.
What if you created your own shadow on the background either with a
flat, person or even your camera bag? Does this take care of the
background and bring a little drama to the image? But still the light
falling on the blossom itself is burning hot, can that be diffused? I
always carry a large Ziploc bag that I use to diffuse light in such a
situation. And with little effort on a bright sunny day, we've taken an
otherwise unlikely photographable scene and made it possible, with
drama!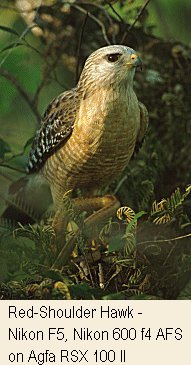 Are you into birds? During the summer especially in the Sierra, the
small dickie birds are very active during the middle of the day when the
big hatches of bugs are everywhere. This is not the best light
especially when you have natural highlights and shadows from the sun
streaming through the canopy. The contrast range is quite high. What to
do? The answer is simple: use flash yet not simply by flash filling but
manipulating to create drama.
Are you into birds? During the summer especially in the Sierra, the
small dickie birds are very active during the middle of the day when the
big hatches of bugs are everywhere. This is not the best light
especially when you have natural highlights and shadows from the sun
streaming through the canopy. The contrast range is quite high. What to
do? The answer is simple: use flash yet not simply by flash filling but
manipulating to create drama. 


