|
page 11 of 23 |
|||
|
page 11 of 23 |
|||
|
Tips for Shooting Sunrises and Sunsets
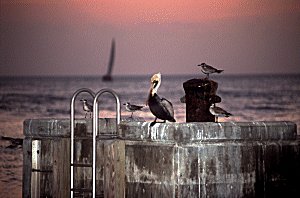
Some simple techniques and some basic filters can make a huge difference in your sunrise and sunset photos. Patience is key to getting great sunrises and sunsets. Walk down to the beach, snap a couple of quick pics, and you might get a good shot - depending on your luck. But patience is almost always rewarded. Sitting with my camera mounted on it's tripod, this pelican landed off to the far right of the frame. I snapped several shots as he floated through the frame from right to left, one of which was the shot I was really after, with the pelican silhouetted against the reflection of the sun on the water.
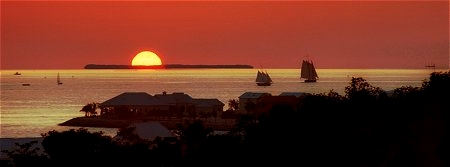
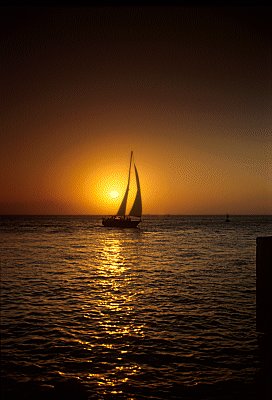
Get there early and be the last to leave to maximize your photo opportunities. Depending on atmospheric conditions, there can be a light show of colors ranging from subtle pastels to vibrant oranges and reds starting before the sun comes up and up to a half hour after it sets. You'll see most photographers snap shots until the sun sinks below the horizon, then pack up and leave - missing some of the best colors in the sky. Another advantage to getting there early is it gives you time to take a long look at the area, pick your foreground and set up. In this shot of a schooner coming back into the harbor, the sun is already well below the horizon.
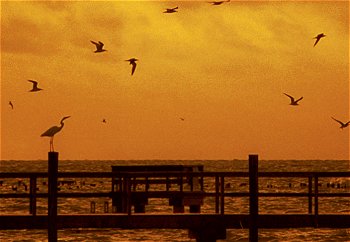
Use saturated films to capture the orange hues in the sky. The daytime sky is blue because the earth's atmosphere scatters blue light. When the sun is near the horizon it's light is traveling through a lot more atmosphere than when it's directly above you. The closer to the horizon the softer and warmer the light appears because more and more blue is being filtered out. We humans perceive orange and red as warm and comforting while blue is perceived as cold. Saturated films bring out these soft warm colors which evoke a soft warm feeling in the viewer. Under expose slide film by 1/3rd to 1/2 stop. Most slide films will give you more saturated colors when under exposed slightly. But don't overdo it or you'll turn your pictures into mud. You can underexpose your film two ways. One is by setting your exposure compensation to the desired underexposure, although on some cameras this will have to be done individually for every shot, or by overriding the films ISO setting on cameras that support it. To do this set the film speed for ISO 64 film to ISO 80. This will give you 1/3rd of a stop underexposure. Just make sure that you reset your film speed back to DX (default) when done or you may get a rude surprise with your next roll of film (don't ask how I know). The top image of the pelican at sunset used this technique along with a graduated neutral density filter (see below) to achieve a very dramatic and saturated sky. ND filters and ND grads are a great way to control the light and increase color saturation. If you put on your sun glasses during a sunset you'll notice that the colors in the sky become more vibrant. Basically a neutral density filter (ND filter) is a pair of sunglasses for your camera. ND filters are rated by how many stops of light they filter. A two stop ND filter will lengthen your exposure time by two stops, giving the light more time to color the film (assuming the same f-stop). The biggest difficulty in shooting sunrises and sunsets is the difference in light between the sky and objects in the mid-ground and foreground. If you expose for the mid-ground or foreground subjects, the sky is overexposed and washed out. Expose for the sky, and subjects in the mid-ground and foreground are hopelessly underexposed. The solution is the graduated neutral density filter. The first two images both make use of this filter to balance the foreground exposures against the sky. For sunsets look for 2 to 3 stop ND Grads.
Often folks will try and shoot a person with a great sunset sky in the background, but the resulting print has the person looking great but the sky behind them has become a black hole. Most current SLRs and external flash units support rear curtain sync flash. This allows the camera to meter and expose for the background, throwing in a pop of flash at the end to properly expose your foreground subject. Fill flash can be used for more than just people. Try it with any foreground subject you want to shoot in low light while preserving the background. On those cameras that support flash compensation, try dialing down the strength of the flash anywhere from 1/3rd to 2/3rds of a stop for a more natural look to the image. This shot used -2/3rds of a stop flash compensation.
Use an orange filter for sunrise effects after sunrise. When I took this shot the sun had already gone well above the horizon and the sky was really beginning to lighten. I used an orange filter (called a yellow filter by some manufacturers) to color the sky as though it was actually just before sunrise and underexposed the image by a full stop. A Tiffen Soft/FX filter further enhances the quiet mood of the scene.
Go long to get big suns. Ever wonder how some photographers get those shots where the setting sun looks so damn BIG in the image? Well, the longer the focal length of the lens used the bigger the sun will appear in the final image. But with really big glass starting at five thousand dollars, what's the budget conscious photographer to do? Easy, most photographers have a 300mm zoom lens in their camera bag these days. Cheap 2x teleconverters start at street prices around 100 bucks. Want big suns, ad a 2x converter to your 300mm zoom for a cheap 600mm lens. What's the downside? Well there's a couple actually. Depending on the quality of the teleconverter you buy you'll see a loss of sharpness. With some of the really cheapies it will look like you've got a mild soft filter on your lens. but for some types of sunset shots that can actually be a plus as you're rarely looking for tack sharp in these kinds of images. Next, if your zoom has a minimum aperture of 5.6 at 300mm you may loose autofocus. Again not a critical thing for this kind of shooting. Isn't it a waste to buy a cheap teleconverter just for sunsets? At around a $100, less if you buy used, you're not spending that much more then you'll spend on some filters. If you want less of a compromise and better optical quality try the OEM 2x converters made by your camera manufacturer. These converters are designed to work with specific lenses and offer improved quality - but at a much steeper price. All images for this article were shot in Key West Florida, USA
|
Make a huge difference in your sunset photos
Look beyond the obvious
Experiment, sometimes you make great mistakes
The longer the lens, the bigger the sun
|
|
text and photography copyright © 2001 Vivid Light Publishing |
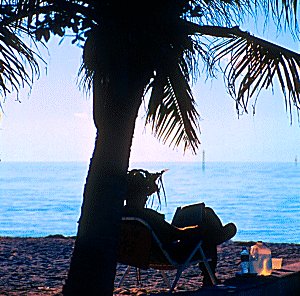 Look
beyond the obvious for shots that are different and can convey a
sense of place. This guy weaves straw hats from palm fronds and
sells them on the beach. I
was walking back from shooting the sunrise and noticed him sitting there
with the morning paper. The way the light was reflected in his water
bottles really caught my eye. I took the shot on a lark and hung the print in my office
with a sign that read "my retirement plan". I've
probably made over a dozen prints of this one for co-workers.
Look
beyond the obvious for shots that are different and can convey a
sense of place. This guy weaves straw hats from palm fronds and
sells them on the beach. I
was walking back from shooting the sunrise and noticed him sitting there
with the morning paper. The way the light was reflected in his water
bottles really caught my eye. I took the shot on a lark and hung the print in my office
with a sign that read "my retirement plan". I've
probably made over a dozen prints of this one for co-workers.
 Use
fill flash to expose your foreground without losing your
background.
Use
fill flash to expose your foreground without losing your
background.
 Experiment,
sometimes you make great mistakes. The light at sunrise and
sunset is changing quickly. Underexposing by 1/3rd to 1/2 of a
stop can yield more saturated colors, as can the use of neutral density
filters. Here I tried several things, using a two stop neutral
density filter plus a 2 stop graduated neutral density filter. I
thought that the sky was too dark in my test prints but the wife loved
it and asked for a copy for her office. Long story short, it's
become another requested print. Every time I look at it I cringe
thinking how I overdid it with the filters but people really seem to
react to this image.
Experiment,
sometimes you make great mistakes. The light at sunrise and
sunset is changing quickly. Underexposing by 1/3rd to 1/2 of a
stop can yield more saturated colors, as can the use of neutral density
filters. Here I tried several things, using a two stop neutral
density filter plus a 2 stop graduated neutral density filter. I
thought that the sky was too dark in my test prints but the wife loved
it and asked for a copy for her office. Long story short, it's
become another requested print. Every time I look at it I cringe
thinking how I overdid it with the filters but people really seem to
react to this image.