|
|
|||
|
page 10 of 23 |
|||
|
|
|||
|
page 10 of 23 |
|||
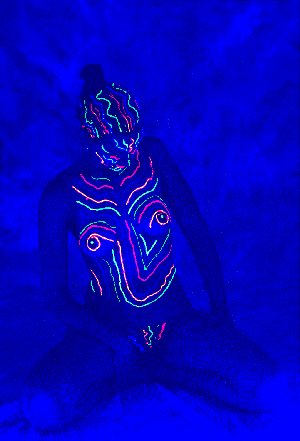
| Blacklight Nudes by Chuck McKern (this page takes a moment to load)
A style of photography that many serious photo enthusiasts enjoy is the taking of artistic nudes. Then comes the quest to do something beyond the ordinary nude, to make something different and unique. Shooting under black light can be a little tricky but it can be a lot of fun and very rewarding if done correctly. The concept is simple. Use artistic poses on a model with fluorescent makeup and costumes and illuminate the set with only blacklights.
Fluorescent costumes can be a bit more difficult to find. Theatrical supply stores are a good place to start. Also, try any shops that sell dancewear or even swimsuit shops. The lights are even easier to get. Blacklight fluorescent tubes can be purchased at most hardware and electric supply stores. They are available in different sizes and wattages, some with the fixture, some without if you already have fluorescent light fixtures. Whatever type you buy make sure they are designated BLB (blacklight blue). These dark blue bulbs have a filter built in to them that will prevent most of the white light from being transmitted. The bulbs that are designated with the code BL will allow too much white light to pass for this type of shooting.
The foil will help increase the intensity of the light and will make it easier to control the direction of the light.
When shooting full-length shots, the lights will be further away from the model than when you shoot just a head shot. This will increase your exposure time so higher film speed may be necessary. Daylight balanced films work best. I suggest print film when doing this because of the extra latitude of the print film in comparison to slide film. You can use slide film if you want, but you will have to be more precise with the lighting and exposures. If you want to accentuate the blues more, you can experiment with tungsten-balanced film.
We also repeated this procedure with exposure times at 1/60 and 1/125. After having these printed, we compared the results to our notes and determined the best exposure. Be sure to tell your lab not to correct your exposure when printing or you won't be able to accurately determine which is your the best exposure. If you are going to try to shoot with slide film, you can use this same procedure and bracket your aperture in 1/3-stop increments. I would ask that the lab leave your test roll unmounted so you will not have to worry about the numbering on the mounts being incorrect. A test like this is needed due to the low intensity of the blacklights and the fluorescent materials. Since these materials will not meter correctly on light meters this will be time well spent.
While you're at it, screw your cable release into your camera and use it to further eliminate any unwanted camera shake. If you are not doing the makeup yourself, let the person who is doing your makeup know what you are looking for and talk about the types of makeup and props you have. Let them see them under the blacklight so they know what the color reflectance will be. As you can see, my makeup artist found a very interesting combination for this shoot. These techniques can also be used to photograph inanimate objects. When doing so, you can experiment with long exposure times and slower films. In either style, be sure to search for items around the house that will illuminate under the blacklights. For example, many white materials reflect a bright blue. Have fun with it!. Approach it as a creative learning experience. Not only do I enjoy the challenge of this kind of shoot, my makeup artist and model enjoyed the unusual experience that this technique allowed.
Model: Kristen
|
|
|
text and photography copyright © 2001 Vivid Light Publishing |
 The
makeup and props are pretty easy to find. Fluorescent makeup can be
obtained at most theatrical supply stores. Art supply and craft stores
sell fluorescent paint, crayons, paper and inks that can be used as
props or to add to backgrounds.
The
makeup and props are pretty easy to find. Fluorescent makeup can be
obtained at most theatrical supply stores. Art supply and craft stores
sell fluorescent paint, crayons, paper and inks that can be used as
props or to add to backgrounds. When
setting up for this, you want to shoot in a room that is completely dark
with the only illumination coming from the blacklights. You'll need to set the lights in place to evenly light your model.
Get them as close as possible to the subject without getting them into your
frame. You may also want to try adding aluminum foil reflectors to the
tubes.
When
setting up for this, you want to shoot in a room that is completely dark
with the only illumination coming from the blacklights. You'll need to set the lights in place to evenly light your model.
Get them as close as possible to the subject without getting them into your
frame. You may also want to try adding aluminum foil reflectors to the
tubes. 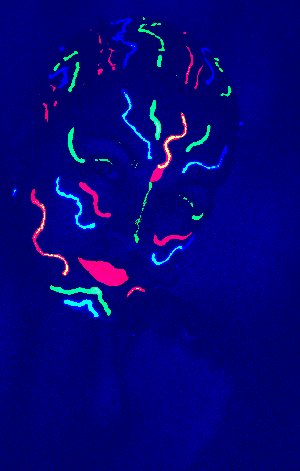 You'll
need to choose your film carefully. When using a live model as
we did, you have to take into consideration that the human body will
always have some movement to it and with the low intensity of these types
of lights you will have longer than average exposure times.
You'll
need to choose your film carefully. When using a live model as
we did, you have to take into consideration that the human body will
always have some movement to it and with the low intensity of these types
of lights you will have longer than average exposure times. 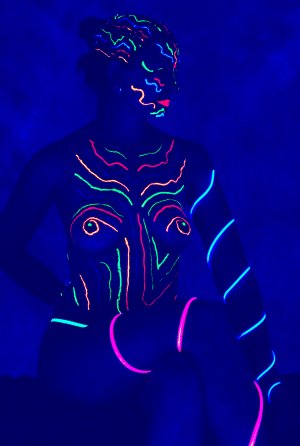 We
shot this session with an ISO 800 print film and had an exposure of f/4
at 1/30. This exposure was determined by shooting a test roll once our
light set up we decided on. The roll was exposed starting at f/2.8 at
1/30 (because this was the slowest we wanted to shoot at for a live
model) and I bracketed apertures up to f/11.
We
shot this session with an ISO 800 print film and had an exposure of f/4
at 1/30. This exposure was determined by shooting a test roll once our
light set up we decided on. The roll was exposed starting at f/2.8 at
1/30 (because this was the slowest we wanted to shoot at for a live
model) and I bracketed apertures up to f/11. 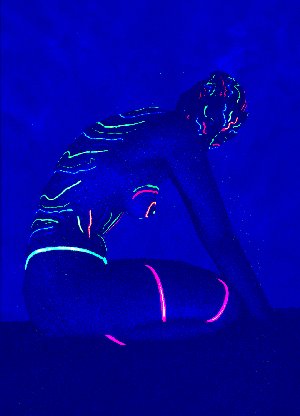 One
of the most important pieces of equipment you will need to use is a
tripod. This will be a necessity because of the long exposure
times. Don't be over
confident in your ability to hand hold your camera at a slow shutter
speed. You're dealing with a live model with a long exposure; don't add
more uncertainty to the equation by not using the tripod. It will definitely be worth it.
One
of the most important pieces of equipment you will need to use is a
tripod. This will be a necessity because of the long exposure
times. Don't be over
confident in your ability to hand hold your camera at a slow shutter
speed. You're dealing with a live model with a long exposure; don't add
more uncertainty to the equation by not using the tripod. It will definitely be worth it.