|
|
|
|
|
|
| Exposure Compensation The Pluses and Minuses
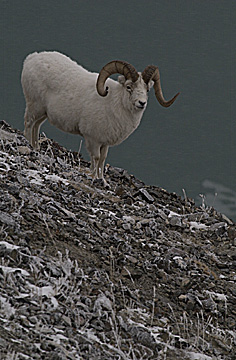
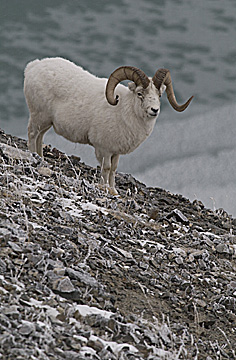
"What is Teddy Bear light?" you ask. Those who are familiar with me, my book, Nikon Guide to Wildlife Photography or my website have at some time or another come across my Teddy Bear exercise for exposure compensation. Photography is all about the quest for the perfect light. Quite often though we find it's less than perfect and as photographers, we have to make compromises by dialing in exposure compensation. I'm not talking about making up for bad metering; I'm talking about dialing in compensation because of what we want to communicate!
How do you know how much exposure compensation to dial in? That's the whole point of the Teddy Bear Exercise. Despite what you might have read, there is no one correct formula for exposure compensation based on a particular metering system, subject or light. The perfect exposure just like the correct amount of exposure compensation comes back to you, the photographer. Knowing what is right or wrong, too much or too little comes from your own shooting. But who wants to be learning when the photo of a lifetime appears in the viewfinder? While I'm typing, a Pileated Woodpecker comes into a dead, silvery tree trunk that's in full sun. Why don't I run out and try to capture this striking black and red bird on film? It comes from having done the Teddy Bear exercise and knowing what I can and cannot do and what the results will be! Just what is exposure compensation? Many don't know what this is even though it's talked about all the time. Conventional film has a three stop range of light that it can hold. When the light levels that you're shooting in are beyond this range you are either going to lose detail in the highlights or the shadows. Which is going to lose out, highlight or shadow, and by how much is determined by exposure compensation. With exposure compensation, just like most everything else in photography, you are deciding what you're going to communicate and what you're not going to communicate in your photograph. You could look at exposure compensation as a way of trying to make up for shooting in bad light. Does this mean that if you're shooting in good light, you don't need exposure compensation? Nope, it just means that if you're shooting in bad light, it's almost guaranteed you'll need exposure compensation (with some cameras, this is done for you and you probably don't even know it). You can avoid this whole thing by learning to recognize good light and then just shoot in it. The first thing is easy to do the second is not!
Generally speaking, we use exposure compensation to prevent our highlights from burning up. We're looking for detail in our highlights while sacrificing the detail in the shadows. This is the norm and depending on what medium you're shooting, positive, negative, B&W or digital determines how you're going to go about saving highlight detail. This is where the Teddy Bear exercise comes in. Our goal is real simple. We're going to create our own, personalized, master set of exposure compensation images. These personalized images are based on how you expose your film with your meter with your lab. You can't get more customized results than this! Once you've done the exercise, you can look at the images on your light table and see for yourself just what works and what doesn't and when. So when that image of a lifetime does appear, you'll be ready. If you hadn't thought this whole thing through yet, the Teddy Bear exercise is just another method to get the image right, right from the start! As you might have gathered, I don't bracket for exposure. There are many reasons for this that I won't go into right now. But the bottom-line is, because of my work with teddy bears, I know when and how I want exposure compensation. The Teddy Bear exercise is done best with three teddy bears, white, tan and black. You're looking for stuffed animals that have a fur and not a carpet coat. You want glass eyes if possible so you can see the flash reflecting back at you (you should do the TB exercise for both ambient and flash). And you want them at most, 12" tall. With these in hand, you set them up in full sun, partial sun/shade and total shade. You then follow the compensations listed below and shoot your examples. You can expand on this exercise by adding additional lighting types and patterns. You can do it in overcast skies, sidelight, backlight or whatever type of light you can think of and want to learn more about. It's really simple and will, I guarantee, save your exposure butt some day! If you did the Teddy Bear exercise for conventional film and think it equally applies to digital now that you have switched, think again! Digital with its five stop range of light is totally different from conventional. When I switched to digital, I did the Teddy Bear exercise all over again and I learned that for myself, I didn't like 1/3 stop exposure compensation increments, I liked ½ stop better. I also learned when I liked it better. That's the whole point. We're working on making exposure the essential tool for our communicating. We're using exposure compensation as one way to fine tune this tool so we can be as effective as possible!
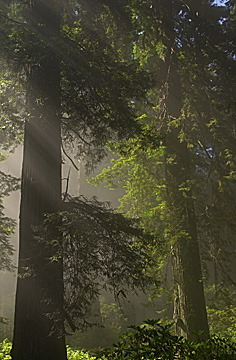
Let me give you some ideas of just how I use the information from the Teddy Bear exercise in my own photography. Let's say I'm shooting in a forest where I have light flooding in from above with God Beams spot lighting here and there. By having exposure comp in my head, I know I want to underexpose to let the shadows go darker, making the beams brighter. When shooting in overcast or no light, I know that I want to dial in +1/2 to "brighten" the scene to my taste. Neither one of these examples is because the meter did something wrong or was fooled, but it was because of what I wanted to communicate! Exposure and exposure compensation have received a really bad rap over the decades. Most photographers have been led to believe that it's all based on some silly gray card and other formulas, which never take into account the most important aspect of exposure, YOU! You have something in your mind and the only way the rest of us will ever see that is if you capture it on film. There is no one perfect exposure that if you don't dial it in, some photo cop is going to come by and arrest you. The vast majority of the time, the only person who knows what truly was the right exposure was you, and half the time, we forget what it was as well. We're in the pursuit to communicate, use exposure compensation to brighten up your highlights or darken your shadows so we all can see the light! Use these charts for your teddy bear tests
|
|
||||||||||||||||||||||||||||||||||||||||||||||||||||||||||||||||||||||||||||||||||||||||||||||||||
|
|
|
|
|
|
|
|
|
 I've
just finished my morning project in the Santa Cruz Mountains. I'm looking
out from my office at the light streaking through the oaks on the
chipmunks, squirrels, birds and lizards going about their routine. From my
office window (the open doors of the shell of my truck) I can shoot out
while I type. I have to wait to shoot though until either the subject is
in one of the rays of light or I can use flash or dial in exposure
compensation. The kind of lighting I have available to me in my campsite
is classic Teddy Bear light!
I've
just finished my morning project in the Santa Cruz Mountains. I'm looking
out from my office at the light streaking through the oaks on the
chipmunks, squirrels, birds and lizards going about their routine. From my
office window (the open doors of the shell of my truck) I can shoot out
while I type. I have to wait to shoot though until either the subject is
in one of the rays of light or I can use flash or dial in exposure
compensation. The kind of lighting I have available to me in my campsite
is classic Teddy Bear light!