|
|
|
|
|
|
| Family Time: Let’s learn to focus! by Bill Hartley
Finding our subject through the viewfinder is the
first step in photographing it. Focusing
is the second step. Only
through properly focusing our cameras can we ensure getting good sharp
photographs - not fuzzy soft ones. When
a photographer refers to a sharp image, they are referring to how a
picture looks; if an image is sharp, the details in the photograph are
clear and clean, lines are crisp, and colors “pop” off the page.
You get sharp images by focusing properly. Back in the old days learning how to focus a camera
was one of the more difficult tasks a photographer would have to do in
order to take good photographs. Because
of this difficulty, camera manufacturers developed fixed focus and
autofocus cameras, enabling more people to get better pictures. Almost every consumer camera sold today comes with
one of three different types of focusing abilities: fixed focus,
autofocus, or manual focus. Some
of the more advanced cameras allow you to choose between auto and manual
focusing. Let me describe each type so you can tell which you
have: Using Fixed Focus.
Make sure your subject is at least four feet from your camera.
Then compose your image while looking through the viewfinder.
Once composed, depress the camera shutter release button and take
the picture. A quick way to determine how far four feet is, look
across your kitchen table, side to side.
If you are sitting in one chair and your child or friend is sitting
across from you, they will be about four feet away. Autofocus.
Most cameras beyond basic point and shoot cameras sold today are
autofocus cameras and there is quite a range among them - from basic
autofocus to top-end pro systems. The
lenses of these cameras can do the focusing work for us.
It is important to know, however, the camera does not focus on
everything you see through your viewfinder.
It only focuses on one point.
With a few exceptions it will focus on a pinpoint that you’ll see
in the very center of the viewfinder.
Although this is usually not a problem, you do need to keep it in
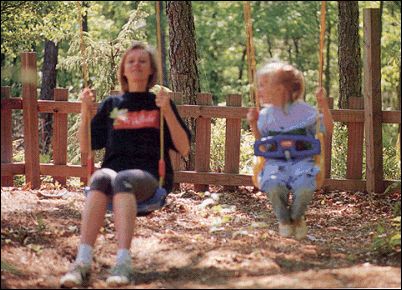
mind. For example, if you
have two friends on swings and you position them evenly in the viewfinder
frame, your camera will focus on the center point.
In this case, it will be in between the two, picking up the
background (which will be in focus) and leaving your friends out of focus
(see images below). In a minute I’ll explain how to keep this from
happening. Using Autofocus. Step
2: Depress the shutter
release button slightly (halfway) with your right index finger.
This will activate the autofocus mode. You should see your subject
moving back and forth slightly in the viewfinder (very little movement,
you may need to look hard). The
simpler cameras will not have a feature that will enable one to see. When the movement (the camera’s focusing) stops, your
subject is in focus. Then
depress the shutter release button completely.
It’s that simple.
There are, however, a few other things you need to
know about autofocus in order to take the best possible photographs and
solve problems like the one with your swinging friends. Your camera’s
autofocus goes into operation only when you depress the shutter release
button all the way down, without pausing, your camera may not have enough
time to focus properly. Which
in turn, may cause your photographs to be soft and out of focus – the
camera needs time to focus. If
your autofocus keeps moving back and forth, this means your camera is
unable to focus. You are most likely too close to your subject or there
isn’t enough light. Autofocus won’t work if it’s too dark. Most autofocus cameras today come with built-in
focusing locks. This means
that once your camera has focused, it will remain focused or locked at the
initial given focal distance until you let up off the shutter release
button. [Below left and right:
.] This focus lock feature can be used to solve the above problem we had with our friends. Remember, I wanted them in focus and not the background. Step 1: Place
the center of your viewfinder frame on one of your friends. Step 2: Put
your camera in focusing mode by depressing the shutter release button. Step 3:
Focus on your subject and continue holding the shutter release
button down. This will put
your camera into the locking mode. Step 4: Recompose
your image by moving your camera around.
Then depress the shutter release.
It is that easy. Note: Do
not take the pressure off the shutter release button, you need the camera
to stay focused at the point of your subject, if you release pressure, the
camera will refocus. As you can see this focus locking function can be a
big help in certain situations. In
most cases you need to remember to take your finger off the shutter
release button then depress it again, every time you want to focus and
take a photograph.
Manual
Let’s look at how focusing works in some traditional cameras and
today’s single lens reflex (SLR) cameras.
SLR cameras come with many different types of focusing screens
(what you see in the camera’s viewfinder).
The most common focusing screen is called a split-image screen.
When you look through your camera’s viewfinder at your subject,
it will appear split in half, top to bottom.
In order to focus on a subject, you need to have both halves, top
and bottom, lined up with each other to form a complete scene. The pictures on this page show a subject out of focus and the
same subject in focus. Using Manual Focus. Step 2:
Use your thumb, index and middle fingers to rotate or turn the lens
focusing ring back and forth. You roll the focusing ring of your lens, clockwise or counter
clockwise. If the halves move
farther apart when you rotate the focusing ring, turn the ring in the
other direction. When both
halves line up to make a complete image, without a step between halves,
you’re ready to take the picture. A good way to practice your SLR focusing technique is to first focus on subjects with straight edges and lines. A straight line is easy to see if it is lined up or has a step. Always make sure the line becomes continuous or one piece in the screen, if it’s not, you will have an out of focus photograph. After you have mastered straight lines, try curved lines. Curved and squiggling lines are much harder to focus on. Then try to see how fast you can get a subject into focus. Focusing with manual camera takes practice but once you get the hang of it, it’s easy. |
|
|
|
|
|
|
|
|
|
 In
last month’s column we discussed how to look through the camera’s
viewfinder, and learned that if you can’t see it, you can’t photograph
it.
In
last month’s column we discussed how to look through the camera’s
viewfinder, and learned that if you can’t see it, you can’t photograph
it.