|
|
|
|
|
|
| Picturing it Wide!
Our vision is captured on a two-dimensional plane - film. To be effective communicators though, we must communicate in a three dimensional language! To accomplish this, our photographs must include a definite fore, middle and background. These three distinctive planes create a visual depth to our photograph. They provide a visual space for our minds to roam, to step into and explore the scene as if really standing on the threshold of the vista. But we need to go beyond this basic building block in our landscape portraits to really inspire others by our vision. We need to use lighting and other techniques to bring drama to our scene. We start by understanding our limitations: physics. In the 35mm format, the 50mm lens is the "normal" lens (that "closest to our vision"), which has an angle of view of 46°. The effective focal length of a typical eye though is 17mm! This focal length combined with the curved retina produces an angle of view of approximately 180°! Photographically, the fisheye lens with its 180° coverage is the only lens that comes close to our binocular vision. Now examine the angle of view of the wide angles available to us. The Nikon 14mm has 114°, 18mm has 100°, 20mm has 94°, 24mm has 84°, 28mm has 74° and 35mm has 62°. Adding to this angle of view disparity is that our eyes have about nine times more depth-of-field than they do. The challenge waiting for us when picturing that majestic panorama is to get all we see communicated on film. Our wide-angle technique starts with understanding what is the subject. The "landscape" itself is normally not the "subject." Usually, there is an element in the landscape that originally attracted our attention to the scene. Whether it's the grandeur of an incredible sky or the backlighting on a small bush, something stopped us in our tracks. Because our vision is so wide, we take in thousands and thousands of elements giving life to that one subject. We must isolate all our sensory input to focus on just that one subject. We must photographically isolate that subject, making it pop to communicate about it and the world in which it lives.
When helping other photographers better define their landscape portraits, there is one thing I commonly suggest to help improve. I recommend they move their tripods closer to the subject and lower to the foreground. No matter if working on the edge of the Grand Canyon or the tundra of Alaska, there is always enough room to get closer. This technique accomplishes a number of things, mainly eliminating a lot of unwanted elements confusing the issue of what is the subject. No matter the focal length, this technique improves a photograph. It also heightens the importance of the foreground (which may or may not contain the subject), thereby giving our photograph a visual depth.
Getting close and low helps communicate even more. Wide angles will make elements far away appear small no matter how large they are in reality. By having a large element in the foreground, we are emphasizing this size difference, reinforcing visual depth. We also create a certain tension in the photograph, a mental path for the viewer to travel back and forth through the photograph over the sweeping middleground. It's often in these travels that the other elements that make the photograph unique are discovered. It's not hard to see why capturing those stunning landscapes takes more than just attaching a wide angle and shooting. The best technique for capturing everything in focus in that sweeping landscape is to focus the lens at its hyperfocal distance. The Encyclopedia of Photography defines hyperfocal distance as "Maximum depth of field in any situation is given by use of the hyperfocal distance set as focused distance on the focusing scale of the lens." The gist of the theorem is the hyperfocal distance's is the point where everything in a photograph sharp is rendered sharply.
This theorem can come across as confusing and complicated. Just reading about doesn't help learning it like actually working through the procedure in the field will. You can do like many (including myself), focus on the middleground and close the aperture down all the way. While not a perfect solution, it is a quick and dirty way of getting it right when time is against you. Hey, there are times when you can't get the camera set up fast enough to capture that unique cloud or fleeting last ray of light to properly dial in every technique by the book. When time allows though, it sure can help to take advantage of all the tools and techniques available to us. The most obvious difference (and probably the biggest) when comparing images taken with different focal lengths is the size of the subject. When selecting a wide angle, consideration for subject size is just as important as how much of the scene is to be captured. The wider the lens, the smaller the subject and vice versa. When the moon is out, madness seems to strike photographers. They go through incredible contortions to include it in the frame. When shooting a landscape with a wide angle, the moon will be no more than a mere white spec though (looks like a mistake from the lab). This is a time when honest consideration of what the real subject is becomes vital to success. If the subject is distant and small, consider using a longer lens, 28mm or 35mm. If the subject is large but still far away, consider using a 24mm to 35mm. And if the subject is large and close, try any of the really wide lenses.
One technical problem inherent with wide angles is wide exposure ranges. Including the entire world in a photograph can bring with it a seven stop or greater exposure range. Landscape portraits are easiest when taken during those magical hours of light, early morning and late evening. It's during these hours that the exposure range is naturally compacted within the general realm of film. These are also the hours when light has the greatest amount of mood and drama. The warm color and long shadows can often create a photograph where there was none before. It can also be fleeting, gone before the camera can ever be set up and fired. Never take for granted the importance of light in making or breaking a landscape photograph! The capturing of light is the true essence of photography. In landscape portraits, that's especially true. Generally, we need a certain amount of contrast, shadows, to visually communicate shape, distance and depth in a scene. That contrast can be effective when very low and we can see detail in the shadows. It can also be effective when the shadows are inky black. Often in landscapes, shadows that fall at an angle to the scene are the most dramatic. Using shadows to isolate subjects eliminates unwanted elements and creates visual depth. This is a very important use of light to communicate. Volumes can easily be written about light. But for this article and this application, I feel understanding shadows and shadow control is important. An important tool in compacting exposure is the split graduated neutral density filter. They come in many forms; Tiffen manufactures both square glass and screw-in, rotating frame versions. The idea behind them all is the same: hold back exposure on one half of the photograph while normally exposing the other half. Generally, these filters are used to underexpose the sky since it is normally the brightest in a scene. Bringing it into the exposure range of the film, the foreground is correctly exposed then. But the filter can be turned to add drama and give direction to the lighting, even if there is none. Since it underexposes by two stops at the darkest part of its filtration (they come in 1 and 3 stop as well), this can be used to darken a portion of the photograph. This in itself can add visual depth to a photograph. With all these techniques, ideas and tools, is anything carved in granite? Not even! Mother nature has created such a tremendous variety that anything is possible. Leading lines in a scene has been a common theme in landscape portraits since the dawn of photography. Light itself can change or make its own rules. A scene that one moment can look like #$%# can the next minute be the photograph of a lifetime, transformed simply by the light. So never pigeon hole your wide angle or imagination to what I or anyone else has written!
The subject, the true subject, will always be what dictates the lens to be used. That's a limiting enough factor; I surely don't want to strap your imagination further with my thoughts. But rather, I'd like you to use your wide-angle to its fullest to help you stretch your imagination, make your own rules. The world is a grand and glorious place, one in which we are uniquely suited to render and express to others. Take what is written here and make it the first word in exploration with wide angles. Make the final word those beautiful pictorials that bring to life the magic of the landscape portrait! |
|
|
|
|
|
|
|
|
|
|
 It
was once said of me that I photograph the world only through a wide-angle
lens. It's true that I see the natural world as a grand and mysterious
place and I often use wide angles to explore and relate my discoveries to
others. I encourage others to likewise explore their world with wide
angles, stretching their use beyond the realms of the basic landscape. The
gift of the wide-angle to photography is more than a mere stretching of
our photographic horizons. They stretch our imaginations!
It
was once said of me that I photograph the world only through a wide-angle
lens. It's true that I see the natural world as a grand and mysterious
place and I often use wide angles to explore and relate my discoveries to
others. I encourage others to likewise explore their world with wide
angles, stretching their use beyond the realms of the basic landscape. The
gift of the wide-angle to photography is more than a mere stretching of
our photographic horizons. They stretch our imaginations!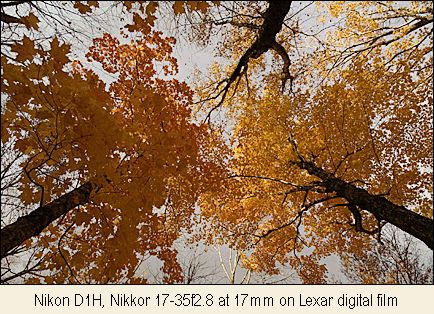 Becoming absorbed in a panorama, our imaginations roam its every inch
and very fiber. This is one of the greatest attractions to landscape
portraits. How many times have you been lost gazing through your
viewfinder at the grandeur captured by your wide angle? How many times
when the film gets back, has that feeling not been preserved? The simple
application of a wide angle doesn't guarantee a great landscape
photograph!
Becoming absorbed in a panorama, our imaginations roam its every inch
and very fiber. This is one of the greatest attractions to landscape
portraits. How many times have you been lost gazing through your
viewfinder at the grandeur captured by your wide angle? How many times
when the film gets back, has that feeling not been preserved? The simple
application of a wide angle doesn't guarantee a great landscape
photograph!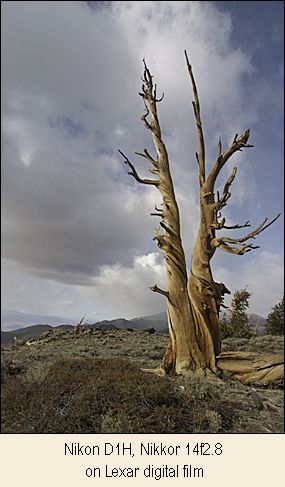 This is where deciding how wide is wide enough strikes fear in many.
Remembering my first and only rule when using wide angles should help
overcome this. Get Rid Of The Junk! The relationship of subject and its
world is how we select the right wide angle for the photograph. You must
be honest to yourself and the scene, deciding what elements really
communicate what the subject is. For example, if your subject is a small
bush against a rocky slope, what does the tree branch framing the top of
the photograph have to do with that bush? The drive to find something in
the photograph to "frame" comes from not understanding what is
the subject. It also comes from trying to kill apparent dead space. Of
course there are always exceptions. But eliminating the junk in the
photograph will make communicating about the subject much clearer, the
photograph having greater impact!
This is where deciding how wide is wide enough strikes fear in many.
Remembering my first and only rule when using wide angles should help
overcome this. Get Rid Of The Junk! The relationship of subject and its
world is how we select the right wide angle for the photograph. You must
be honest to yourself and the scene, deciding what elements really
communicate what the subject is. For example, if your subject is a small
bush against a rocky slope, what does the tree branch framing the top of
the photograph have to do with that bush? The drive to find something in
the photograph to "frame" comes from not understanding what is
the subject. It also comes from trying to kill apparent dead space. Of
course there are always exceptions. But eliminating the junk in the
photograph will make communicating about the subject much clearer, the
photograph having greater impact!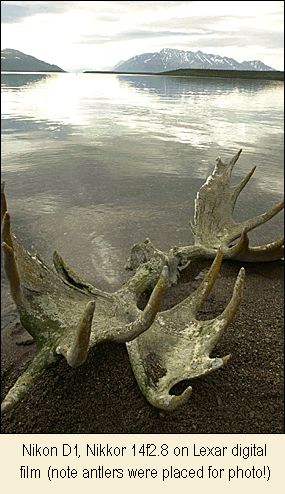 What one element do all panoramas no matter how big or small have in
common? They all have a sweeping area of land connecting where we're
standing to the horizon. Often in getting close and low to the foreground,
we tilt the lens downwards. This "exaggerates" the middleground,
the sweeping area connecting our foreground and background. The wide angle
without any help from us will capture this, but we want more. We want to
visually hit the viewer of our photograph on the head and say, "Look,
this is really grand!" Providing an element or the subject in the
foreground increases this feeling. This increases the visual depth of the
photograph and even when photographing a physically small patch of land,
can make it seem vast. This also de-emphasizes unwanted elements that we
cannot eliminate from the scene.
What one element do all panoramas no matter how big or small have in
common? They all have a sweeping area of land connecting where we're
standing to the horizon. Often in getting close and low to the foreground,
we tilt the lens downwards. This "exaggerates" the middleground,
the sweeping area connecting our foreground and background. The wide angle
without any help from us will capture this, but we want more. We want to
visually hit the viewer of our photograph on the head and say, "Look,
this is really grand!" Providing an element or the subject in the
foreground increases this feeling. This increases the visual depth of the
photograph and even when photographing a physically small patch of land,
can make it seem vast. This also de-emphasizes unwanted elements that we
cannot eliminate from the scene.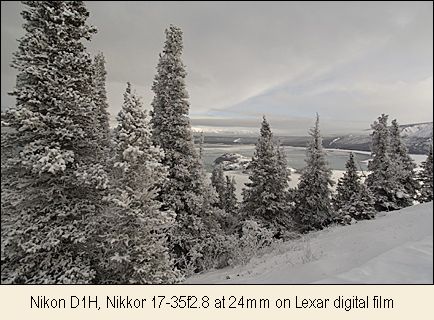 Applying HFD requires first focusing on the closest element in the
foreground included in the photograph. Second, take note of the footage on
the distance scale for that distance of the element just focused on. Next,
turn the focus ring as if focusing on infinity, stopping when the distance
mark just determined in step two is opposite the f/stop mark on the
depth-of-field scale (missing on many AF wide angles) for the aperture in
use. This must be set on the mark on the minimum focus side of the scale
and not on the infinity side. With this, the lens is set at Hyperfocal
Distance. Everything from the closest element to infinity will be in
focus.
Applying HFD requires first focusing on the closest element in the
foreground included in the photograph. Second, take note of the footage on
the distance scale for that distance of the element just focused on. Next,
turn the focus ring as if focusing on infinity, stopping when the distance
mark just determined in step two is opposite the f/stop mark on the
depth-of-field scale (missing on many AF wide angles) for the aperture in
use. This must be set on the mark on the minimum focus side of the scale
and not on the infinity side. With this, the lens is set at Hyperfocal
Distance. Everything from the closest element to infinity will be in
focus.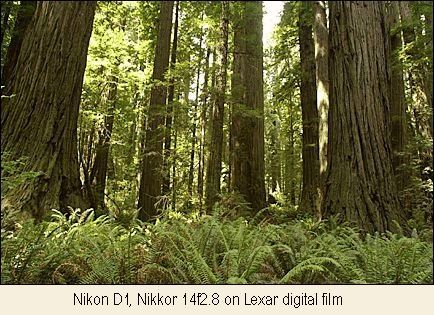 Those new to wide-angle photography are often concerned with
distortion. Let me ask one question, who will ever know if what you
photographed was straight? If you are photographing buildings that's one
thing, but we're talking about landscapes here. How many have seen a
perfectly straight tree? Aren't most of them imperfect, leaning in some
way? What land mass, fence line or shrub is straight? The point is, even
if distortion is present, who will know? This one problem stops many from
ever trying ultra wides or fisheyes when it shouldn't. Test yourself and
look at the photographs with this article, can you tell which ones were
taken with the fisheye? Did you know that if you place the horizon line
through the middle of the frame, the fisheye's affect on the horizon line
is nullified?
Those new to wide-angle photography are often concerned with
distortion. Let me ask one question, who will ever know if what you
photographed was straight? If you are photographing buildings that's one
thing, but we're talking about landscapes here. How many have seen a
perfectly straight tree? Aren't most of them imperfect, leaning in some
way? What land mass, fence line or shrub is straight? The point is, even
if distortion is present, who will know? This one problem stops many from
ever trying ultra wides or fisheyes when it shouldn't. Test yourself and
look at the photographs with this article, can you tell which ones were
taken with the fisheye? Did you know that if you place the horizon line
through the middle of the frame, the fisheye's affect on the horizon line
is nullified?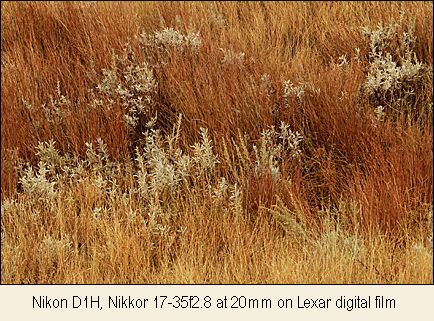 The photographs that accompany this article have a purpose, to visually
illustrate the strengths and difference of various focal lengths. No
matter the focal length of your wide angle, 18mm, 24mm or 35mm, or a
wide-angle zoom, all these techniques apply. I would love to say that when
you have a scene containing X, Y, and Z you must use this focal length.
But it doesn't work that way. The spectacular panoramas of Mono Lake serve
to visually illustrate how various focal lengths communicate differently.
Notice in them how much is included in a scene and how small or large
elements are rendered. Studying the photographs of others is still a very
valid method of learning more about our own photographs. I hope these
photographs open up doors to your wide-angle imagination and stretch it to
the limit.
The photographs that accompany this article have a purpose, to visually
illustrate the strengths and difference of various focal lengths. No
matter the focal length of your wide angle, 18mm, 24mm or 35mm, or a
wide-angle zoom, all these techniques apply. I would love to say that when
you have a scene containing X, Y, and Z you must use this focal length.
But it doesn't work that way. The spectacular panoramas of Mono Lake serve
to visually illustrate how various focal lengths communicate differently.
Notice in them how much is included in a scene and how small or large
elements are rendered. Studying the photographs of others is still a very
valid method of learning more about our own photographs. I hope these
photographs open up doors to your wide-angle imagination and stretch it to
the limit.