Magnificent Raptors!
 It's
a hot August day. We sit and wait, scanning the horizon. There is no shade
and all we see is Southern California chaparral stretching before us as
far as the eye can see. We're on a ridge looking to the east at the floor
of the San Joaquin Valley with all of its agricultural fields below us and the
Tehachapis far off in the distance. With no warning, we hear the rush of
wind first behind us and then overhead. "Sneak attack!" the cry
goes out as we stand up at the same time, bringing our bins to our eyes. A
giant shadow envelops us briefly as a California Condor wings on by, not
ruffling a feather as it gracefully floats by us on winds it has soared on
for a millennium. It's
a hot August day. We sit and wait, scanning the horizon. There is no shade
and all we see is Southern California chaparral stretching before us as
far as the eye can see. We're on a ridge looking to the east at the floor
of the San Joaquin Valley with all of its agricultural fields below us and the
Tehachapis far off in the distance. With no warning, we hear the rush of
wind first behind us and then overhead. "Sneak attack!" the cry
goes out as we stand up at the same time, bringing our bins to our eyes. A
giant shadow envelops us briefly as a California Condor wings on by, not
ruffling a feather as it gracefully floats by us on winds it has soared on
for a millennium.
 It's 1983 and Sharon and I are at the "Sign" working with
biologists to photograph the last remaining California Condors. Our goal
is to photograph the condors in flight, capturing on film their primaries
fully extended so individual condors can be identified. This is at a time
when there were only 17 condors left in the wild, in the world! I first
learned how to photograph birds in flight, raptors, with the California
Condor. My fascination and love for this group of birds that started at
that hot, dusty sign with these masters of the air has only grown from
those early days. It's 1983 and Sharon and I are at the "Sign" working with
biologists to photograph the last remaining California Condors. Our goal
is to photograph the condors in flight, capturing on film their primaries
fully extended so individual condors can be identified. This is at a time
when there were only 17 condors left in the wild, in the world! I first
learned how to photograph birds in flight, raptors, with the California
Condor. My fascination and love for this group of birds that started at
that hot, dusty sign with these masters of the air has only grown from
those early days.
Is photographing raptors all that different from photographing birds in
general? In many respects no, much of the same techniques I've already
described on the pages of Vividlight about photographing
birds applies to raptors. But then there are some very specific
techniques unique to raptors. It's both of these I want to share with you
this month.
 A Quick Review - The Basics A Quick Review - The Basics
This section is not new; this is a retread! But I can't emphasize enough
the importance of proper handholding and long lens technique. Both
techniques require that you first have an eyecup on your camera. This acts
like a shock absorber between you and the camera. Second, both of these
techniques demand that you practice them. These are not techniques I
invented but they are ones I practice even today! What do I mean by
practice? I mean, if I'm not shooting this day, I will pick up my camera
and practice my technique. Why? I want the techniques to be second nature;
I want to do them without thinking about them so all of my concentration
is on just the subject!
Proper handholding consists of making
yourself into a tripod, that's to say, providing your camera with three
points of contact. First, bring your elbows into your sides. Second, cup
the lens in your left hand. Third and lastly, pull the camera back against
your forehead, using the eyecup. You don't hold your breath and slowly let
it out. You don't grip the lens from the top so gravity is pulling it out.
You do practice this simple technique so when you put the camera to your
eye, you're good to go!
 Proper long lens technique is just as important though it has fewer
steps to remember. This technique is for any lens that you attach directly
to a tripod. The two things you need to do are, rest your left hand on
your lens barrel just like you rest your hand in your lap and press your
eye up against the eyecup. With both of these two techniques, all we're
dealing with is physics and in this case, the physics of movement. In both
cases we are working at stopping the wave that's normally created by the
firing of the camera that travels to the front of the lens and then
travels back to the film plane where it causes images to be out of focus. Proper long lens technique is just as important though it has fewer
steps to remember. This technique is for any lens that you attach directly
to a tripod. The two things you need to do are, rest your left hand on
your lens barrel just like you rest your hand in your lap and press your
eye up against the eyecup. With both of these two techniques, all we're
dealing with is physics and in this case, the physics of movement. In both
cases we are working at stopping the wave that's normally created by the
firing of the camera that travels to the front of the lens and then
travels back to the film plane where it causes images to be out of focus.
Panning is a technique where you keep the film plane traveling in
relationship with the subject's movement. You do this by literally moving
the camera, a scary thought to many. If handholding, you use proper
handholding technique and twist at the trunk to follow the subject in the
viewfinder. If tripod bound, you use proper long lens technique and pivot
the lens on the tripod again following the subject in the viewfinder.
These three essential techniques are not new and should not be new to
Vividlight readers. Search through the archives
and you'll find I've written about them before. You'll find I'll write
about them again as they are essential to our success. Now, let's get on
with photographing raptors!
Background
 We're photographing magnificent creatures, so nothing but the best can be
behind them! We need backgrounds in our photographs that make our subject
pop. The background should also tell some part of the story. This is
especially true about flight. While many don't think about it, the great
images have the great backgrounds.
We're photographing magnificent creatures, so nothing but the best can be
behind them! We need backgrounds in our photographs that make our subject
pop. The background should also tell some part of the story. This is
especially true about flight. While many don't think about it, the great
images have the great backgrounds.
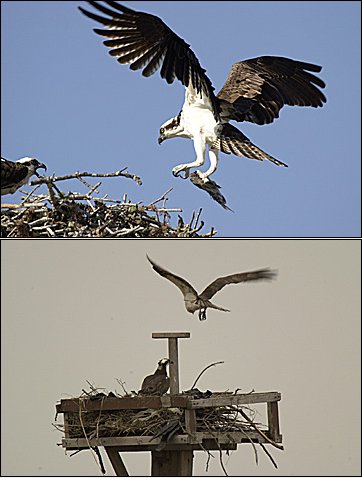
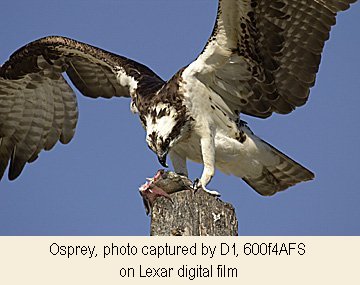
There is one rule about flight photography you cannot ignore, and
that's not to photograph flying birds against gray sky backgrounds. This
means that when it's overcast, you don't point the lens up. The two
photographs of the Osprey flying into the nest are perfect examples of
what I'm talking about. The visual impact of the image with the blue sky
background screams volumes about what I'm talking about, as the blue sky
has incredible visual impact. But there's more than a visual reason to
refrain from gray skies.
When it comes to metering and light, the gray sky background is a no
win situation. First and foremost, the range of light between the gray sky
and the underside of the wings of the bird is so far beyond the range of
the film, there is no way you can obtain a decent image. If you were to
meter for the shadow under the wing to bring up that detail, the sky would
blow out. Meter for the sky and you'll have a silhouette for a subject.
This is a no win situation, so don't take the photo in the first place!
This goes for perched images as well as flight.
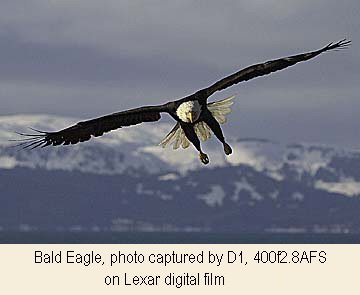 But then again, I don't want you to get hooked on rules. If you look at
the image of the Bald Eagle in flight, you'll notice it's against a gray
sky. So what gives? There is a difference in gray skies believe it or not
and in this case, the gray sky behind the Bald Eagle has light streaming
through it so it's not a solid overcast gray, but a moody gray sky. This
is a fine line, a line between great images and sucky images! But then again, I don't want you to get hooked on rules. If you look at
the image of the Bald Eagle in flight, you'll notice it's against a gray
sky. So what gives? There is a difference in gray skies believe it or not
and in this case, the gray sky behind the Bald Eagle has light streaming
through it so it's not a solid overcast gray, but a moody gray sky. This
is a fine line, a line between great images and sucky images!
They're Made for Flight
One of the most magnificent aspects of birds of prey is their flight! They
were made to ride the wind and tame the breeze. The number of hours I've
just sat and watched raptors on the wing over the decades spans more hours
than I can count. I try to bring this love to my images along with the
graceful presence the birds themselves exhibit. These are some of the
things I think of when I'm photographing raptors on the wing.
 I always leave room in front of the bird when I'm composing. When the
raptor is smaller than half the frame, I compose it so it's flying into
the frame. This means that if the bird is flying left to right, I select
the left AF sensor in my D1H and then pan to the right. If the opposite is
true, then I select the right AF sensor and I pan to the left. Selecting
these sensors naturally forces me to compose how I desire without really
thinking about it. And at the same time, I'm using the AF system of the
D1H to its optimum. The last thing I do, the very last thing, is to center
the raptor! This is the most boring composition and I'd rather not take
the photo if I can't get it out of the center. I always leave room in front of the bird when I'm composing. When the
raptor is smaller than half the frame, I compose it so it's flying into
the frame. This means that if the bird is flying left to right, I select
the left AF sensor in my D1H and then pan to the right. If the opposite is
true, then I select the right AF sensor and I pan to the left. Selecting
these sensors naturally forces me to compose how I desire without really
thinking about it. And at the same time, I'm using the AF system of the
D1H to its optimum. The last thing I do, the very last thing, is to center
the raptor! This is the most boring composition and I'd rather not take
the photo if I can't get it out of the center.
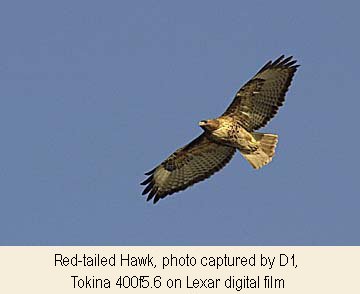
When the bird is smaller than half the frame, how bad is centering,
really? If you look at the images of the Peregrine Falcon, Rough-legged
Hawk and Red-tailed Hawk and you cover up the portion of the image in
front of the bird so you only see the bird, you'll quickly see what I
mean. Leaving room for the raptor to soar into the frame makes all the
difference for success!
 If the raptor fills more than half of the frame then I go for my
favorite shot, corner to corner wing tips. This is, to place the bird of
prey so the wing tips go corner to corner in the frame. This means
typically the bird is flying right at you like the image of the Bald
Eagle. When this is happening, I select the center AF sensor and let it
track the approaching bird while I concentrate on the composition of
corner to corner. If the raptor fills more than half of the frame then I go for my
favorite shot, corner to corner wing tips. This is, to place the bird of
prey so the wing tips go corner to corner in the frame. This means
typically the bird is flying right at you like the image of the Bald
Eagle. When this is happening, I select the center AF sensor and let it
track the approaching bird while I concentrate on the composition of
corner to corner.
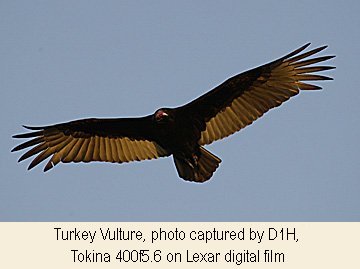
A critical part of the flight equation in flight photography is the
light. A perfect example of this is the photo of the Turkey Vulture. There
is only one way you can capture the grace of this ugly bird in flight and
that's when it tilts its wings up to catch the breeze and the sun lights
up underneath the wing. Now you can have only one wing lit up and be
successful but having both has more visual oomph. You can look at all the
flight shots in this article and see for yourself what I'm referring to.
 Getting this light under the wing, you need to learn to take advantage
of when raptors are "ringing." Ringing is a term from falconry
and refers to when raptors are making circles as they rise up in the wind
currents. You need to watch for this behavior then follow it in your lens,
taking the photo when the raptor banks so all of its underneath feathers
are lit up. Getting this light under the wing, you need to learn to take advantage
of when raptors are "ringing." Ringing is a term from falconry
and refers to when raptors are making circles as they rise up in the wind
currents. You need to watch for this behavior then follow it in your lens,
taking the photo when the raptor banks so all of its underneath feathers
are lit up.
This brings me to the feathers. If you look at all the images in this
article, you'll notice that all of the feathers are in place. All of the
primary and secondary feathers are present, there are no holes. This is
important to me in my bird photography. It's strictly a psychological
thing, but I don't want birds of prey which are so magnificent, looking
moth eaten. This means that I won't photograph a raptor in molt; it must
have all of its feathers present for me to take its photograph.
The Stare!
So uniquely raptor, the stare is an integral part of what makes a raptor,
a raptor. Capturing the stare requires something that can be incredibly
difficult when photographing raptors and that's being eye to eye.
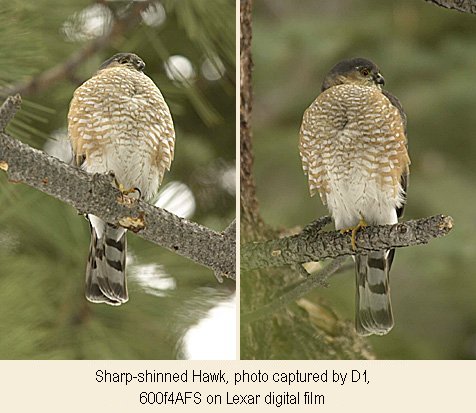
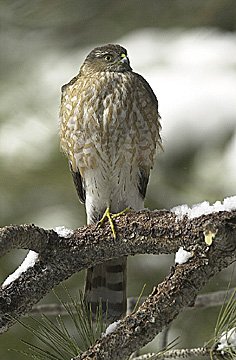
What do
I mean by that? Look at the two images of the Sharp-shinned Hawk. One is taken
from below, an "up the butt" shot as I call it. This is an all
too typical pose folks capture of raptors. I can't stand this pose! To
capture the stature of the raptor and more to the point, the stare, you
must be shooting the raptor at its level. Just look at the other image of
the exact same Sharp-shinned Hawk taken from its level; there's all the
difference in the world between the two images!
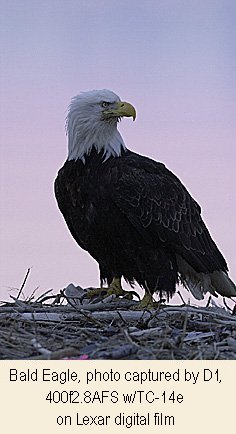
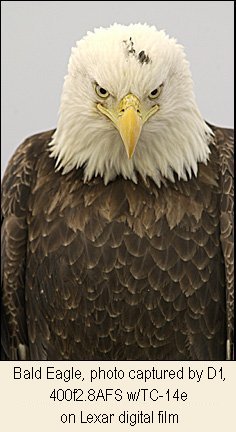 The stare itself is captured by centering the bill in the frame (edge
to edge) and then just waiting until you see the whites of both eyes.
Again, look at the image of the Bald Eagle. The bill is nearly centered
and I'm at the same level as the eagle. In this case, I captured the stare
going down the bill as the eagle was looking down. The triangular shape of
the bill is what draws our eyes into the stare of the raptor and it's this
shape we must utilize to bring our subject and the viewer of our image eye
to eye! The stare itself is captured by centering the bill in the frame (edge
to edge) and then just waiting until you see the whites of both eyes.
Again, look at the image of the Bald Eagle. The bill is nearly centered
and I'm at the same level as the eagle. In this case, I captured the stare
going down the bill as the eagle was looking down. The triangular shape of
the bill is what draws our eyes into the stare of the raptor and it's this
shape we must utilize to bring our subject and the viewer of our image eye
to eye!
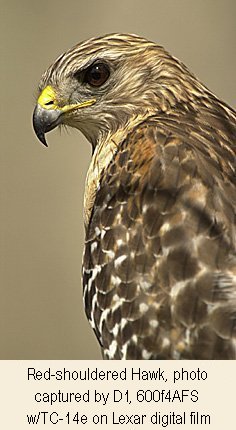
Do you need both eyes to capture the "stare?" No, like you
see in the image of the Red-shouldered Hawk, you can capture the stare
with only one eye visible. The "trick" in making this work to
your advantage is to have the raptor looking down at a slight angle like
with the Red-shoulder. This point like many of the points I've made in
this piece seem trivial but they make the biggest difference in successful
bird of prey photography.
 Similarities
& Differences Similarities
& Differences
All of the techniques I describe here can be used with any bird because as
they say, birds of a feather….. But with raptors, capturing their
eloquence, their majesty and grace requires these techniques be carried
through to the letter. So yes they are the same and yes, they are quite
unique. Let your technique and skill take flight in the challenge of
communicating to others just how magnificent raptors are to all who gaze
up and watch them!
 Subscribe to
Vivid Light
Subscribe to
Vivid Light
Photography by email
Tell
Us What You Think
|