|
|
|
|
|
|
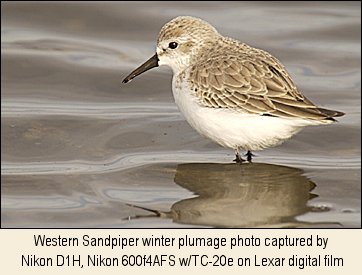
| They're gray… it must be winter!
Getting close
Shorebirds feed mainly on little creatures that live in or on mud. If you want to find shorebirds then, you need to find mud. But it can't be any old mud like you would make pies out of, oh no, it must be A #1 prime mud! What kind of mud is that? Primarily it's mud that is washed by water at least once a day, new mud, one that has a new fresh smorgasbord of critters to munch. Most typically, this is tidal mud found on mudflats on or near the shore (hence the name shorebirds). The larger the mudflats and the bigger the tides, the greater the number of shorebirds will gather there. The more exposed the mud, the greater the number of shorebirds. With this relationship though there are more places for the shorebirds to feed far away from you, which means you either get really muddy chasing the birds or you don't get close physically. That's unless you know a very important secret. That secret is, wait for the high tides to photograph shorebirds! During high tides, shorebirds lose much of their large mudflats and are forced by the water to the edge where you can easily reach your subject and get close physically. Of course, you don't have all day to photograph them as the tides come and go, but it will make your photography more successful and shoes cleaner! Once you have your mud selected it's time to get close. Typically, shorebirds walk the shoreline at high tide, looking for tiny morsels to munch. In this process if you have staked out good mud (you learn good mud from bad with time) the shorebirds will literally walk right up to you! This is by far the most ideal method of getting close to shorebirds. All it takes of course is one bird to come really close and you're in business. I'm sure though you've heard the old saying, "birds of a feather flock together." This is especially true with shorebirds. Once you have one, you will have more as they find comfort and safety in numbers. Your flock of one will grow and with it, your photo ops! Lens selection
I'm also not suggesting you must get down on your belly, though this is a great angle in which to photograph these small birds and control the background. I am talking about getting down low in the sense you minimize the geometric angle of your lens. Getting your long lens as parallel with the ground as possible is what I always try to achieve. The easiest and fastest ways of doing this is by going down hill! Most tidal flats are slopped with the high tide mark being the highest piece of property. Simply walking a little ways out on the tidal flat and shooting up slope reduces the angle of your lens. With that same thought, any natural depression you can find will serve the same purpose just as simply lowering your tripod. However you want to get down is up to you, I'm just strongly hinting that it makes a big difference in your overall photographic success. Don't take your angle of attack lightly! The Sewing Machine Lighting When you're looking for that mud where the birds feed, be thinking about light as well. Think about how shiny the mud is and what is being reflected in that mud. Is the mud smooth or lumpy, clean or full of shells and other natural debris (if there is man made debris, I know you'll dispose of it properly and not leave it there). I know this is an aspect of shorebird photography you've not thought of before. It is essential though if you want to capture the cool shorebird images.
IDing Little shorebirds like Least and Western Sandpipers and Sanderlings tend to flock together in larger numbers than say Greater or Lesser Yellowlegs. Black-necked Stilts and American Avocets tend to stay in one area where Marbled Godwits and Willets move around. These are just a few of the shorebirds you're likely to encounter. Knowing these little pieces of trivia, and much more, will make your time in the field more productive and your photography more successful. Identifying these little gray jobs is a challenge! You can start out by taking your bird ID book into the field, but I don't recommend that, it just gets in the way. You can wait until you get home, and get your images on the monitor to ID the birds, but often you'll find this method doesn't help you learn birds quickly. I propose another way of learning shorebirds - go out with birders! Most folks have Audubon Chapters near them which is by far the best way to learn about birds. These folks are very knowledgeable in not only IDing birds, but where to find them. Tap into this resource to improve your photography! When I did this way back when, I found a birder who would go shooting with me. Not only did he ID the birds for me, but was an outstanding set of second eyes! I've been fortunate for the past twenty-five years to have my wife who is an excellent birder and second set of eyes to help me out as well. This really makes a difference in getting the image!
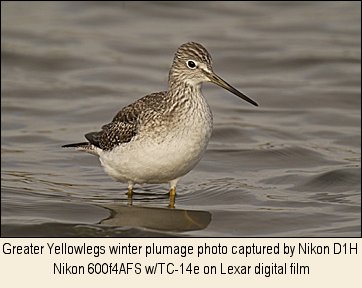
There are two references I need to recommend to you in your quest to ID shorebirds. The Sibley Guide to Birds, and Field Guide to the Birds of North America are a must! My library has over a dozen books on just shorebird ID's but it's these two books I constantly turn to. Don't ever think you know it all about birds because if you're lucky, you never will, that's the fun and challenge. I was recently photographing shorebirds in the San Francisco Bay area when a bird landed right in front of me. It looked a lot like a Greater Yellowlegs, but it was so close, all I could capture was a head shot. It was present for just a few minutes before it took off. Wondering exactly who it was, I watched it fly to see to my amazement a white back and rump. That might not mean much to you if you're not into birds, but that meant it wasn't a yellowlegs. After consulting my books including Shorebirds - An Indentification Guide (ISBN#0-395-37903-2) and consulting a couple of birder friends, it's still a mystery, but that's the fun! That's the cool thing about photographing shorebirds, you just never know who's going to show up! In the winter shorebirds migrate south and in doing so, some end up in places they normally aren't meant to be. That's the fun, that's the challenge and that's the feeling of success getting out and being amongst shorebirds brings you! If you want to brighten up your winter shooting days, turn to the gray and have the time of your life photographing these little gems of the shoreline!
|
|
|
|
|
|
|
|
|
|
|
 Winter
can easily be considered the gray time of year. I'm not talking about the
weather (though that could apply) but rather the color of the shorebirds
we find in our midst. Having molted their bright colors of summer that
they parade around in at the arctic circle, most photographers and birders
only know this group of birds known as shorebirds for their winter grays.
While they might have many shades of gray interspersed with brown, they
are still pretty drab looking. So much so that many photographers don't
tackle the challenge of capturing these amazing world travelers on film.
Winter
can easily be considered the gray time of year. I'm not talking about the
weather (though that could apply) but rather the color of the shorebirds
we find in our midst. Having molted their bright colors of summer that
they parade around in at the arctic circle, most photographers and birders
only know this group of birds known as shorebirds for their winter grays.
While they might have many shades of gray interspersed with brown, they
are still pretty drab looking. So much so that many photographers don't
tackle the challenge of capturing these amazing world travelers on film.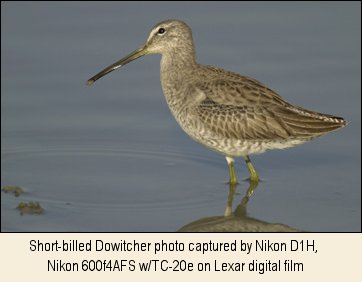 Personally, I can't get enough of them! I love the challenge of
photographing them in the winter as they dart about the bays and ponds of
California. I've traveled north to their nesting ground on the tundra to
observe and photograph them in their spectacular breeding plumage. But
it's in the winter when they're in their gray plumage that I spend the
most time with them, learning about and photographing them. Here are some
of the insights I have picked up in the last twenty years in photographing
shorebirds.
Personally, I can't get enough of them! I love the challenge of
photographing them in the winter as they dart about the bays and ponds of
California. I've traveled north to their nesting ground on the tundra to
observe and photograph them in their spectacular breeding plumage. But
it's in the winter when they're in their gray plumage that I spend the
most time with them, learning about and photographing them. Here are some
of the insights I have picked up in the last twenty years in photographing
shorebirds.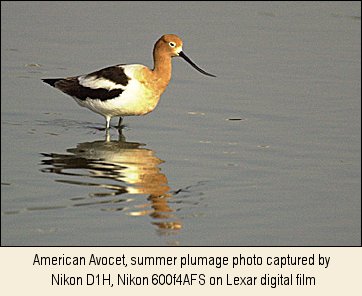

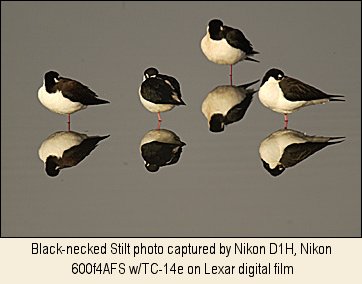 When I talked about getting close physically, I mean close as in 20
feet or closer! This is the minimum distance for me with my 600f4 / 1.4x
combo to get the image size I desire (this is for the smallest shorebird
like a Western Sandpiper, you can be a little further away for the bigger
ones like a Black-necked Stilt). I didn't start photographing shorebirds
though with a 600mm, that wasn't in my budget back then. I started out
with a 400f5.6 and 1.4x, or a 560f8 lens. This shorter combo forced me to
learn many of the tips I'm passing along here. My good friend Arthur
Morris likewise started photographing shorebirds many years ago with a
400mm lens. So it can be done and done effectively but it takes greater
knowledge of the birds, their habits and habitats.
When I talked about getting close physically, I mean close as in 20
feet or closer! This is the minimum distance for me with my 600f4 / 1.4x
combo to get the image size I desire (this is for the smallest shorebird
like a Western Sandpiper, you can be a little further away for the bigger
ones like a Black-necked Stilt). I didn't start photographing shorebirds
though with a 600mm, that wasn't in my budget back then. I started out
with a 400f5.6 and 1.4x, or a 560f8 lens. This shorter combo forced me to
learn many of the tips I'm passing along here. My good friend Arthur
Morris likewise started photographing shorebirds many years ago with a
400mm lens. So it can be done and done effectively but it takes greater
knowledge of the birds, their habits and habitats.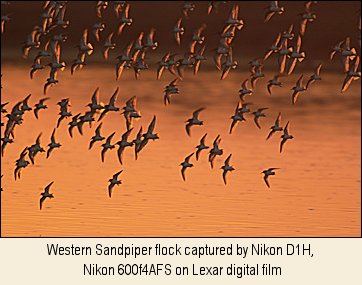 Angle of Attack