|
|
|
|
|
|
|
Get the Look of Small f-stops from
your Consumer Zoom
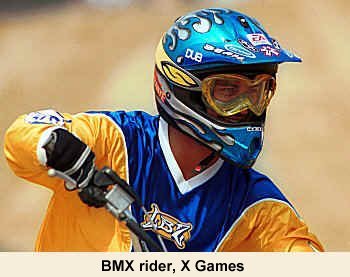
One benefit of fast lenses is their ability to isolate subjects with their narrow plane of focus. As the focal length of the lens gets longer, the plane of focus gets narrower - as it does at faster f-stops. Take a 300mm lens opened up to f2.8 and you get an image like the skateboarder shown here. The background fades to a soft blur of color while the subject is sharp. This difference in sharpness makes the subject pop off the page which is why pro photographers favor these bigger, faster beasts. So how can you get that look from you consumer zoom lens. It's widest aperture is only f5.6 and background elements are still discernable? Well you can't get it in-camera but you can get it digitally.
Start with a sharp original The first thing is to copy your subject to a different layer from the background. To do this, use the selection tool to outline your subject. I like to use the point-to-point selection mode for a little more control than the smart edge mode. It's important to take your time and be accurate. If you're working in a tricky area include some of the background rather than try to define a thousand crop points for your subject. It's really easier to go back and clean up the background later. Once you've highlighted your subject, copy it to it's own layer and name that layer "subject". If you turn off the subject layer you'll see the base layer is unchanged. Now turn the subject layer back on and turn off the base layer.
It's important to remember when working with layers that any changes you make will only be visible in the current layer. Other layers are unaffected. Softening the background First a short explanation of the tools. The blur filter smoothes transitions by averaging pixels next to the hard edges of defined lines and in shaded areas where there is a significant color transition. This is the opposite of the sharpen filter.
The gaussian blur filter uses a weighted bell curve to average the pixels around a target pixel. The radius around each pixel that is effected is variable allowing you to control the intensity of the effect. This filter, when used properly, will give you the soft focus background that is characteristic of big, fast zoom lenses. Now that you've selected the background layer and selected the gaussian blur filter (the subject layer should be visible) click on the preview box in the gaussian blur control box. This will allow you to see the effect as you vary it. The amount of blur you want to dial in will vary depending on the image, resolution, and what looks right. Start with a radius of one, then put in a radius of five to get a feel for the effect of the filter. Now dial it up and down until you get the effect you think you like. Go easy here. There is a real tendency to overdo it with the filter. In the example above we have it cranked up to show the effect. To see the effect as you vary the control make sure that both layers are visible before you open the dialog box. Then use "proof" to see how the final image will appear. Save that file as version one. "Bracket" the filter
You may also want to sharpen your subject a little to make it stand out from the background. The key here is don't overdo it. You want it to look natural. Once you have your final image, save it making sure you don't overwrite your original scan. Digital imaging techniques can't replace the high quality of the best professional zoom lenses. But if you don't have the cost of a used car to spend on your next lens, this technique can give you some great looking results without breaking the bank. |
|
|
|
|
|
|
|
|
|
|
 High-end
  It's critical that you start with a sharp original to use this
technique. There must also be a separation between the subject and
the foreground. If their feet and the ground are visible you'll
wind up with a very unreal effect. Also make sure you're working
with a high res original. Any mistakes made in a low res original
will be magnified when the image is resized for printing.
Conversely, if you're working with a larger file than you need, there is
a tendency for mistakes to be hidden as the image is sized down.
It's critical that you start with a sharp original to use this
technique. There must also be a separation between the subject and
the foreground. If their feet and the ground are visible you'll
wind up with a very unreal effect. Also make sure you're working
with a high res original. Any mistakes made in a low res original
will be magnified when the image is resized for printing.
Conversely, if you're working with a larger file than you need, there is
a tendency for mistakes to be hidden as the image is sized down.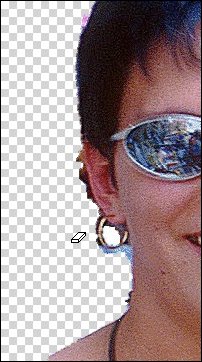 Zoom in so you can clearly see the edges of your subject. Use
the eraser tool to carefully remove any background that was copied up to
the subject layer. Unless I'm taking out a large area, I prefer to
set the eraser size to between one and three pixels in diameter to give
me the most control over the selection. Remember you're only
removing these pixels from the subject layer. They're still
present in the background layer. When you're done turn the
background layer back on and choose it as your current layer.
Zoom in so you can clearly see the edges of your subject. Use
the eraser tool to carefully remove any background that was copied up to
the subject layer. Unless I'm taking out a large area, I prefer to
set the eraser size to between one and three pixels in diameter to give
me the most control over the selection. Remember you're only
removing these pixels from the subject layer. They're still
present in the background layer. When you're done turn the
background layer back on and choose it as your current layer.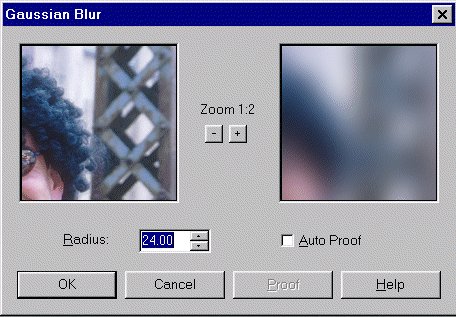 The soften filter applies a uniform blur to the entire image.
The result is similar to using a soft focus filter on your lens.
The soften filter applies a uniform blur to the entire image.
The result is similar to using a soft focus filter on your lens. Now lay the prints out side by side. The intensity of the
background effect tends to look a lot different on paper depending on
the resolution and size of your monitor. Decide which effect you
like best and whether you need to tweak your settings a little more
before making the final print.
Now lay the prints out side by side. The intensity of the
background effect tends to look a lot different on paper depending on
the resolution and size of your monitor. Decide which effect you
like best and whether you need to tweak your settings a little more
before making the final print.