|
|
|
|
|
|
| Digital Learning Curves
Revisited
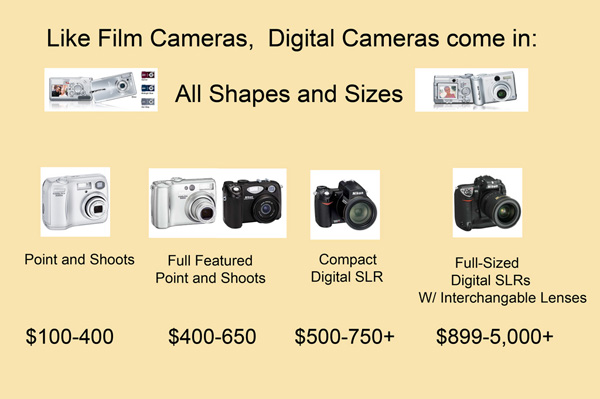
About Digital Cameras 1. The Point and Shoot digital cameras ($100 - $400) (2.5-4 megapixels): Automatic Operation is very similar to your current point-and-shoot film cameras. They are generally very lightweight, compact, and for the most part, quite easy to use. The LCD screen on the back makes it easy to review your images, and most should have a built in flash. Their advantage is their size being easy to take just about anywhere, great for family outings, hiking, vacations etc. As the quality and mega pixels increase, so does the price. There are also more menu selections, options, and with an increase in quality comes the ability to make larger high-quality prints. Figure that the low-end cameras will be fine for emailing images to friends, but making 4x6 prints will be about the limit. At the other end of this price and pixel range, you should be able to make a nice 8x10, if you did your part of capturing a good image. The downside to the cameras in this range can be Lag Time. There can be significant time lag between the time you press the shutter release and the actual capture of the image. People will often want a digital camera to record their children in sporting events at school, not realizing that this can be an issue. You can plan on spending more money for the higher-end digital cameras to help with this problem. 2. Full-featured Point and Shoots ($400-$650) (4-7 megapixels): The point-and-shoot cameras in this range are nothing short of amazing, considering their size. These cameras are usually very compact, sturdy and full featured. Most have metal bodies and a respectable 3-4X zoom range (28-100mm approx.). My Nikon CoolPix 5200 for example is a 5.1 mega pixel camera with a 3x zoom range (38-110mm). It has Macro for close-ups, multiple flash settings, continuous shooting sports mode, best shot selection, automatic in-camera red eye fix, panorama and landscape settings and the list goes on. Quality is outstanding as well, with Nikon claiming that it can produce up to a 15 megabite file and 16x20 print. That is stretching things a bit but it is still very nice. Don't be fooled: Just because these cameras have some very high mega pixel ratings doesn't mean that they will match the quality of a digital SLR with the mega pixel count. Why? Because the sensors on the point-and shoots, are smaller, so quality can suffer when compared the larger sensors on the SLRs. 3. Compact Digital Cameras ($500-$750 or higher) ( 5-8 mgapixels): These digital cameras come close to a digital SLR in both mega pixels and in features, yet are a little more compact, have a fixed zoom lens (no interchangeability) usually in the 28 - 200, 35- 300mm range). In the case of the Nikon and Canon versions, these lenses are equipped with very high quality optics. The new Nikon CoolPix 8800 even has their VR (built in Vibration Reduction) feature. This is probably the one area where I would tell you to think hard about your particular digital camera needs before dropping that kind of money considering the latest digital SLRs now start at around $899. If you want a do-it-all digital camera for vacations and travel and have no interest in carrying a camera bag full of additional lenses, then this could be the way to go. 4. Full Size Digital SLRs ($899-$5000, some even higher) (6-14 megapixels): If you are serious about adding to, or replacing your current film SLR with a digital SLR, you've come to the right place. Providing you have the more recent film SLRs, your existing lenses should work fine on these digital SLRs. As you might expect, digital SLRs are similar in size, feel, and features as film SLRs, plus they have the additional LCD screen, various custom menu selections and features. These full-size SLRs are more than capable of producing excellent prints up to 16x20, again depending on you using good photographic technique. Digital vs. Film: How does a Digital Camera
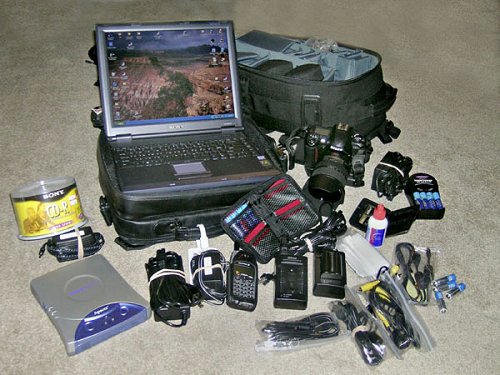
differ from With digital capture using memory cards you have immediate use of the image after the exposure is taken. You can view the image on your LCD panel, print to a portable printer, or download to your laptop. This allows you to edit your images even before you leave your shooting location. No more waiting for your film to be processed, praying everything came out okay, then, looking forward to the back-braking and tedious process of editing and filing your slides. Let's see, how does Sir Isaac Newton's Law go again? "For every action there is an equal and opposite reaction." I just found out what that means! While this educational experience has not deterred me from shooting digitally; it has forced me to re-think the process, for example; Traveling with Digital.
The very first thing I noticed was how much heavier my laptop is than the 100 rolls of film that I used to carry. Yes, but Gary, you already started dragging along a laptop to retrieve emails when you're away from home, so that doesn't really count right? Oh yeah, that's right. But now, during a busy photo tour, I have the laptop with me so I can download my CF cards, edit and organize my images during down time in my hotel, instead of resting between shoots. ??? Okay, now that I have justified that, I need to go through my new check list.
I use 4-Delkin Pro 640mg CF cards, so I can record one full card to one 700 mg CD, it just seems to make sense to me. I usually am able to wait until I get back to the hotel before I erase a CF card. I like to use the laptop to verify that the CD burned properly and to put a copy of the images on the laptop. Of course I'm exaggerating a bit, but It is always a good idea to be properly prepared, and a serious check list is a good idea. Long Exposures: Faster films can help shorten the exposures, but increased grain is usually the tradeoff (though the new high speed films from Fuji are amazing). In digital capture, long exposures will also introduce grain in the image. This grain is called Noise in digital terms. The high-end cameras may feature, Noise-Reduction as a solution. You can select higher 'ISO' settings in digital as well if you need faster shutter speeds, but added noise could be a trade off. Traditional Metering, with Film or Digital: I found that both my film camera and my digital camera meter alike, with the major difference being not in how you meter the scene, but in how the scene is rendered in the final photograph. In traditional photography, you match the film to the color of the light. With White Balance, it's using white as a reference to balance color so that the other colors look natural. You would make adjustments to your white balance settings based on the type of light you are shooting under, i.e. daylight, cloudy, tungsten etc. With regard to getting correct exposures, both can be fooled and register incorrect exposures. LCD Screen: A handy tool for editing your images. You can review or preview your composition before finalizing the image. A word of warning here: The best time to edit your images should be after you download them to your computer. Your LCD screen may not be an accurate tool for judging correct exposure. I would still recommend making exposure choices the same way you would with a traditional film camera. Using the LCD panel can also make you LAZY! What? How? Well, being able to quickly take a shot, review it and re-shoot can allow you to become a little lazy. I don't want you to forget all those basics of good photography that you've learned. I believe you should still use a tripod, a cable release, and have a good understanding of what it takes to have a good composition and how to get correct exposure. For those of you using the compact digital cameras, a small compact tripod can still work very well. Batteries: Keep a good supply of batteries on hand. Using the LCD panel does increase battery consumption. When shooting outside, you will need an accessory rubber hood that fits over the panel to block out extraneous light from hitting the screen. If you have either Canon's IS lenses, or Nikons VR lenses, you can count on battery consumption to increase there as well. Lenses and Filters: Many digital point-and-shoot cameras have zoom lenses that serve the user well in general shooting situations. Many manufacturers make screw-on accessory filters as well as screw-on lenses for macro, wide-angle or telephoto use. The digital SLR can use built-in filtering systems (white balance adjustments) or, interchangeable lenses and screw-on filters in the same manner as you would with a traditional system. The Big difference in SLR photography: The biggest difference, however, in digital SLR photography, is that although the equipment seems to be the same general size with the same traditional 35mm feel, digital is a different camera format than an SLR film camera. With the exception of a few of the higher priced digital SLRs, the sensor size is smaller than the area size of film. Most folks refer to this difference as a 1.4, 1.5, or 2x multiplication factor depending on the manufacturer model, but this is somewhat of a misnomer. Because you are essentially mounting your existing lenses on a similar looking body, you might think that everything will be the same. Again, because digital is a smaller format, mounting the same lenses on them will cause the sensor to capture the smaller center area of their 35mm equivalent. So, for any lens mounted on a digital SLR there is about a 50% loss in the effective angle of view when using a wide-angle lens. Translated this means your 28mm lenses mounted on your digital SLR now becomes a 40mm. Wow! Not so wide any more is it? As a result, manufactures have scrambled to produce lenses from 14-17mm just to achieve a decent wide-angle in the equivalent 20-24mm 35mm SLR cameras range. Nikon, Tokina, and Sigma have 12-24mm wide angle lenses built specifically for the digital SLR, and Canon now has a 10-22mm wide angle. At the other end of the spectrum, and good news for anyone who is not up to spending $8 - $10,000 on a 600mm f/4 wildlife lens, is that a modest 400mm f/5.6 becomes a 600mm f/5.6, a 300mm f/ 2.8 becomes a 450mm f/2.8. Add a high quality 1.4X tele-converter and you now have a 630mm f/4 at a fraction of the cost of the straight 600mm f/4. Yes a 50% increase in telephoto without an increase in f-stops. Wow again! Granted, your initial output to obtain a digital SLR body, can range as I said, from $800 and up, and you have of course other considerations such as extra batteries, perhaps an external memory storage device, extra memory cards, and so on, makes it tough to compare the costs between the two types of systems. So much depends upon your needs and final output. When you lay down that kind of serious money, you have to expect that it will take a few years before you recoup your investment, although I figure I saved around $700 in film and processing on our last Yellowstone trip alone. I hope this gives you a good overall understanding of what is happening in the digital world, and that it really isn't all that scary once you've taken the plunge. As I mentioned at the outset, this article is here just to get you familiar with both the terminology, and the equipment that's out there, so that you can make an informed decision before making your purchase and before diving even deeper into digital. Be sure to review Frank Phillips ten part series Introduction to Digital Photography, as his articles delve much deeper into the whole digital process. Good luck. |
|
|
|
|
|
|
|
All
materials contained herein © Copyright Vivid Light Photography Magazine
2001, 2002, 2003, 2004 |
|