|
|
|
|
|
|
Copyright & Your Digital Files
Adobe's Extensible Metadata Platform (XMP), that's built into Photoshop, is a labeling technology that allows you to embed data, commonly known as metadata, into the image file itself. With XMP, desktop applications have a common method for capturing, sharing, and most important to us photographers, rights management. Instead of having a big copyright notice obliterating the digital image, you can use the following method to make your copyright notice an integral part of a digital file. While the steps shown are for the Mac OS version of Photoshop CS, it should also work for Photoshop 7. Step 1: Open with a blank document in Adobe Photoshop CS. File->New. Then Click OK. (Don't worry about the settings that appear in the dialog box.)
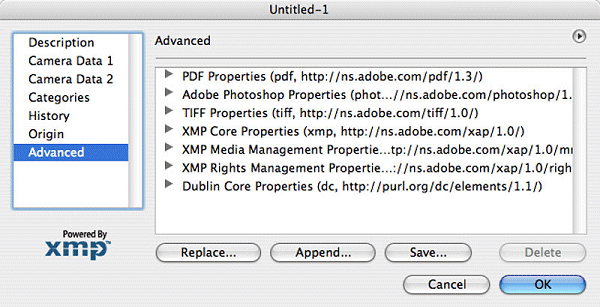
Step 2: Choose File Info from the File menu File>File Info. Step 3: Select Description in the menu on the left side, then choose Copyrighted from the Copyright Status pop-up menu. In the Copyright Notice section (below) type in the information that you want to appear as part of the image file. You can include a phone number, © symbol, year created, "All Rights Reserved," or whatever you think is appropriate. Then, enter your Web site information, if you have one (and if not, why not), into the Copyright Info URL box. Step 4: Choose Advanced from the menu on the left-hand side. (It's below Description.) Next, click Save and save a .xmp (Extensible Metadata Platform) file containing all of this copyright notice data using whatever name you like and wherever you want to store it, but make it an easy place to remember. Click OK on the File Info box.
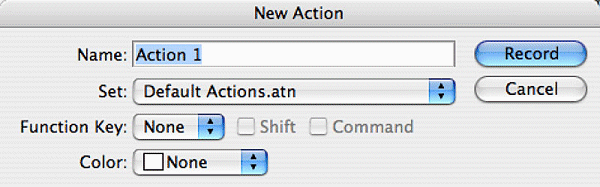
Having to do this for each and every image file that you create would be tedious, so the next phase will be to create a Photoshop Action to automate the entire process. For more information see Joe Farace's Adorama Academy Lesson: Automating Digital Enhancement How to Create and Use Photoshop Actions. Step 1N: Start with a blank document. File>New Step 2N: Go to the Actions palette making sure you are not in Button Mode. If so, got to the Actions fly-out menu and select Button Mode.) Then choose New Action. Step 3N: In the dialog box that opens, assign a function key so the next time you want to associate a file with your copyright notice, it's simply a button click. You can also group it with some of Photoshop's Sets of Actions that you may have already installed. I placed the Copyright Action in the Production set but you can pick whatever you want. Then click Record.
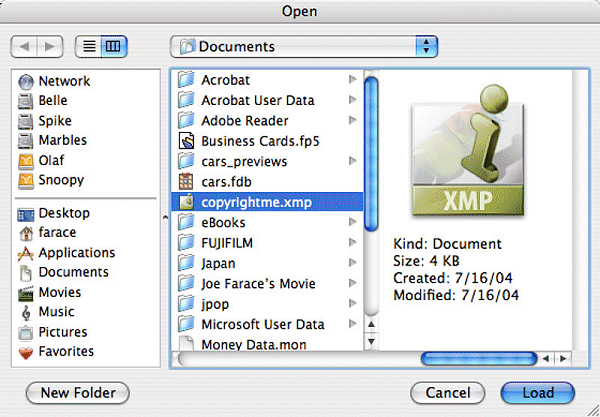
Step 4N: Chose File>File Info. Click Advanced, then click Append, then go to the place where you stored the .xmp file and click Load, then click OK to close the File Info box.
Step 5N: Then, click the Stop Recording button at the bottom of the Actions Palette and you're done! You only have to go through this process once. The next time you want to imbed copyright information into an image file, just click the function key you've chose, or on the newly created button (when you're back in Button Mode) in the Actions Palette it's done.
|

|
|
|
|
|
|
|