
|
|
|
|
|
|
The Joys of Kayaking and Photography
With my initial success came the realization that photography from a kayak takes on another dimension, another challenge, and offers me endless opportunities to be in unique places and to see what mother nature has to offer in a world that I otherwise would not have seen from shore.
My first experience in a kayak was a feeling somewhat of apprehension. I felt insecure, not knowing what lie beneath the depths, or what lurked in the grasses or what was around the next corner. It all kept me at bay and somewhat tense. Perhaps I've watched too many episodes of Steve Irwin and Jeff Corwin with my kids!
Purchasing a kayak: My first word of advice is to buy from an experienced dealer and explain to them what your goals are. Explain to them that you want to be able to photograph from the kayak and that it needs to be stable. Let them also know your level of experience with a kayak. Many authorized dealers offer rentals along with lessons, and have great buys on used kayaks allowing you a chance to try before you buy.
My personal Favorite: My kayak of choice is the Old Town Loon 138. (about $500-$600 with paddles and life jacket) This model is not only wide and comfortable, but very stable. I have ridden some very big waves on Lake Champlain with no problem at all. When shooting from a kayak though, I do prefer lake conditions that are near mirror-like, such as early in the morning, or on extremely calm days.
Photo Equipment: I tend to bring most of my essential gear with me, because you never know for sure what you may find to photograph. I wear a photo vest to carry small accessories, and a small camera bag for lenses. Because all my images shot from a kayak are handheld, I use Canon's IS (Image Stabilizer) lenses. The IS technology allows me to handhold the camera and lens and still capture razor sharp images. Here's a list of essential camera equipment to have along.
Good Idea: Additional kayaking accessories such as a dry bag can be purchased from your local dealer to help protect your gear from water. Better Idea: Always wear a camera strap around your neck when shooting over water. One mistake and your gear could be gone forever. Best Idea: I have separate insurance policy for loss of equipment. State Farm has what is called an Inland Marine Policy. It covers all losses regardless of reason and is very affordable. Technique: Whether you shoot with digital or film, set your aperture to its widest opening for the fastest possible shutter speed. Use a high enough speed film or with digital, high enough ISO setting to give you the kind of shutter speeds needed to stop the movement of your subject. I also start out with my longest focal length lens attached to my camera. Remember, you'll often come upon your subject unexpectedly, like a Great Blue Heron or loon coming out of a thicket of grasses, so you'll want to be ready. Whether you're shooting wildlife or landscapes, try to keep your subject level in your frame, this is much more difficult from a kayak and takes some getting used to, after all, you don't want the loon swimming downhill (using a grid screen in the viewfinder will help). Kayaks are prone to some movement even when the water is fairly calm, so you will need to concentrate on both your subject and your horizon line.
If you plan on printing your images, include more of the scene than you think you'll use. This will allow some room for cropping, giving you a comfort zone when shooting moving subjects. Shooting slides for presentation purposes leaves even less room for error. Remember, you can take away, but you cannot add to an image. The Bottom Line: While your success rate may not be 100% when photographing from a kayak, you can greatly increase your odds by following the suggestions in this article. Good luck. Be safe and experience "The Joys of Kayaking and Photography!"
|
|
|
|
|
|
|
 Nature photographers face endless challenges when on land, but none
seem quite as challenging as creating images from a kayak. When first
introduced to kayaking, my initial goal was to photograph loons. I was
fascinated by this prehistoric bird, its unique spine-chilling calls, its
vibrant red eye, and its distinct black and white pattern.
Nature photographers face endless challenges when on land, but none
seem quite as challenging as creating images from a kayak. When first
introduced to kayaking, my initial goal was to photograph loons. I was
fascinated by this prehistoric bird, its unique spine-chilling calls, its
vibrant red eye, and its distinct black and white pattern.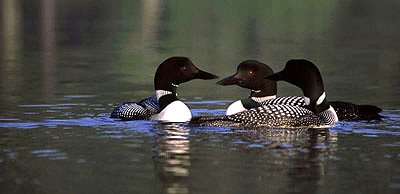
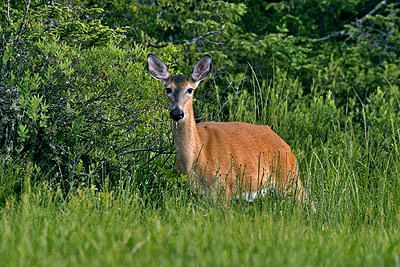 Since then, I've discovered that what you do encounter is a great
variety of wildlife. Beavers, muskrats, moose, herons, and a numerous
variety of waterfowl, just to mention a few. I also found that as time
passed my confidence grew, my knowledge broadened, and the photographic
opportunities grew. My comfort level and my concentration grew as well. In
this article, I'll share with you this most rewarding way to enjoy nature
photography, with a kayak.
Since then, I've discovered that what you do encounter is a great
variety of wildlife. Beavers, muskrats, moose, herons, and a numerous
variety of waterfowl, just to mention a few. I also found that as time
passed my confidence grew, my knowledge broadened, and the photographic
opportunities grew. My comfort level and my concentration grew as well. In
this article, I'll share with you this most rewarding way to enjoy nature
photography, with a kayak.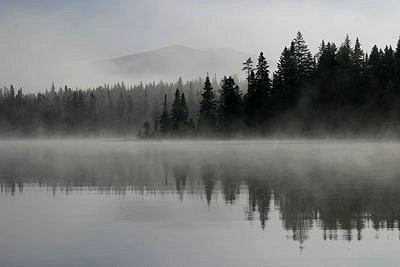 Comfort: Be sure to choose wisely as comfort will be very important.
Look for a kayak with a large enough cockpit so that you can not only
access your gear easily, but one with plenty of leg room too. I sometimes
spend 2-3 hours at a time exploring and photographing, and the extra room
allows you to stretch your legs. You may also need to land or beach
somewhere to allow additional circulation for your legs and bottom.
Comfort: Be sure to choose wisely as comfort will be very important.
Look for a kayak with a large enough cockpit so that you can not only
access your gear easily, but one with plenty of leg room too. I sometimes
spend 2-3 hours at a time exploring and photographing, and the extra room
allows you to stretch your legs. You may also need to land or beach
somewhere to allow additional circulation for your legs and bottom.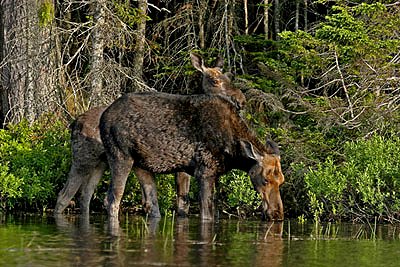 Know Your Subject: I'm
often asked in my workshops whether or not I
go into the field with intentions of capturing one particular subject. My
response is; "it depends." Subject matter can vary from place to
place, so you'll need to become familiar with your chosen location.
Research an area first so that you know what animals or plants exist
there. For example, I know that Curtis Pond (Vermont) is abundant with
fragrant water lilies, Kettle Pond has nesting loons with young and
Victory Bog has an abundance of moose.
Know Your Subject: I'm
often asked in my workshops whether or not I
go into the field with intentions of capturing one particular subject. My
response is; "it depends." Subject matter can vary from place to
place, so you'll need to become familiar with your chosen location.
Research an area first so that you know what animals or plants exist
there. For example, I know that Curtis Pond (Vermont) is abundant with
fragrant water lilies, Kettle Pond has nesting loons with young and
Victory Bog has an abundance of moose.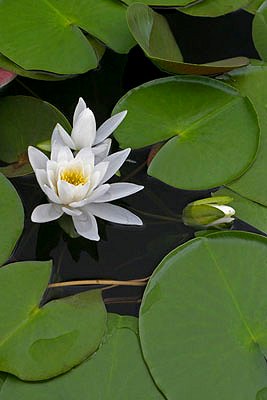 Helpful Hints: If your goal is to photograph loons, a call or visit to
the folks at the Department of Fish and Wildlife will help you find out on
what body of water you are most likely to see them. Consulting with a
state botanist will direct you to a variety of areas where you can
photograph lilies. Photographing in a kayak on the water, I prefer more
remote areas, in order to keep shooting conditions as peaceful and quiet
as possible.
Helpful Hints: If your goal is to photograph loons, a call or visit to
the folks at the Department of Fish and Wildlife will help you find out on
what body of water you are most likely to see them. Consulting with a
state botanist will direct you to a variety of areas where you can
photograph lilies. Photographing in a kayak on the water, I prefer more
remote areas, in order to keep shooting conditions as peaceful and quiet
as possible.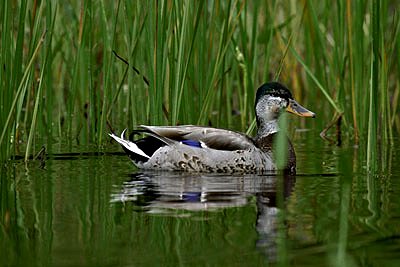 To successfully photograph water fowl from a kayak, I pan with their
movement and take advantage of my camera's motor drive. To steady the
camera, I place my right elbow tight against my abdomen. Then I cup the
lens in my left hand and bring my left knee to my chest, resting my left
elbow against knee.
To successfully photograph water fowl from a kayak, I pan with their
movement and take advantage of my camera's motor drive. To steady the
camera, I place my right elbow tight against my abdomen. Then I cup the
lens in my left hand and bring my left knee to my chest, resting my left
elbow against knee.