
|
|
|
|
|
|
| Digital GEM Airbrush Professional Cindy Crawford once told me "Even I don't look like Cindy Crawford when I get up!" Anyway that's my story and I'm sticking to it. What this means to real world portrait and glamour shooters is that "some retouching" is always gonna be required when photographing real people. Kodak's (www.asf.com) Digital GEM Airbrush Professional is part of the company's suite of correction and enhancement Photoshop-compatible plug-ins which provide easy and effective tools to improve your digital images. Other members of their Professional suite include the Digital SHO Professional Plug-In for revealing detail hidden in shadows or highlight areas. The Digital ROC Professional Plug-In restores, corrects, and balances image color, letting you tweak brightness and contrast control. Digital GEM Airbrush Professional gives you a quick and powerful way to smooth skin without blurring detail or important features such as hair, eyelashes, and eyebrows. By reducing harsh shadows and highlights, it automatically smoothes skin, minimizes imperfections and produces airbrush effects, without having to resort to masks or manual softening. Shooters that like RAW files will be glad to know that it supports 16 bit color files, as well as the use of standard 8 bit images.
The best way to use the plug in is to work with the sliders slowly and move the Coarse slider and bit and watch what happens in the preview window. Then move the Medium, then the Fine, gradually fine tuning the effect. Click the Before and After buttons to see the effect your changes are having. Clicking Detail lets you preview the finished image as a high contrast mask that dramatically shows affected or unaffected image detail. There are two ways of applying the filter; the easiest is to move the sliders until you see what you like and apply. You can overdo the controls for a Playboy look or back off for a more realistic appearance and then use the Clone Brush or Retouching Tool to finish retouching. For this image only Airbrush Pro was used.
Another way to apply the filter is to first create a Duplicate Layer (Layer>Duplicate Layer) and then crank up the sliders to create perfect skin. Then use the Opacity settings on the duplicate layer to allow some of the original image to show through. How much? Like Julia Child once told me, "to taste." Yes, I realize that Digital GEM Airbrush Pro has a Blend setting that allows you to blend the original and modified images in similar ways, but that is on a single file. Using layers leaves the original image untouched and you can always change the opacity at any time in the future and even remove it. When used with large files created by Pro SLRs, Airbrush Pro can also be pokey to apply.
Want to try it yourself? The best way is to download a fully functional trial version and experiment yourself. The demo applies a digital watermark. In order to disable it, you gotta purchase a software key for $99.95 from Kodak.
|

|
|
|
|
|
|
|
|
|
|
|
All
materials contained herein © Copyright Vivid Light Photography Magazine
2001, 2002, 2003, 2004 |
|
 This model is a rodeo rider who injured her arm while
barrel racing (see close-up at left). This is the original unretouched JPEG file as it came
out of an EOS 10D. While she's a beautiful young woman, light application
of Digital GEM Airbrush Professional, can make her even more so.
This model is a rodeo rider who injured her arm while
barrel racing (see close-up at left). This is the original unretouched JPEG file as it came
out of an EOS 10D. While she's a beautiful young woman, light application
of Digital GEM Airbrush Professional, can make her even more so.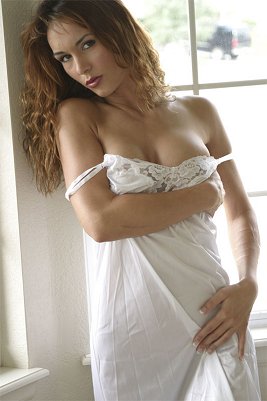 After launching the plug-in from the Filter menu, the Digital GEM
Airbrush Professional control panel offers three sliders (Fine, Medium,
and Coarse) that let you tweak smoothing effects and intensity to maintain
the character of your subject's face.
After launching the plug-in from the Filter menu, the Digital GEM
Airbrush Professional control panel offers three sliders (Fine, Medium,
and Coarse) that let you tweak smoothing effects and intensity to maintain
the character of your subject's face. 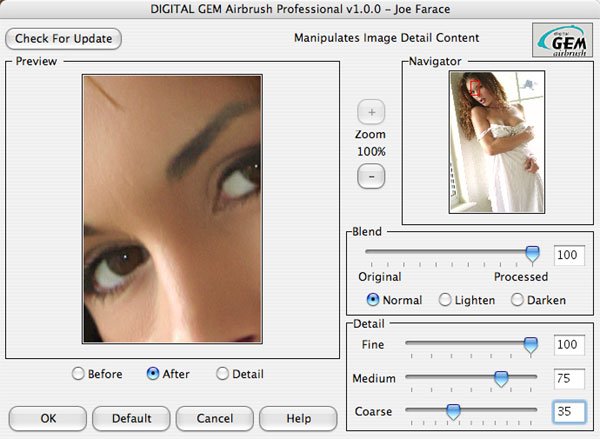
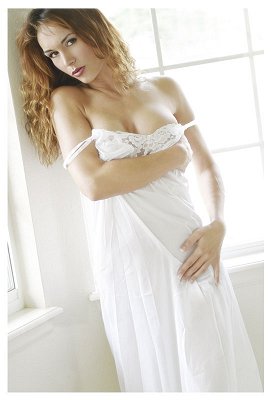 For this image only Airbrush Pro was used on a duplicate
layer and some burning and dodging were done to complete the finished
look. It was also combined with another file to show more of the effect of
the setting;
I just liked her expression with the closer shot and that's the basis for
the final image. There is no right or wrong way to use the Digital GEM
Airbrush Professional Plug-In.
For this image only Airbrush Pro was used on a duplicate
layer and some burning and dodging were done to complete the finished
look. It was also combined with another file to show more of the effect of
the setting;
I just liked her expression with the closer shot and that's the basis for
the final image. There is no right or wrong way to use the Digital GEM
Airbrush Professional Plug-In.