|
|
|
|
|
|
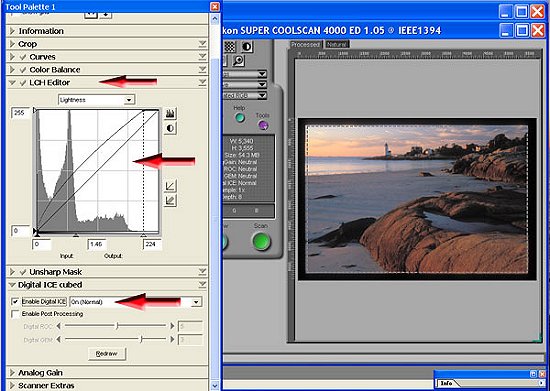
| Digital Shortcuts By Gary W. Stanley Last month, I showed you how to Create Great Digital Prints . In this month's Digital Darkroom column, I want to take things a little further. Not from the standpoint of creating a great print, but with the idea of keeping things simple. I'm letting you know the point of this article right up front. This is for you! It's for all you folks out there who, like me, have had some doubts about digital and the new learning curve. It's for those of you who either don't have the time or the interest to learn every tool that Photoshop has to offer. It's for those of you out there who don't mind taking a little shortcut every now and then, and yet you want the confidence in knowing that you can take these Digital Shortcuts without sacrificing quality. I had been photographing for some twenty years, and leading photo tours since the early nineties, and all of a sudden there was this whole digital revolution and I hadn't even mastered the computer! Quite frankly, I was overwhelmed. I was a working professional who was faced with a "sink or swim" reality. If I was going to continue teaching photography and leading tours, I had better hit the books and figure this digital stuff out. Now you can buy books, attend workshops and listen to everyone's "better" way of doing something, but if you're like me, all you ever wanted to do with Photoshop was keep it simple. I've read some of the most complicated methods of working an image that you could imagine, including detailed ways to adjust color, reduce grain, bring up shadow detail, work in layers, and layer masks etc., all with the intent of producing a high quality final image. If you can grasp all of that, fine keep doing it. But, if you don't mind a few "Digital Shortcuts" here and there, read on! Relax: You don't have to know it all. Take a moment to stop and think about what it is that you want your digital experience to do for you (sounds like a therapy session doesn't it?). Maybe you just want good scans of your slides so that you can catalog them and make your own prints of some of them. Maybe you just want to make Photoshop a little easier to work with. Whatever the reason, relax; it doesn't have to be that hard. The Scan: I have a Nikon Super Coolscan 4000 that has many pre-scan adjustments and various "shortcut" software built into the unit. For example: I don't go crazy trying to make a lot of adjustments prior to the scan other than a small adjustment to the LCH editor under the Tools Palette (Lightness, Chroma, and Hue, leave it on the Lightness setting). I adjust the exposure of the previewed slide a little so that there are no blocked up blacks or washed out whites. In other words, I make slight adjustments to the histogram to get the best scan possible. One other thing I recommend doing is to enable the Digital ICE Cubed feature (many scanners include this dust and scratch removal feature or something similar) and set it to normal. This automatic feature will save you tons of work later on.
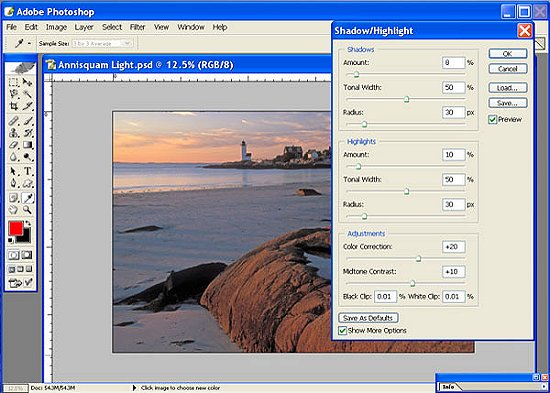
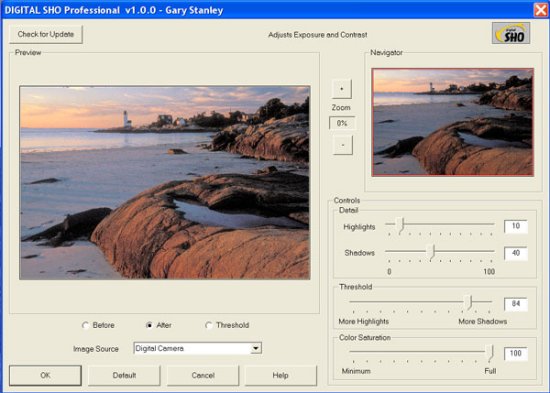
Save the Image: Now the image is in the computer, and whether it was a scanned slide or an imported digital image doesn't really matter other than the file size will be different. I now do a save as naming the image and saving it as a PSD file. You can put the image wherever you want to. I have a work-in-progress folder that I use when I know I'm going to work on the image right away. Note: You may wish to create a duplicate layer and work on that instead of the original, to keep the integrity of the original intact. Image Adjustment Shortcuts: My most used shortcut is the Shadow/Highlight adjustment found in Photoshop CS. You say you haven't upgraded to CS yet? No problem! Kodak and others have software plug-ins available that do essentially the same thing. Kodak's is called Digital SHO Pro (see my article on Digital Plug-ins). This same article illustrates some other great software, called Digital Gem, for easily reducing Digital Noise or Film Grain. As I mentioned at the outset, there are certainly longer, more painstaking, ways to make these same kinds of adjustments to your image, but why? Photoshop or Kodak wouldn't have come up with such a useful tool as Shadow/Highlights or Digital SHO Pro if it didn't do the job.
The Shortcut to Shortcuts: The above plug-ins are just a small example of the software available designed to make your digital experience less painful. I want to re-emphasize my point here that if you don't have the time or desire to learn the long way, why not take advantage of someone else who has taken the time to create software that drastically shortens both the time and the learning curve. Here is another website that has been very useful for a lot of photographers - http://www.fredmiranda.com/. Click on the Software button and you will see a very complete list of plug-ins for all digital cameras and scanned film that will do a variety of things from sharpening, interpolation and noise reduction etc. There are actions for things like Edge Sharpening, Warm and Cool, Soft Focus, and Highlight Recovery (for Canon). Much of his software is camera specific so as to optimize the usefulness of that particular plug-in to your particular camera. The great news is they are very reasonably priced (usually, under $15). Other Shortcuts: Besides the growing list of software plug-ins, keep in mind that there are various keystroke shortcuts that can make your editing easier. In John Shaw's new E-Book, Photoshop Field Guide (see this month's book review), Chapter 27 covers Photoshop Tool, Palettes, and Shortcuts, and talks about the most commonly used Photoshop tools as well as some very valuable keystroke shortcuts. The Photoshop Help menu also contains a list of keyboard shortcuts. The Shortcut Advantage: Shortcuts are the jumpstart to your digital experience. There are people out there spending all their time creating these shortcuts and most are doing a tremendous job. While I certainly enjoy the digital darkroom, I'd still rather spend my time photographing. Nothing says you can't continue to learn more about this exciting new element of photography. Don't let a learning experience pass you by because there isn't a shortcut for it yet. As I've said before, I'm living proof that you can teach and old dog new tricks. I tend to let my interest level guide my learning curve. If I see the value of learning a new technique, I'll read up on the subject, try different folk's methods, and then pick the one that works the best for me. Invariably, just about the time I've mastered that particular technique, someone will come out with a new software shortcut that is easier, takes less time, and works better. Go Figure! |
|
|
|
|
|
|
|
|
|