|
|
|||
|
page 16 of 23 |
|
|
|||
|
page 16 of 23 |
| Understanding Layers by Jim McGee
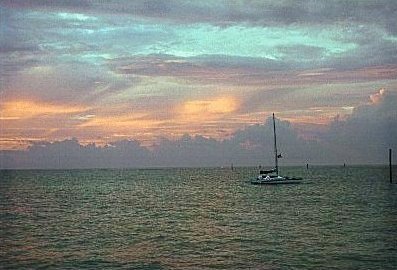
The image above was taken some years ago and relegated to the reject pile without much thought. These were the days when I knew a bit about photography but was still relying on 4" mini lab prints and only rarely having them print an 8x10 or 11x14 enlargement. Photo quality printers for your PC were as yet unheard of.
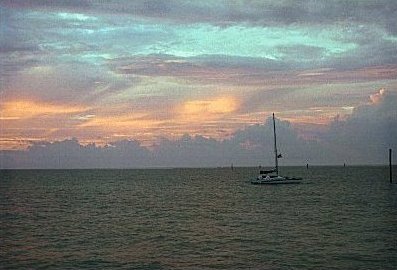
In fairness to the printer at the mini-lab I hadn't given her many good choices here. I had spot metered on the sky to capture the vibrant pastel colors. This left the ocean and the sailboat underexposed by a full stop and a half (as shown here). The printer had to choose to print for the exposure value of the boat or for the exposure value of the sky. She chose the boat in the foreground as the subject of the image - leaving the sky washed out and dull compared to what I had seen. A graduated neutral density filter (explained in the article on shooting sunrises/sunsets) would have cured the problem in the camera, but this shot was before I owned such things. Looking at the dull sky in the four inch print I just figured I'd missed the shot and never thought about it again. But as luck would have it there was another shot on the same film strip that was dead on, and I had had several 11x14 prints made from it. Then while I was scanning that image about a year ago I rediscovered this one hiding next to it on the film strip. It's not unusual to have an image where the difference in exposure values between the darkest and lightest areas is greater then we can print on paper. Years ago photographers develeoped darkroom techniques called dodging and burning to control the exposure in a part of the image. Dodging referred to blocking off light from part of the print when developing to produce lighter areas. Burning is masking off part of the print to darken selected areas. Most photo software gives you tools for dodging and burning small areas, but layers are the best way to mask large areas. So what are layers? Think of your image as a large transparency. Now imagine that you can cut out and/or copy parts of that transparency and work with those parts individually. You can make each of these layers opaque so that the layer underneath is covered, or you can make a layer partially transparent (with the original image underneath) so that you can control how much of the original shows through the changed piece. The first step in adjusting the exposure of this image is to start with a good quality scan. In this case the image was scanned so that the sky was properly exposed while retaining good shadow detail for the boat and the water. Next I mask off the boat and the water using the lasso tool. In most drawing programs the lasso tool has an option that allows you to let the program choose the edges based on the contrast of the image. This is called the magnetic lasso tool in Photoshop and the Smartedge tool in Paint Shop Pro. Once I have the area I want to work with masked off I want to create a layer out of that mask. I do this by promoting this area to a new layer (Layer->New->Layer via copy in Photoshop, or Selections->Promote to layer in Paint Shop Pro).
Next I want to take a look at image sharpness. This negative had gotten a bit of rough treatment as it had been used for making numerous prints over the years, and it had picked up some scratches. Applied Science Fiction's Digital Ice had taken care of the scratches during the scan but had also introduced a bit of softness. Simply applying a sharpening filter introduces it's own set of problems though. This image was shot with Royal Gold 400 to allow me to handhold, and 400 speed film was much grainier then than it is now. A sharpening filter would bring out that grain - especially in the soft tones of the sky. The solution is to sharpen only the base layer containing the sailboat and ocean, and to slightly soften the sky to minimize the effect of the grain and provide smooth even tones. As a final step we merge the layers containing a final image into a single layer, and save the file. The final version is shown below.
|
The image had been relegated to the reject pile years ago.
Years ago photographers develeoped darkroom techniques called dodging and burning to control the exposure in a part of the image
Simply applying a sharpening filter introduces it's own set of problems
|
|||||||||
 |
|
text and photography copyright © 2001 Vivid Light Publishing |
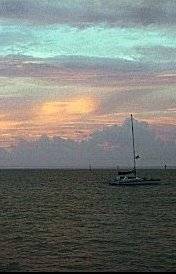
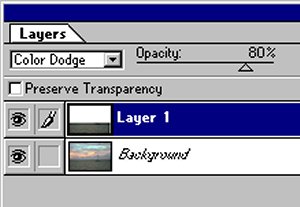 Once
I have it as a layer I can determine how I want to blend this new layer
with the underlying image by setting it's opacity (here set at 80%). I can also determine what I want to do with the layer.
In this case applying a dodge filter to lighten the area.
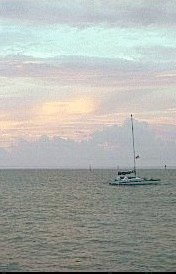
Once
I have it as a layer I can determine how I want to blend this new layer
with the underlying image by setting it's opacity (here set at 80%). I can also determine what I want to do with the layer.
In this case applying a dodge filter to lighten the area.