Traveling with a 4x5 Camera in North
Carolina's Outer Banks
by Chuck McKern
Usually when we go away on vacation, being into photography the way we are,
we want to take great pictures to remember the trip by.
Years ago, 4x5 cameras provided the best quality images you could get.
So serious enthusiasts would make room for the size and bulk of all the equipment one would
need to support a 4x5 in the field whenever they traveled.
Today, 4x5 is a format that seems to be slowly fading away; in large
part due to the constant improvement of 35mm films. So is there still a reason to take the big monster along?
To get some images for comparison I took both 35mm and 4x5 rigs to
the Outer Banks of North Carolina.
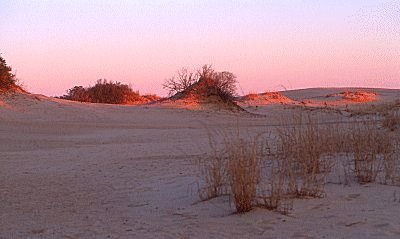
The Outer Banks offer a nice variety of ways to relax as well as
numerous picture taking opportunities. You have golf courses, plenty of gift shops (not just the typical tourist type gift shops, but several up-scale
shops as well), wild life preserves, and lots of history.
One of the wild life preserves is home to wild horses, while another has
numerous species of coastal wildlife. You can visit the largest "living" sand dune,
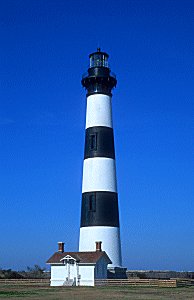
Jockey's Ridge, where you can hang glide. If you are interested in nautical history, there are 4 historic lighthouses, and countless shipwrecks, several of which are visible without diving.
There is plenty of fishing and boating and miles of undeveloped beaches.
Did I mention food? There are countless restaurants in the small towns
of the Outer banks. Most offer fresh seafood (which personally, I love) and I have yet to have a bad meal
here. If you like the shore and haven't been to the Outer Banks, I strongly suggest going.
But when you are preparing to go with a 4x5 you have to take a close look at
available space. Most cars are smaller now then they were years ago. The case for the 4x5 camera filled about half of the trunk of
my car and just fit to allow the lid of the trunk to close. And don't forget
you need a tripod.
 With my 4x5 camera, I prefer to use a heavier tripod than the Bogen I use for my 35mm and medium format.
With such a large case you want to be sure to use any free space to your advantage. In the camera case, there is enough room on the end compartments, under the rail of the camera, to store some of the necessities. I usually store my film holders, Polaroid back and film, cable release, focusing cloth, and loupe (for fine focusing on the ground glass of the camera). I also carry a changing bag and an empty 4x5 film box
in case I need to change film. If I am not taking along a smaller camera, I will also carry my light meter. Loading all this equipment into the camera case
makes the case heavier, but it definitely saves a considerable amount of space. With my 4x5 camera, I prefer to use a heavier tripod than the Bogen I use for my 35mm and medium format.
With such a large case you want to be sure to use any free space to your advantage. In the camera case, there is enough room on the end compartments, under the rail of the camera, to store some of the necessities. I usually store my film holders, Polaroid back and film, cable release, focusing cloth, and loupe (for fine focusing on the ground glass of the camera). I also carry a changing bag and an empty 4x5 film box
in case I need to change film. If I am not taking along a smaller camera, I will also carry my light meter. Loading all this equipment into the camera case
makes the case heavier, but it definitely saves a considerable amount of space.
If you think that this case sounds big - it is. It measures 18" tall, 12" wide, and 25" deep.
Then there's getting the camera to where you want to shoot.
Lugging 4x5 equipment around is no easy thing. The case for the camera
with all the needed accessories is not only large, it's heavy weighing
about 20 pounds depending on how many other gadgets you are carrying.
Try carrying that and a full size, metal tripod over the dunes in the
deep, loose sand that makes up the North Carolina coast. It's difficult
enough to walk a long distance on a sandy beach - this adds a new level
pain. If you're not in good shape, you will definitely be feeling it the
next day.
Shooting with a 4x5 camera is much slower than with the smaller formats. With adjustments on the front board (lens board) and adjustments on the rear board (film plane), it is time consuming to size, compose, and focus the camera. Both boards have right and left horizontal movements, right and left swings, upward and downward tilts. You will spend some time getting the shot composed and sized the way you want it. These movements will allow you to correct for converging lines in a scene or you can distort straight line for artistic
effects - something you can't do with 35mm.
Once you have everything set where you want them, it's time to focus. Focusing is done on the ground glass on the rear board. Once you have it focused visually, get the loupe out and check it again. With the detail in this format and the cost of the film and processing, you want to make sure the focus is correct. Be sure to use the focusing cloth over your head and ground glass, it will eliminate the glare on the glass and make it a lot easier to focus.
Now with the camera focused, continue to watch the scene through the ground glass with the loupe while you close down the aperture. It will
quickly get very dark, but if you watch closely, you will see how much depth of field you will have and how much more detail will be getting sharp. Be sure to get an accurate meter reading with your hand-held meter and don't forget to factor in how much light is being lost with the extension of the bellows (the accordion looking connection between the lens boards). The more distance the bellows is being extended, the more light that is being lost. If you are shooting Polaroids, do so now. This will help ensure that you have the exposure set correctly. Whether you are shooting Polaroids or not, be sure to bracket your exposures. If this sounds like it is time consuming, it is. However, like anything else, the more you do it, the easier it gets.
Why shoot 4x5 in the first place? In a word, quality. The larger negative or transparency would require much less magnification for printing and enlarging. If you were to enlarge an image to 8x10, a 4x5 negative would only be magnified four times. That's considerably less magnification than a 35mm negative would require.
And did I mention that 4x5 slides on a light table are nothing short of stunning?
With the advancements in film today, 35mm negatives can be enlarged considerably more than they could have been a few years ago without
a major loss of detail because of the grain structure of the film. This has allowed the smaller formats to compete with the quality of 4x5.
4x5 also has a significant advantage for macro work allowing greater depth of
field, greater perspective control with it's tilt/shift capability, and
the recording of greater detail. The trade-off however is that all
the additional setup and exposure issues mentioned when shooting
landscapes apply to shooting macro as well. Also when doing macro with 4x5 cameras, you will have a major exposure adjustment for the
bellows. Test polaroids are highly recommended.
The 35mm shots in North Carolina were shot with a Nikon F4s with a Nikkor 35-70 F2.8D and the 4x5 shots were shot with a OmegaView 45c with a 210mm Caltar II-E Copal 1 lens. The close-up shots were shot with a Nikon F4s with a Nikkor 55mm F3.5 micro. The 4x5 set up was the same as the North Carolina set up. All the images were shot on Fujichrome
Velvia - both 35mm and 4x5.
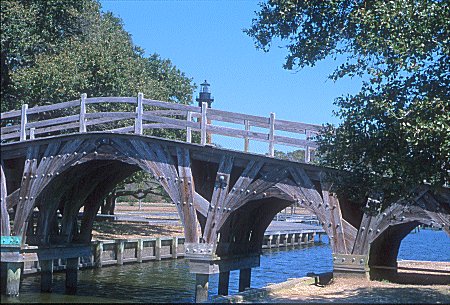 |
|
Velvia
does a great job rendering this bridge in both
35mm and 4x5 formats |
|
35mm

|
4x5
|
Zooming in on the
bridge support in the lower left corner shows a slight softness in
the 35mm image,
but notice that not only the wood grain but also the saw marks in
the board are clearly visible and film grain is negligable.
You can't see it in this 256 color image, but the original
shows relatively smooth tones in the faded paint on the horizontal
board. Selective sharpening could still bring out some additional
detail for a large blowup.
The 4x5 image is noticably sharper, exhibiting no softness
and holding more detail - particulary in the tones of the faded
paint.
Look at the complete image above, this is a VERY small area of a 35mm slide. |
|
35mm
|
4x5

|
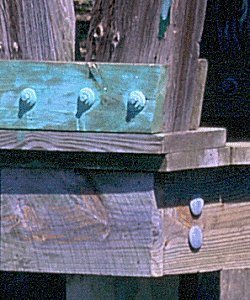
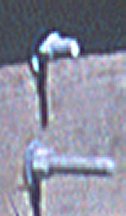
Go back up and look at the center
pillar of the bridge on the original image. There are four
large bolts visible where the angled beams tie into the center
column. Below that is a skirt. These images show a
detail of the bolts coming through that skirt, not even visible at this
resolution in the original image.
In the 35mm image on the
left the film grain is clearly visible at this
magnification.
The 4x5 image on the right is going a bit
soft at this magnification but the grain is still smooth, and you
can clearly see the flats on the nut.
Software such as Genuine Fractals can lessen the impact of
the grain if you're printing digitally, but for very large prints
4x5 still has an edge. |
In my opinion, 4x5 still has an advantage for big enlargements, especially if you want the highest degree of quality in poster size or wall size prints. In
reality though, how often do we enlarge prints that big? Personally, I haven't printed any
poster prints for a couple of years. Let's face it; it's most common for most of us blow our pictures up to
8x10s and the occasional 11x14s. 35mm definitely has the edge in
ease of use and cost compared to 4x5.
I will still use my 4x5 camera - but I will continue to be selective as to when I take it out.
For more information on the Outer Banks check out:
www.outerbanks.com
 Subscribe to
Vivid Light
Subscribe to
Vivid Light
Photography by email
|
|
Is there still a reason to take the big monster along?
Shooting with a 4x5 camera is also much slower than with the smaller
formats
4x5 still has a major advantage for big
enlarge-
ments
|


