|
|
|||
|
page 3 of 23 |
|||
|
|
|||
|
page 3 of 23 |
|||
| Filter That Light! by B. Moose Peterson
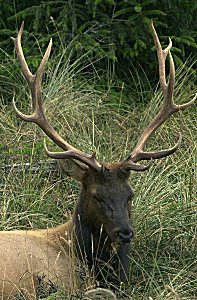
In that drive for personal "perfection" in my images, there are three filters I count on to help with the light: the 81a "warming" filter; the Moose Filter (warm-circular polarizer) and the 3-stop Split Graduated Neutral Density Filter. You master light and these, and your images will knock folks' socks off! The 81a Warming Filter Called the A2 by Nikon The 81a warming filter has a technical and psychological reason for its use. Let me start by explaining that with conventional or digital film, short lens or long lens, at sea level or at my home at 8200 feet, overcast or sunny days, no matter when or where I'm shooting, I always use an 81a filter. It's for the two reasons I mentioned that I always have this filter in place.
The technical reason is because of our film, be it conventional or digital. Conventional film has a daylight color balance that is equal to 5500k (also the benchmark for digital). Regrettably, we rarely have this light with this color balance when we're shooting. Quite often it's much higher than this, ranging as high as 9000k on an average day! When this occurs, shooting with 5500k rated film at 9000k, the resulting images without any filtration produces color that looks as if a "blue wash" has been applied. In these instances, what we're capturing on the film is not what we're seeing with our eyes. The 81a filter brings the color balance back to the film's 5500k when the light is 9000k. Look at the before and after Roosevelt Elk images, and you can see for yourself the difference that the 81a visually makes to the image. It "warms" it up, hence the name, warming filter (to see the difference, place your mouse on top of the image and images will be swapped). The psychological reason is to beat the eight-second clock. What, you didn't know there was a clock involved in photography? The clock, which I'm referring to, is the one that starts when someone turns the page of a magazine or book and sees your photograph. They say you have a maximum of eight seconds to grab peoples' attention before they move on (some say it's even shorter on the Web). If the image has that "blue wash", it conveys a psychological cold feeling that while the viewer doesn't say to himself, "this image has a 'blue wash' to it," they just turn the page. I want to grab the viewers' attention, their heartstrings and make them stop to look. This is why I use the 81a filter! Warm and fuzzy beats cold and steely any day. The Moose Filter The importance of the 81a filter to my photography is such that, like I said, I use it all the time. The polarizer is also a very important tool to my photography to remove reflections (will explain in a moment). The problem was that when I used the combination of the two filters, 81a and polarizer, stacking them on my ultra wides, I would get vignetting (darkening of the corners). From this problem arose the solution, marry the two filters into one to eliminate the vignetting. With that was born the Moose Filter. The polarizer is a filter designed to remove reflections. Its purpose in life is not to create blue skies, although this can be the effect at times when used correctly. The true purpose of this polarizer is to remove reflections such as those off a windowpane. The major reflection we have to deal with in wildlife/scenic photography comes from the blue sky. It bounces its blue tint on everything. Along the same idea as the 81a filter, we use the polarizer to remove this blue, remove the skies' reflection, so the film records the true color of the subject/scene.
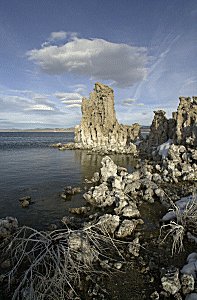
In practice, its use can be tricky at first. To see when the reflection is gone is hard for some folks to see. The best way to describe this is to look at the ground and rotate the polarizer until the dirt becomes a rich chocolate mousse color (get it? chocolate mousse, moose filter, ha!). The moose skull is a good example. You can see the blue sky; it's bouncing its blue light all over the scene. By looking at the grasses in the foreground and rotating the Moose Filter until the grasses got that rich, healthy look to them, I effectively removed the blue reflection of the sky. In the process, the sky got a tad darker and the skull more impressive! Is the Moose Filter used all of the time then? No, the Moose Filter or any polarizer is only used when you have reflections, like that from the blue sky that you want to remove. Do you use the Moose Filter with an 81a, stacking the two together? No, that would not only defeat the purpose of creating two filters in one, but would cause vignetting. (Tech Note: when shooting conventional film with a polarizer, I always dial in +1/3 comp so the image doesn't have that "polarized" look to it.) Do I still use the Moose filter when shooting with the D1? You bet because bad light is bad light no matter the format you're shooting with. The Split Graduated Neutral Density Filter This filter's sole purpose is to "compact" the light so it fits within the three-stop range of the film. If you want to hold and communicate information in the highlights and shadows of an image, you must have light within a three-stop range. This is often not the case and when it's not, that's when I pull out my Lee 3-stop SGND filter. Best rule of thumb to me is, when you photograph a sunset reflected in water and the exposure in the water is better than the real thing, a SGND filter should have been used. But you want to have it right before you get the film back and see this problem. Learning to see light and understanding its relationship with film takes time. I highly recommend you buy a Lee 4x 3-stop split graduated filter and just start shooting with it, taking before and after images. You start doing this and seeing the results on your light table, and you'll soon discover when the right time is to apply the filter. A hint in using the SGND filter: don't have the "line" of the filter going directly horizontal half way down in the image, at the horizon line! You want to use the filter to "enhance" the direction of the light in the scene while compacting it. I always have the "line" above and below the horizon line, tilting at an angle, either left or right depending upon the scene at hand. The image of Mono Lake is a good example.
I wanted the sky and clouds in the top left corner to have a little more drama. To achieve this, I tilted the Lee SGND filter so the "line" went up hill from left to right. The dark part of the filter covered the top left corner and the clear part of the filter, the lower right corner. In this way, I didn't affect the Tufa and make it darker, just the sky. If light were perfect all of the time, we wouldn't need these filters. Perfect light is of course in the eyes of the beholder. Apply these filters as a means of improving your communication; use them so folks viewing your images don't know that you're using them, and you'll be successful every time!
|
To master photography is to master light
If the image has that "blue wash", it conveys a psychological cold feeling
The polarizer is a filter designed to remove reflections
This filter's sole purpose is to "compact" the light so it fits within the three-stop range of the film
|
|
text and photography copyright © 2001 Vivid Light Publishing |
 If
light were perfect, a whole lot of photographers who are writers would
be out of business! That's because all the ills of photography would
instantly evaporate. But such is not the case. To master photography is
to master light, seeing when it's perfect and when it's not. The
threshold of perfect or not perfect is all in the eyes of the beholder.
It comes down to what you see and what you want to communicate about
what you're seeing.
If
light were perfect, a whole lot of photographers who are writers would
be out of business! That's because all the ills of photography would
instantly evaporate. But such is not the case. To master photography is
to master light, seeing when it's perfect and when it's not. The
threshold of perfect or not perfect is all in the eyes of the beholder.
It comes down to what you see and what you want to communicate about
what you're seeing.