The Canon MP-E 65mm
Macro Lens &
MT-24EX Macro Twin Lite
by Frank H. Phillips
 What
is the Canon MP-E 65mm Macro Lens? It's the most advanced macro lens in
Canon's lineup, and perhaps the most advanced consumer-class macro
available (see the sidebar What
is True Macro Photography? for an explanation). It can
produce up to 5 times life size magnification, or a magnification ratio of
5:1. It is an exceptionally sturdy, firm, and well-constructed lens. Using
an optical formula that features 8 groups, 10 elements, and ultra-low
dispersion glass. With all that glass this lens is no lightweight,
weighing in just shy of two pounds. A tripod collar is included, and will
come in very handy for stationary subjects. What
is the Canon MP-E 65mm Macro Lens? It's the most advanced macro lens in
Canon's lineup, and perhaps the most advanced consumer-class macro
available (see the sidebar What
is True Macro Photography? for an explanation). It can
produce up to 5 times life size magnification, or a magnification ratio of
5:1. It is an exceptionally sturdy, firm, and well-constructed lens. Using
an optical formula that features 8 groups, 10 elements, and ultra-low
dispersion glass. With all that glass this lens is no lightweight,
weighing in just shy of two pounds. A tripod collar is included, and will
come in very handy for stationary subjects.
 Despite
being compatible only with Canon's EOS series of autofocus cameras
(including all of Canon's digital SLRs) the MP-E 65mm is a manual focus
lens. Being a dedicated macro lens, it cannot be used like a
"normal" 65mm lens because it cannot focus more than a few
centimeters away from the front element. A mounting ring on the front of
the lens is used to attach Canon's macro flashes, the MR-14EX and the
MT-24EX. Despite
being compatible only with Canon's EOS series of autofocus cameras
(including all of Canon's digital SLRs) the MP-E 65mm is a manual focus
lens. Being a dedicated macro lens, it cannot be used like a
"normal" 65mm lens because it cannot focus more than a few
centimeters away from the front element. A mounting ring on the front of
the lens is used to attach Canon's macro flashes, the MR-14EX and the
MT-24EX.
Some people confuse the 1X - 5X designation with a zoom factor, like
the zoom factor on a zoom lens (i.e. a 35-70 zoom lens is a 2X zoom lens).
But the MP-E 65mm is not a zoom lens; the 1X - 5X designation indicates
that it can produce magnifications of full lifesize (1X) to five times
lifesize (5X).
Using the MP-E Lens
If you've ever looked through a long telephoto lens you know that the
higher the magnification the more exaggerated small movements
become.
 The
smallest of movements can ruin the shot. The effect is especially
pronounced with this lens. Shooting at 1X can be mastered quickly, but
hand-holding this lens at 2X or higher can be quite a challenge. If you're
shooting a stationary subject its no problem using a tripod (and even some
focusing rails). The
smallest of movements can ruin the shot. The effect is especially
pronounced with this lens. Shooting at 1X can be mastered quickly, but
hand-holding this lens at 2X or higher can be quite a challenge. If you're
shooting a stationary subject its no problem using a tripod (and even some
focusing rails).
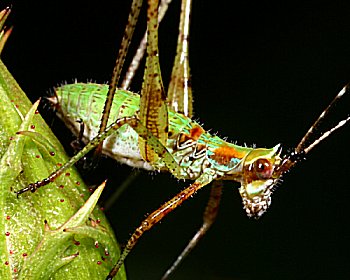
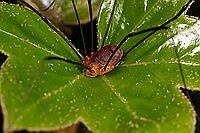
But if you've got a subject that changes position
frequently, there's no time to use a tripod, so you've got to hand-hold,
and this is incredibly hard at 4X and 5X. All of the photos of the
Harvestman or Daddy Longlegs shown below were hand-held.
Focusing: There are two ways to focus this lens: frame the shot
and then twist the barrel to focus (which changes magnification), or set
the magnification where you want it and then position the camera to the
correct focusing distance.
I use the latter method 99% of the time because for me it's easier, and
because I can remember where I had the magnification set when I made the
shot for documentation purposes. When I start shooting a subject, I
typically set the lens to 2X, then put the lens close in front of the
subject, then put my eye to the viewfinder (I often use Canon's Angle
Finder C accessory), then move forward and back until the subject is in
sharp focus, then I fire.
From there, I'll experiment with more or less magnification, depending
on the composition I want. Sometimes I'll shoot an insect at 1X just to
document it at lifesize, then experiment to see just how far I can go with
magnification.
 Depth
of Field Issues: Physics dictate that the higher the magnification,
the shallower the depth of field for any given aperture setting. So as you
can imagine when you're shooting an insect at the high magnifications used
in macro photography your depth of field is extremely small, in fact
you'll be lucky to get a few millimeters of depth in a shot - even at
f/16. Depth
of Field Issues: Physics dictate that the higher the magnification,
the shallower the depth of field for any given aperture setting. So as you
can imagine when you're shooting an insect at the high magnifications used
in macro photography your depth of field is extremely small, in fact
you'll be lucky to get a few millimeters of depth in a shot - even at
f/16.
Loss of Light: When you increase magnification by moving the
lens elements further from the film plane you decrease the amount of light
reaching the film plane (or image sensor). So whether you use extension
tubes with a lens or the MP-E lens, as you increase magnification it will
become harder and harder to see your subject through the viewfinder
because of the light falloff. This means your exposure times increase as
magnification increases.
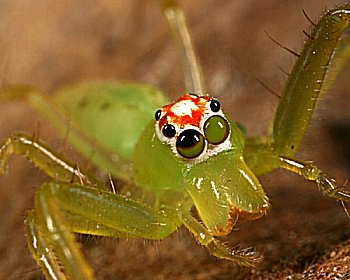
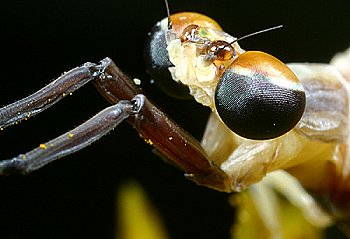
 Working
Distance: Since the MP-E is a 65mm lens you'll have to get very close
to your subject which will often present difficulties. For example,
dragonflies are extremely skittish and it's rare to be able to get close
to one unless he's eating. Another case is jumping spiders, because as the
name implies, these little guys will literally jump onto the lens when
it's too close. Working
Distance: Since the MP-E is a 65mm lens you'll have to get very close
to your subject which will often present difficulties. For example,
dragonflies are extremely skittish and it's rare to be able to get close
to one unless he's eating. Another case is jumping spiders, because as the
name implies, these little guys will literally jump onto the lens when
it's too close.
Metering Technique: I always shoot this lens at f/16, the
smallest aperture setting available on this lens, in order to maximize
depth of field. Next, I set my shutter speed to anywhere between 1/90 and
1/250 second, depending on my magnification level and the amount of wind;
higher shutter speeds for high magnification or high wind. But how, you
may ask, do I get away with simply setting my camera on full manual
settings of my choice without even bothering to meter the shot? That's
where the macro flash comes in…read on.
 Accessory
Macro Flash: The two current macro flashes in Canon's lineup are the
MR-14EX Macro Ring Lite and the MT-24EX Macro Twin Lite. Both are EX
flashes, meaning that they are compatible with EOS cameras employing
Canon's E-TTL metering system. I have experience only with the MT-24
flash, so my comments here are based on that flash. Accessory
Macro Flash: The two current macro flashes in Canon's lineup are the
MR-14EX Macro Ring Lite and the MT-24EX Macro Twin Lite. Both are EX
flashes, meaning that they are compatible with EOS cameras employing
Canon's E-TTL metering system. I have experience only with the MT-24
flash, so my comments here are based on that flash.
Simply put, if you mount this flash on the front of the MP-E 65mm lens,
you control almost 100% of the light on your subject, so metering is no
longer an issue, except in cases where the subject or background can
"fool" your metering system. An example would be when shooting a
small bee climbing over a flower with a yellow center and white petals; in
a case like this, the white and yellow will cause the shot to be
underexposed, and you'll have to compensate for that by about 1 or 1½
stops. But in most cases, the metering will be spot-on, so let the E-TTL
do the work for you. All you do is set your camera to manual (whatever
aperture and shutter speed you wish), set the MT-24 to E-TTL, and fire
away…the flash does all the work for you!
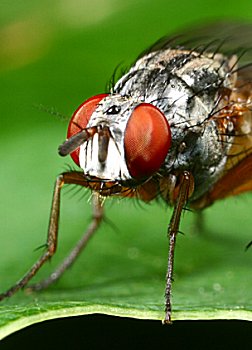 The one
drawback to this technique is that the flash takes over the shot to such
an extent that very little ambient light is included in the shot,
especially at small apertures like f/16, which produces a jet-black
background in your shot (like the one above). Personally, I like this
effect because it removes any distractions that might be in the background
and lets you "focus" on the true content of the photograph. The one
drawback to this technique is that the flash takes over the shot to such
an extent that very little ambient light is included in the shot,
especially at small apertures like f/16, which produces a jet-black
background in your shot (like the one above). Personally, I like this
effect because it removes any distractions that might be in the background
and lets you "focus" on the true content of the photograph.
Conclusion
The combination of the MP-E 65mm lens and MT-24EX Macro Twin Lite allow
you to take shots that are nearly impossible with a typical
"macro" lens and flash. It allows you a tremendous amount of
control and produces sharp crisp images that let you peer into a world
that is normally beyond our view. We found street prices for the MP-E 65mm
ranging from $810 to $850 and the MT-24EX Macro Twin Lite from $650 to
$700.
While this isn't a budget setup it will energize your photography and
encourage you to explore places you've never seen before. Isn't that worth
the price?
| What
is True Macro Photography?
Although many lens manufacturers
(including Canon) tend to use the "macro" designation in
a rather cavalier fashion its important to remember the difference
between true macro photography and simple "close-up"
photography. A picture of a flower up close doesn't make it a
macro shot.
The true definition of macro photography, also known as "photomacrography"
is production of an image that is the same size (or larger) on the
film plane as in real life (lifesize). Thus, if you photograph an
insect that is 2 centimeters long at 1:1 (lifesize), it's image
will be 2 centimeters long at the film plane or digital sensor.
The most common way to increase magnification is to get the
lens as far away from the film plane as possible. There are a
couple of ways to do this including extension tubes, bellows
(those accordion-looking gizmos), close-up filters, and of course
using a true macro lens like the MP-E 65.
This lens is much easier to use than any of the other methods.
A simple twist of the lens barrel moves the elements away from the
film plane creating the bellows effect.
Extension tubes do the same thing (they're nothing but hollow
tubes with no lens elements) but you'll need to stack several of
them to achieve 2x magnification. Having said that, extension
tubes are far less expensive than the MP-E 65 lens, and if you
want higher magnification on your current 1:1 macro lens (like the
Sigma 50mm, Sigma 105mm, or Canon 100mm) you should give them a
try first.
|
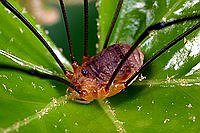
1:1 Magnification (Lifesize)
|
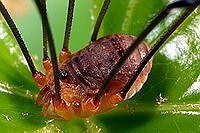
2:1 Magnification (2X)
|
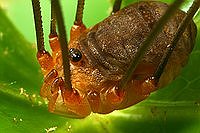
3:1 Magnification (3X)
|
|
4:1 Magnification (4X)
|
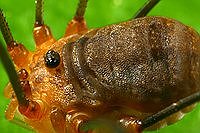
5:1 Magnification (5X)
|
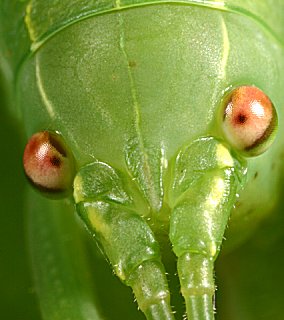
The photos of the Harvestman (a.k.a. "Daddy
Longlegs") above appear to have been produced by
"zooming in" on the insect. They were not. The effect
was achieved simply by changing the magnification on the lens and
then moving the lens until the insect came into sharp focus. For
the first shot, I set the lens to 1X then moved the camera closer
and closer until sharp focus. For the second shot, I set the lens
to 2X then moved the camera closer and closer until sharp focus,
then I fired, and so forth all the way through 5X. In each and
every case, I was within only a few centimeters of the insect.
As you can see, there is a tremendous difference between 1X and
5X. At lifesize, it's hard to tell that this insect has two tiny
eyes on top…they become apparent at 2X, and most pronounced at
4X and 5X. These are the kind of results you can expect from this
lens once you've mastered its handling. |
 Subscribe to
Vivid Light
Subscribe to
Vivid Light
Photography by email
Tell
Us What You Think
|
|
