|
|
|
|
|
|
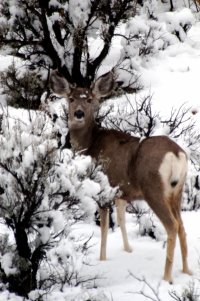
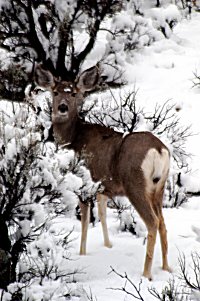
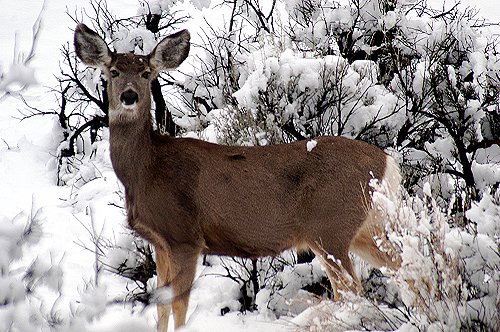
| Long Handheld Exposures Or Getting Past Fear of Failure by Jim McGee There is a rule of thumb in photography that you shouldn't try shooting without a tripod if the shutter speed is more than one over the focal length. That means that for a 300mm lens you shouldn't try hand holding anything over 1 / 300th of a second. Some photographers advocate shooting just about every shoot from a tripod and some won't even attempt a shot if they think it might not come out sharp. Phooey! There are some simple techniques you can learn to improve the quality of your hand held shots and some good reasons for doing so. The most obvious is that a shot may never present itself to you again. Another reason is that by practicing those "extreme" handheld shots you're more likely to be able to pull one off when you really need to. Just Do It! That's when I see the mule deer moving in the trees down below us - beautiful against the fresh snowfall. They're moving away from us. If I take the time to go back to the car they'll probably be gone and there's no good candidates for use as a lens prop. So I figure what the heck, I can let the shot go or see what I can get. A 70-300mm lens and a 2x converter mounted on a D100 give me an effective focal length of 900mm. Anyone will tell you that's too long to handhold. By the rule of thumb above I might have a chance at a sharp image at 1/1,000th of a second. No such luck. One glance at the heavy overcast tells me that the weather gods aren't going to give me a break today. My meter is telling me 1/350th of a second. I shot a series of images as the deer worked their way back up into the woods anyway. The first image is very soft and doesn't even look good as a four-inch print and image two is actually a bit worse. But image three is sharp enough that it still looks pretty good as an 8x10. A little soft for my finicky taste but all-in-all not bad. In the forth shot I switched to a horizontal composition and it's noticeably sharper at 8x10. You can clearly make out detail in the fur.
How to Do It Relax. If your body is tense your muscles will shake. If you don't believe me make a fist and squeeze it hard and hold your arm out. In short order you'll see a slight tremor in your hand and arm and it doesn't take much vibration to make a photo soft. The body mechanics I talk about in the next few paragraphs are all about relaxing your body as you shoot. Take all the tension out of your body and your hands will be much steadier and your images sharper. Get a good stance and hold your camera correctly. Stand with your feet about shoulder width apart. Your front foot should be pointing in the general direction of your subject and your back foot should be around 90 degrees to your subject. Don't go nuts worry about the exact angles and placement of your feet. Just get them generally in this alignment so that you're in a relaxed stance. Don't lock your knees. Get your shoulders in line with your hips. I'm always surprised when I see photographers crank their bodies around to shoot. Their shoulders are at a 30 degree angle to their hips. That means your muscles are exerting force to keep you at that angle. Rotate your shoulders so that they're roughly in line with your hips and the muscles of your torso will be relaxed rather than working to keep you in position. A little body rotation is fine. A lot is bad. Elbows in. An awful lot of photographers shoot with their elbows hanging out in the wind like a pair of wings. That causes your shoulder muscles to work. If you don't believe me put your hands in front of your face as if holding a camera. Start with your elbows at your side and raise your elbows up and down a few times. You'll feel the muscles in your shoulders working. Get in the habit of relaxing your arms and letting your elbows rest at your side. It's especially easy to cock that elbow out when you're shooting a vertical composition. When you're shooting your left elbow should be resting against your body and your left arm should be supporting all of the camera's weight. Use your right arm only to steady the camera and press the shutter. When you take all the weight on your left arm you'll relax your right arm and the right elbow will drop on it's own. Control your breathing and relax. Do you hold your breath when you shoot? Do you even know for sure? Holding your breath is the same as clenching your fist. You're bringing air in and tensing the muscles in your chest to keep it there. While you're reading this exhale deeply. Your chest and shoulders will drop. If you do this while standing as described above there will be a feeling of your upper body settling down onto your hips. I exhale just before shooting and often don't breathe for a couple of frames if I'm shooting some kind of action handheld. It allows my body to stay relaxed. Don't worry I've never known a photographer to pass out from lack of oxygen! Find a brace. Ideally when I spotted the deer there would have been a tree or wall I could have used as a brace. In that particular case there was no tree and the wall around the parking area was under a snowdrift. But if you can find a solid vertical object such as a wall or tree let your upper body sag against it. Let it take your weight. That extra support can buy you up to two stops (sometimes more). If you can find a horizontal surface throw a jacket or camera bag on it and rest your camera on top of that soft support in place of a tripod. Under expose. If you're shooting print film you've got a lot more exposure latitude than you do with slides. Bracket your shots so that some are at the recommended exposure and some are a stop underexposed. You can almost always get a usable print from a negative that was shot one stop under. Take multiple shots. Just as with the deer in the example take multiple shots if you can. You'll probably have three or four throw-aways to every shot that's acceptable and a much higher ratio of so-so shots to tack sharp shots. But you'll improve with practice and the number of keepers will go up. Push the Envelope Go ahead and push the envelope a bit. This isn't brain surgery after all. If you screw up a frame or two there's no harm. When the light is fading fast I've had exposures over one second come out tack sharp. Now no sane photographer would try and hand hold an exposure over one second. But if you never try you'll never "get lucky". |
|||||||
|
|
|
|
|
|
|
|
|