|
|
|
|
|
|
| Technique: Try Something New by Gary W. Stanley
No matter what format we use, we still strive for correct exposure and sharp images. We still need to compose well and look for great light. I have always been a believer that no matter what type of photography you do, whether it is landscapes, nature, wildlife, people or sports, if you practice good technique and understand good basic photography, you should be able to cross over into any of these other areas of interest and capture some nice images. From time to time, I cross over from my nature, landscape and wildlife work to try my hand at action sports. I take with me my experience photographing wildlife and apply the same techniques. A friend will invite me to an event such as a bike race or kayaking event, and at their prodding I take a camera along just in case. I usually end up admitting that I had more fun than I thought, and got some great photographs along the way. While I do a good deal of wildlife shooting, I'm not willing, nor do I have the time and patience, to sit in a blind for hours waiting for a particular animal to show up. I'm what I label a "Found Photographer." "If I find it I'll shoot it." I do of course lead specific tours where wildlife is the focus of attention, and where they are plentiful, but I still prefer my landscapes. Anytime you veer away from the normal routine of your photography, you're bound to learn something new and a little more about yourself. Preparation is a key factor in trying anything new, and vital to the success of your endeavor. Let's take a look at some ways to prepare for this type of shooting (action sports) and some techniques I've used to insure you get great results. Equipment Preparation: The very first thing I have to do is to remember that I won't be shooting landscapes at f/22 with Velvia. I may not use the camera on spot metering and manual focus, and while I will try to use a tripod, I might not always be able to do so. Settings: I make all my camera settings except for exposure ahead of time. For most sports and wildlife action, I will set my camera to either aperture priority using a fairly wide-open lens aperture for maximum shutter speeds, or to manual. I double check to make sure that I have the correct ISO settings and that I don't have any compensation dialed in. I decide whether or not to use spot metering or to trust matrix. I also will decide whether or not autofocus will work best for me, or should I focus manually. Again this will all depend upon subject matter, desired affect and the type of surroundings that I'm dealing with. Lens Selection: Based on what I know about my subject and the surroundings, I will choose a lens or lenses for that situation. If I'm photographing birds I know I'll probably be using a strong telephoto lens in the 400mm to 600mm range at a minimum. If it's biking or kayaking, it might be an 80-200mm f/2.8 or my 80-400 VR stabilizing lens to freeze the action. With a zoom, I can also crop my subject easily, follow the action and shoot while panning. Film: I still want sharp fine-grained color saturated film, so I will usually choose Provia 100F and shoot it at 200 ISO if I need to. Since you are probably looking for faster shutter speeds, film choice will have to be made based upon the available light and desired affect you're looking for. With digital, you can choose the equivalent ISO setting you need or change it at any time along the way if lighting conditions warrant it.
The Technique: You now should be ready to handle your new shooting experience, so here are a few of the techniques from shooting wildlife that I have used for action sports to successfully capture the images in this article.
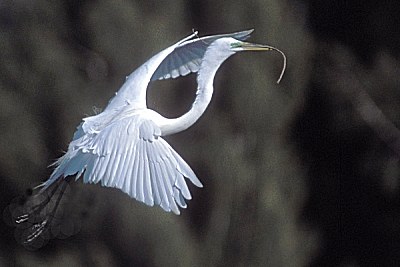
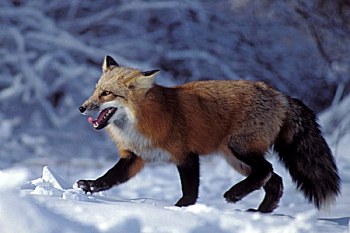
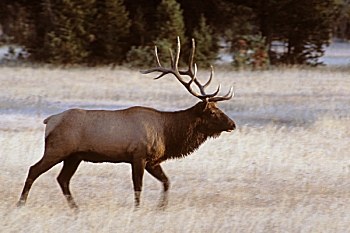
Panning With The Wildlife: One of the first things that I realized when I first started photographing wildlife was they don't always hold still. Panning is a nice way to show or imply action in still photography. With birds such as herons, I'll set up my tripod so that I can photograph them on a vertical plane and parallel to the camera as they pass back and forth coming to and leaving a nest. With this method I can actually focus manually without any problem (you may choose autofocus), and I can preset my exposure, spot metering the bird to get the results I want. I did the same thing for both the bull elk and the red fox. They, of course, were not as hard to photograph as the birds, but in each case you still need to be smooth and fluid as you pan in order to assure a sharp image. Shutter Speeds and Depth of Field: With wildlife like this you may be working in low light conditions, so shutter speeds can be low making this all the more important. The key thing here for me was again was panning to keeping the image from looking static, and making sure the head, eyes and nose were sharp. If the light is constantly changing and the subject is relatively easy to meter, I will use aperture priority (the A setting) shooting at or close to wide open to assure the fastest possible shutter speed. This is where someone will say: "Gary, why not use shutter priority instead of aperture priority since you want a fast shutter speed?" My answer is simple: "What if there isn't enough light to handle the shutter speed you have selected?" If you use aperture priority, the camera will automatically set the highest possible shutter speed for the aperture you've selected, the film speed in use, and the amount of light available. When you need a little more depth of field, you can quickly and easily rotate the aperture dial (stopping the lens down) with the confidence of knowing that you are still getting the highest possible shutter speed for the aperture you have now set.
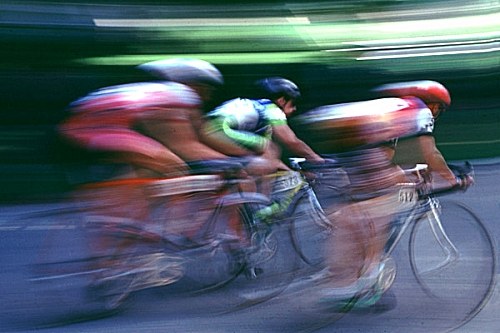
However, because they made numerous laps past my position, I was able to set up and be ready for each pass. First, I would just try to capture or freeze the action as they came through the turn, by using a fast shutter speed (at least 500th sec). After a while, though, I started to think of new ways to make an image a little different. In the second photograph of the bikes I slowed the shutter speed down to around a 60th to 125th of a second. Then I carefully followed the bikes as they approached my new position. I stood so that I could make a full sweep panning as I went. Try this before they approach to make sure you don't get your legs all tangled up when the bikes actually do pass. The slower shutter speed helps to blur the background as you pan while the shutter speed I set was enough to freeze the action of the bikes themselves. Taking the time to broaden your photographic horizons can be both fun and rewarding. Often you can take one technique, master it, and use it in totally unrelated areas of photography.
|
|
|
|
|
|
|
|
|
|
|
 With
all the attention paid these days to the latest and greatest products in
our techno-world, it is easy to get wrapped up in the digital capture
verses film conversations. In fact, I have devoted a couple of articles to
it over the past few months. But I have also mentioned that for the most
part photography is still photography and we need to continue to exercise
good technique just as we always have, regardless of the format used.
With
all the attention paid these days to the latest and greatest products in
our techno-world, it is easy to get wrapped up in the digital capture
verses film conversations. In fact, I have devoted a couple of articles to
it over the past few months. But I have also mentioned that for the most
part photography is still photography and we need to continue to exercise
good technique just as we always have, regardless of the format used.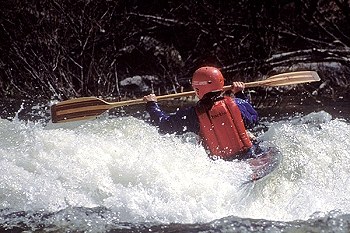 Tripods and More:
If at all possible I will use a tripod. I'll use one
that is fairly lightweight and easy to set up, like my carbon fiber
tripod. I use a quality ball-head (a Kirk BH-1) for smooth operation while
following the action. There are of coarse specialized heads out there for
large lenses, like the Wimberly head for those who can justify the extra
cost ($250 - $600). They are designed to balance the big lenses without
worry of tipping over, and yet are extremely smooth, making it easy to
follow the action.
Tripods and More:
If at all possible I will use a tripod. I'll use one
that is fairly lightweight and easy to set up, like my carbon fiber
tripod. I use a quality ball-head (a Kirk BH-1) for smooth operation while
following the action. There are of coarse specialized heads out there for
large lenses, like the Wimberly head for those who can justify the extra
cost ($250 - $600). They are designed to balance the big lenses without
worry of tipping over, and yet are extremely smooth, making it easy to
follow the action.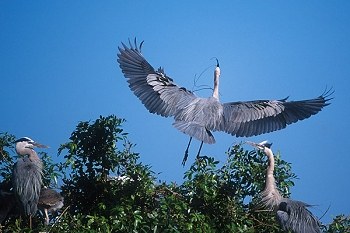 Yourself: Shooting wildlife or sports can be very tiring. You may be
standing for long periods of time waiting for something to happen, or
following the action without an opportunity to rest. Try to dress for the
day and anticipate the weather. Photographing kayaking without gloves
during the spring runoff in Vermont for example can be a very chilling
experience. Standing in the Florida sun photographing
birds without head protection or sunscreen can also be a very painful
experience. I try to anticipate the amount of equipment
that I will need and limit myself to just a photo vest. It simplifies
things for me, giving me less to worry about.
Yourself: Shooting wildlife or sports can be very tiring. You may be
standing for long periods of time waiting for something to happen, or
following the action without an opportunity to rest. Try to dress for the
day and anticipate the weather. Photographing kayaking without gloves
during the spring runoff in Vermont for example can be a very chilling
experience. Standing in the Florida sun photographing
birds without head protection or sunscreen can also be a very painful
experience. I try to anticipate the amount of equipment
that I will need and limit myself to just a photo vest. It simplifies
things for me, giving me less to worry about.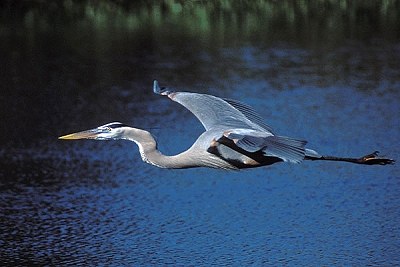
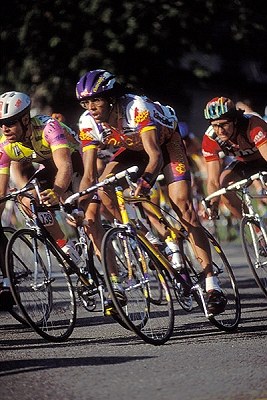 Panning in Sports:
Here we have several different things going on. With
sports as in wildlife, the action or decisive moment can happen very fast,
as in the case of the bikers.
Panning in Sports:
Here we have several different things going on. With
sports as in wildlife, the action or decisive moment can happen very fast,
as in the case of the bikers.