|
|
|
|
|
|
| Photo Business Cards A Critical Part of Your Professional Image by Gary W. Stanley Years ago when I first got interested in trying to make money with my photography (I'm still interested and still trying!), I thought that having business cards made of one of my images would be a great way to promote my work. I carefully selected a slide that I thought would work well, then hopped in my car and drove thirty miles to the lab that offered photo business cards. I explained to the person at the counter exactly what I wanted for text, the quantity etc. I arranged for them to send a proof of the card to me, thinking that once I called and approved the work, it would be one to two weeks from that point. Wow! A couple of weeks and I'll be in business. The proofs came; the photo looked awful, I sent it back saying it was way too light. I got the revision a week later, and it was way too dark. I got back in my car and drove the thirty miles back to the lab. "How come you're having so much trouble with this image?" That was my remark. Their remark was: "It's hard to get a good print from a slide, do you have any other images?" It was then that I began to realize that the two weeks I had planned on wasn't gonna happen. More than that, I was embarking on a learning experience that would take me to a new place in time, one where modern technology would solve some of my problems for me. For most businesses just about any card will do as long as you convey your basic contact information and what it is you do. When you are a photographer however, your business card with your image on it is a very important introduction to who you are and what you do as a photographer. Because photography is my business, the images have to be perfect. This, of course, applies to the images on your website and other promotional pieces as well. When the day came that I could actually produce my own promo pieces using a computer, Photoshop, and an inkjet printer, I was ecstatic. I no longer had to make those daylong trips to my lab. The struggle of trying to get them to understand what I wanted was over. I was the one who knew exactly what I was looking for when I produced an advertising piece. But none of that matters compared to the fact that the quality of the promo pieces I produce at home are better than the work I would have gotten had I sent it out. As I said before: "Photography is my business so the images have to be perfect." This brings us to the "how-to" portion of the article. Let me start by saying that you will no doubt find there are many ways to produce your own personal promo pieces such as photo business cards. You can go to your local office supply store and purchase pre-made Avery cards in 8-1/2 x 11 sheets that are already perforated. You can select the Avery number so that your computer knows how to format it to your inkjet as well, all making it very convenient. Again, this may be great for the average Joe, but ask yourself: Will these cards have the kind of quality that you'll want, on the kind of stock that will make your images pop? Can you do the kind of graphics and text that will make these cards a real attention getter? For me the answer was a resounding NO! I made the choice to do it the hard way, if you will, although I don't find it that hard to do. I basically choose an image that first, looks great, and, secondly, is simple enough to have plenty of room for text. You may be using a different editing program than Photoshop and while I realize that I'm not getting into the details of how to put text on an image, how to work in layers and how to choose colors and styles, my reasoning is simple: this article isn't about teaching you that. Many of you will already know how to do this, but the ideas that I am sharing in this article hopefully will be enough to spark interest and get those creative juices flowing. Besides, I need to save those details for another day (it's called job security!).
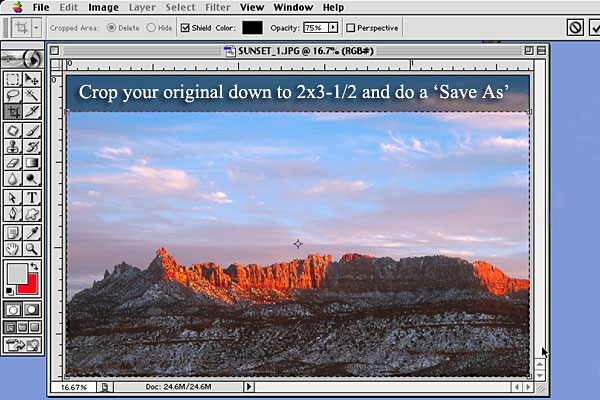
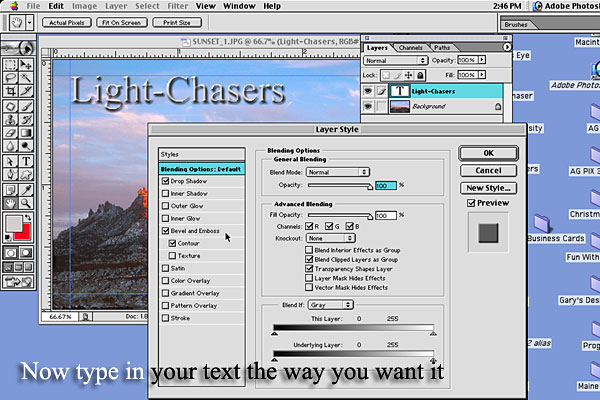
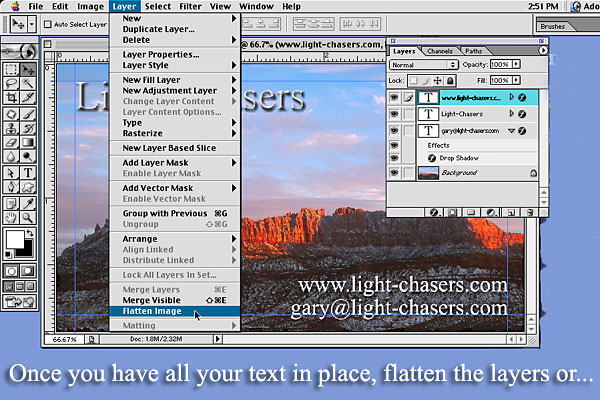
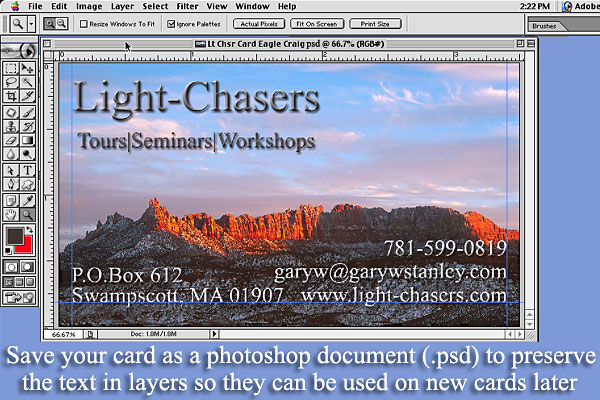
The first thing I do is to bring up the image that I wish to use for a card and crop it to the size of a business card (2x3-1/2) (photo 1). I then type in the text that I want for that card (photo 2). Once you have all the text in place the way you want, flatten the image (photo 3) or, to maintain some sort of consistency from card to card as I create new ones, I save the image as a Photoshop document (.psd) so that I can preserve the layers of text (photo 4). Then when I bring up and size a new image, I can simply copy and paste or drag the text from the first card (after I open it) onto the new card.
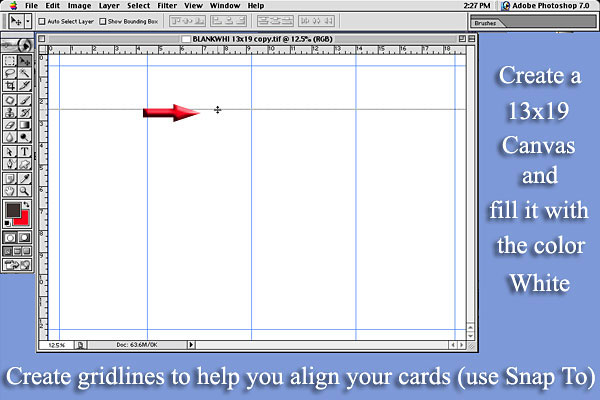
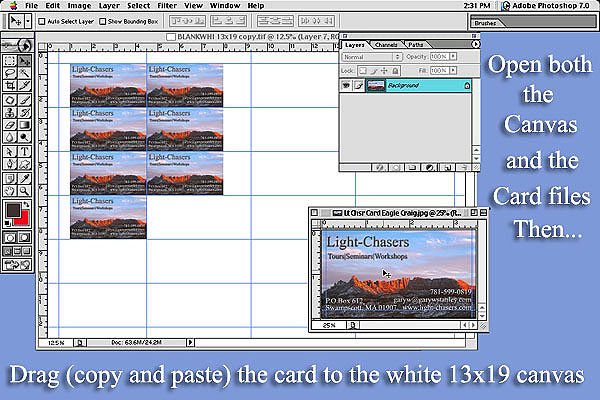
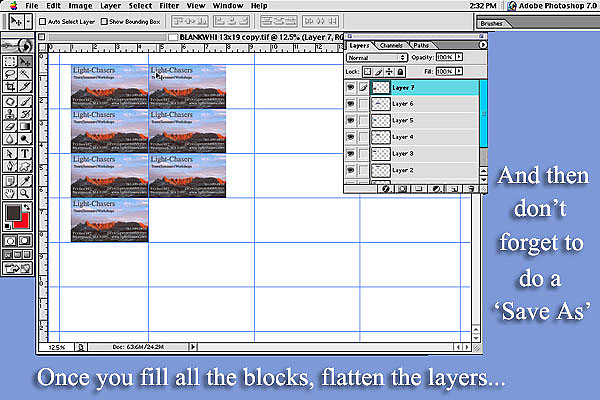
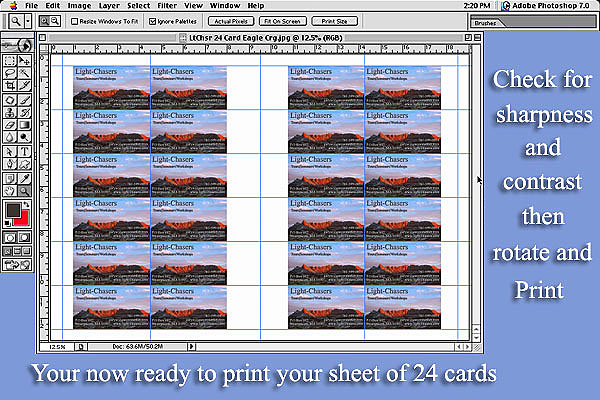
I then create a 13x19 canvas for use on my Epson 1270 printer. I fill the canvas with the color white so that it is easier to see my blue grids when I place the copied card onto that newly created 13x19 template (photo 5). I then place the blue grid lines to align as many cards on a page as possible (24 with my 1270 Epson). You may be able to get more using the 1280 or 2200 Epson printers because they can print to the edge of the paper. You should be able to get 12 cards on an 8-1/2 x 11 sheet when using a smaller printer like my old Epson 870. I use Ilford's Classic Pearl 13x19 paper for my cards because I like not only the look but also the thickness of the paper. Once my grid guides are in place on my white template I save it for the next time. I open that template in Photoshop as well as my pre-made card (sized to 2x3-1/2), reducing the card's visual size down so that I can see both my template and the card. Then I drag (copy and paste) that card each time over to the template and place them in their respective boxes (photo 06). When all twenty-four are in place, I flatten the layers (each dragging of a card creates a new layer) (photo 07), make final adjustments of contrast brightness and sharpness and then I'm ready to print it (photo 08).
I will usually make one test sheet to see how it will look. I then do a 'save as' of that finished sheet for use again each time I need more cards, and to preserve my original template. I have a small photo paper cutter that I use to cut the sheets down to their individual card sizes. This makes for a very clean looking, professional job. I generally print several sheets (usually 4 or 5) at a time (about 100 cards total) and cut them while watching the news, or when I need a break from the computer. I have to be honest here, I get so wrapped up in these little projects - seeing what my latest greatest image will look like as a card - that I feel the presence of my editor looking over my shoulder wondering when I'm going to get my next article written! |
|
|
|
|
|
|
|
|
|
|