|
|
|
|
|
|
| Preserving Luminosity by Gary W. Stanley Recently I had a conversation with Jim McGee, our Managing Editor here at Vivid Light Photography. If I've learned one thing about my conversations with Jim, it's this: don't discuss any photographic technique with him unless you're prepared to write about it! "Hey, that would make a nice article. Why don't you write about it?" Man! He got me again. Now I'm forced not only to do an article (not that that is a bad thing), but I'll have to do research. "Why Gary, aren't you an accomplished Photoshop wizard?" "Ah - No!" I know what it takes to do what I want to do, and I do that well. But Photoshop isn't exactly a simple four-step program with only one way of doing things. It's HUGE! If I could even begin to grasp all that Photoshop has to offer, I would be well on my way to understanding the secrets of the universe. I've touched on the subject of luminosity from time to time in other articles as well as Curves and Levels, but I thought (thanks to Jim) that we would dig a little deeper to see if there is a way to make your prints or images look as good as your original slide or digitally captured image. What seems to impress us most about seeing an image projected onto a screen or when viewed on a light table, is that beautiful vivid color and three-dimensional (3D) quality that a backlit image has compared to the relatively flat two-dimensional look of a print. Now in all fairness to the techies out there, I searched and searched for information on luminosity in virtually every book on Photoshop that I could find, and none of them told me what I'm about to tell you. I looked up Luminosity and found "Luminosity Mode" that just tells me that it "preserves the Hue and Saturation of the base image while applying the luminance of the blending pixels" (this is in Layers by the way). Wow! That was helpful? I looked up "Luminance" and discovered that…"you can create a Luminance Mask based on the composite channel." Someone must know what that means but it sure isn't me. All I want to do is make my image or print look like my slide. Is there something wrong with that? After going through my personal library, and after spending several hours in roaming the bookstore, I came to the conclusion that perhaps we weren't even talking about the same thing. Finally I decided to have a little one-on-one mental discussion with my old pal Mr. Webster. He said that "1. Luminosity is the quality or the condition of being luminous. 2. Something luminous. 3. Brightness." Okay Brightness is cool. Now explain luminous for me Mr. Webster. Luminous: "1. Giving off light; shining; bright. 2. Filled with light; illuminated." Yes! That's much better. Of course, I made the mistake of reading the rest of the definitions and quickly realized that number 5 didn't apply to me: "5. Intellectually brilliant." So, armed with that bit of information, let's define what luminosity will mean for the remainder of this article.
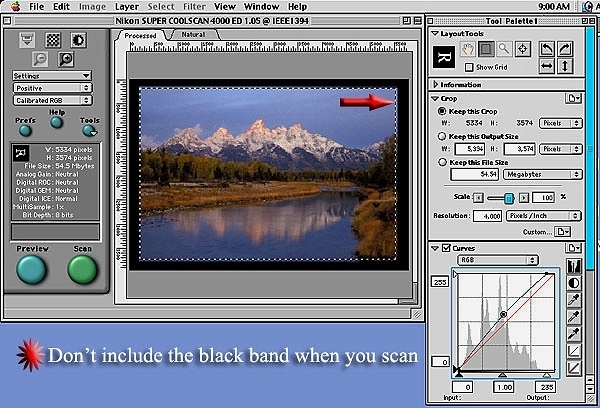
Wow Gary, it only took 539 words and several hours of research to get to the bread and butter of the article. Let's start by saying that the better the luminosity of your original, the better your resulting image should be. Yes, you can bring up the luminosity of a relatively dull image, but that won't necessarily be your best image. Remember the GIGO theory: "garbage in garbage out." Start with a high-quality original and your results will be much better. If your image starts out flat and uninspiring, don't expect Photoshop to fix it for you. Now let's talk about scanning slides first, then once we have the image into Photoshop or similar program, we'll be referring to both slides and digital capture. Scanning: While the actual scan may not be the biggest issue in our discussion, there are a few things to remember when scanning that will at least help you later. When you bring up the image in the pre-scan, remember to select only the image itself as part of the scan. If you include the black (the mount) area around the image in your scan, the scanner assumes that that black area is part of your image which can throw off the auto-exposure mode of the scanner. You only want the scanner to read the actual image so that the information brought into your editing program is as accurate as possible.
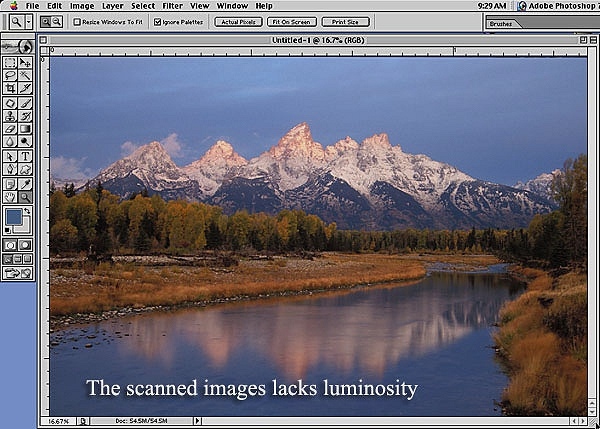
As I have mentioned before, I don't make too many other adjustments when scanning preferring to do that in Photoshop. Sometimes I will adjust the brightness a little so that the image is not too dark (I'm really just previewing here). I don't want to go too far one way or the other with regard to highlights and shadows, because I want the scanner to capture detail in both areas. The Editing Program: Once into your editing program (Photoshop), we can do several things to increase luminosity. As you can see, the image brought into the editing program is lifeless and somewhat dull, so we will need to make adjustments to bring out the look of the original.
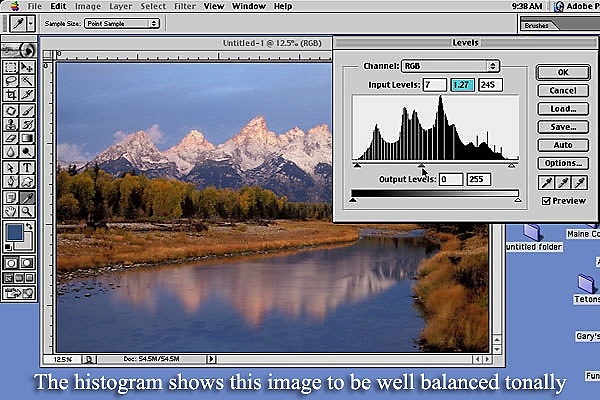
Levels: First let's go into the levels settings. The histogram is showing that the overall image is fairly well balanced without a lot of extremely light or dark areas. Most of the tonal range is centered in the midtone area. This does not mean that every image you shoot will be that way, it just means that this particular shot is. I moved the Gamma setting (the middle triangle) around to see if this would help. This only affected the midtones, and because this image didn't have any extremely bright or dark areas, Levels didn't help much here.
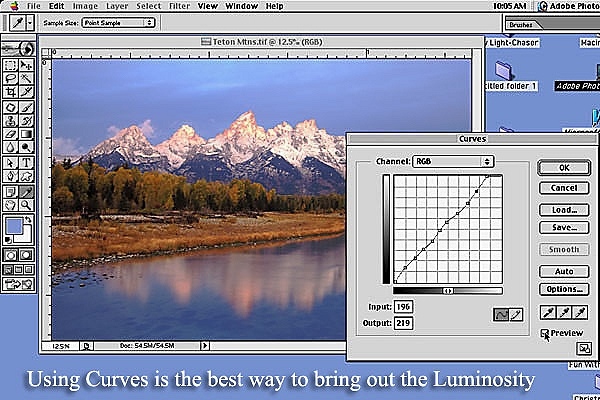
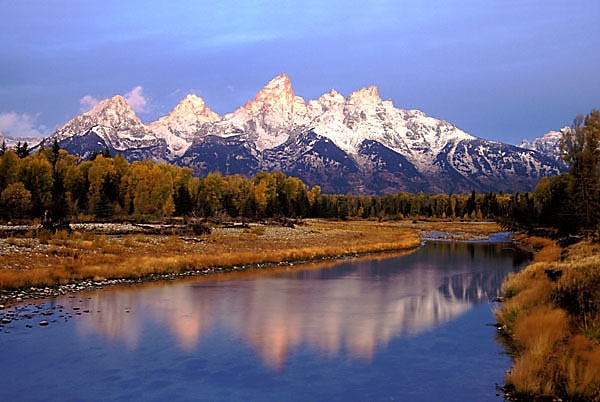
Curves: Using curves on the other hand allowed me to fine tune the image and get the luminous look of the original slide. Curves allowed me to make changes to the darker area of the image, in this case the foreground, without blowing out the highlights of the snow on the mountains. I also made some subtle adjustments bringing up the contrast of the mountains and the snow. While I was able to do all of this using Curves, there may be an easier way for you to do it with certain images.
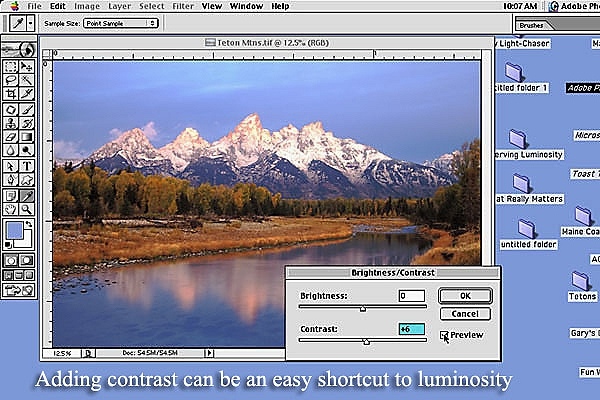
Brightness and Contrast: While I do realize that adjusting Brightness or Contrast here affects all the pixels in your image and not just a selected area of pixels as in Curves, it doesn't mean that you can't at least try it and see. Often I am able to make very quick adjustments using Levels, then, go right to the Brightness and Contrast palette and make my final adjustment before sharpening the image. Contrast in particular plays a key role in adding that 3D look. You may want to at least try the Brightness/Contrast palette anytime during the editing process just to see if that is indeed what the image is lacking.
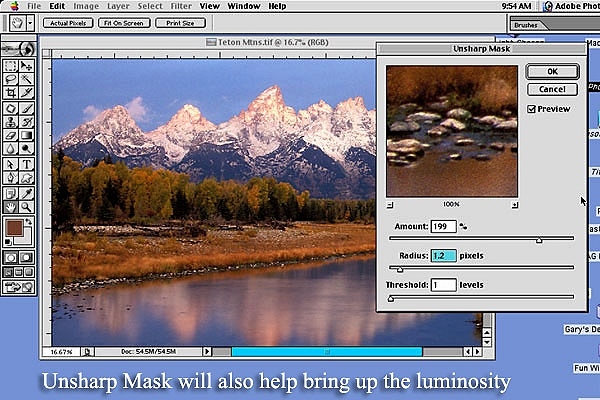
Sharpening: Sharpening is the final step in creating that luminous look to your print. Detail is important, so making the image look as sharp as your original is also important. Granted, the luminosity created by using Unsharp Mask is a byproduct of your first intent, and that is to sharpen the image.
The Final Touch: One last thing that I will do to help get that luminous 3D look to my prints, is to make adjustments in my printer program settings. Keep in mind that the paper on which you choose to print will make a difference in how the final print will look. I do a test print to see how close the print looks to the image that is now on my monitor. If it is still flat and lacking that 3D look, I will bump up the contrast in my custom printer settings, and save it there if I'm happy with the results. You can also make other adjustments at the printer, such as Brightness or Saturation that may also help the 3D look and luminosity of your print. I have saved the settings for the different paper that I use and am familiar enough with my printer that I usually don't even need a test sheet. Remember: "Practice Makes Perfect" or at least pretty darn close to perfect!
|
|
|
|
|
|
|
|
|
|