What is Hyperfocal Distance
and Why Should I Care?
by The Staff at Vivid Light
So what the heck is hyperfocal distance
and why should I care?
In Plain Language
If you focus your lens at its hyperfocal distance you will get the
greatest depth of field. With a high quality lens you can produce images
with your 35mm that people will swear came from a medium format camera.
 So
what is hyperfocal distance? Whenever you focus your lens there will be an
area that is in focus and areas that are out of focus. The area that is in
focus is referred to as the "focal plane". So
what is hyperfocal distance? Whenever you focus your lens there will be an
area that is in focus and areas that are out of focus. The area that is in
focus is referred to as the "focal plane".
The import thing here is that 1/3rd of the focal plane is ahead of the
thing you're focused on and 2/3rds of the focal plane falls behind what
you're focused on.
Focus your lens at infinity and the leading edge of the area that is in
focus is the hyperfocal point for that lens. Focus on that point instead
of infinity and you'll have the greatest range of focus from infinity back
toward your location.
The Chart
You can cheat, and many photographers do, by focusing about a third of the
way into a scene. This will get you good sharp images with a lot of depth
of field. But if you really want to squeeze the maximum depth of field out
of that sweeping landscape before your lens knowing the correct hyperfocal
distance for your lens is the only way.
You can do some math to find out the hyperfocal distance for any focal
length lens at any aperture. But since most of us don't carry around
calculators in our camera bags it helps to have a little cheat sheet
along. We've included a couple of links below that allow you to print out
charts for 35mm, 4x5, 6x6, and digital cameras. There are a couple of
versions of the charts. The simplest to use is the PDF version. Just
download it and print it. We've also included charts in Microsoft Excel
format for the math wizards out there who want to modify
the spreadsheets for other formats or to change the value of a constant in
a formula (see Understanding the Math
below).
Using the Chart
The first step in getting maximum depth of field is to use a tripod. The
idea is to capture fine detail. Unless you're using a very high shutter
speed and you have the steady hands of a marksman the only way to do this
is with a tripod to keep your camera rock steady.
Compose your image. Put your camera into manual focus mode, pick an
object at the hyperfocal distance indicated by the chart and focus on it.
There was a time when every lens had a distance scale printed right on the
lens barrel. Those days are gone so unless you're using an older manual
focus lens you'll have to estimate distance.
Use a cable release or the camera's built in self-timer to trip the
shutter. Doing it manually by pressing down the shutter release button
will cause camera movement and everything you've done so far will have
been wasted.
When you get home make a nice big print and enjoy the results!
 Times
You Don't want to Use Hyperfocal Distance Times
You Don't want to Use Hyperfocal Distance
A visual technique that has become common in today's landscape photography
is to pick a strong foreground subject placed low in the frame. Your eye
naturally goes to that foreground subject and then on back into the image.
Depending on the focal length of the lens and the closeness of the
subject, hyperfocal distance may leave the focus on that foreground
subject soft. Since that is the first thing the viewers eye goes to the
whole image will appear to be slightly out of focus - even if everything
beyond that foreground subject is tack sharp. So if you're employing this
compositional technique for your landscapes you have to make sure the
foreground subject is sharp.
If you have a sufficiently bright viewfinder you can go to your
hyperfocal distance and then gradually back the focus in until the
foreground is tack sharp.
That's the end of the practical discussion and most of us should stop
reading here. Continue on only if you want to get into the math and
science behind calculating hyperfocal distance.
Understanding
The Math
Most of us can skip this part and just refer to the chart for the
point on which to focus our lens. But for those wanting to calculate
other formats or recalculate using a different value for the circle
of confusion we've provided the formulas.
(L x L)
H = ------------
(F x D)
| Where: |
|
H = |
Hyperfocal distance (in
millimeters) |
|
L = |
Lens focal length (i.e., 35mm,
100mm) |
|
F = |
Lens aperture f-stop |
|
D = |
Diameter of circle of least
confusion (in millimeters) |
|
|
Digital SLRs |
D = 0.02 |
|
|
35mm format |
D = 0.03 |
|
|
6x6cm format |
D = 0.06 |
|
|
4x5in format |
D = 0.15 |
Why use a different value for the circle of confusion? The
constant used here is based on what is considered to be acceptable
sharpness in an 8x10 print at a normal viewing distance. The problem
is that normal and acceptable open the door for interpretation.
The constant we used has been around for a while and is widely
accepted. But it's been argued that this constant doesn't take into
account the tremendous improvements in lens design and film
sharpness that we've seen over the last few years. Search around the
Web for a while and you'll find numerous values to substitute for
the circle of confusion constant, along with very technical sounding
arguments for each.
In reality the markings on your lens barrel aren't all that
accurate and if you're shooting with a newer lens you don't even
have the lens markings going for you. That means you're estimating
where the hyperfocal point is. So unless you're using and electronic
range finder the slight differences in hyperfocal distance you'll
get by recalculating with a different constant for the circle of
confusion just won't make any difference in the real world. Also
useful is being able to determine your near focus distance:
H x D
NF = ----------------
H + (D - L)
| Where: |
|
NF = |
Near focus limit (millimeters) |
|
H = |
Hyperfocal distance (in millimeters from
equation above) |
|
D = |
Lens focus distance (in millimeters) |
|
L = |
Lens focal length (ex. 35mm, 50mm, etc.) |
|
For the
Technically Obsessed
 Let's
say you're the photographer who not only has every gadget in the
world but you're obsessive about details. You can get the ultimate
in accuracy by purchasing an Electronic rangefinder. Let's
say you're the photographer who not only has every gadget in the
world but you're obsessive about details. You can get the ultimate
in accuracy by purchasing an Electronic rangefinder.
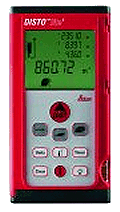
The one shown here is a Disto Lite5 hand held laser meter from
Leica Geosystems. It sells for around $375 and will give you
accurate distance readings from 0.2 to 200 meters (8 inches to 650
feet). How accurate? How about ± 3mm!
A number of companies make laser rangefinder systems ranging from
handheld to tripod mounted monsters that cover big distances and
cost big dollars. Will they make a difference in your photography?
Heck no!
But you'll have a cool toy that none of your buddies have in
their camera bag. "Look Chuck that tree is exactly 142.69
meters away!"
|
|
Calculating Circle of Confusion for Other Formats:
1
CoC = --------------
1300 / d
D = diagonal of chip in mm
To Find Hypotenuse (diagonal) of a film or digital format:
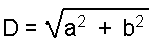
Where:
a
& b are the length of each side of the format.
This constant in this formula is based on 4 lines per mm viewing
resolution. I have seen some charts whose results are based on 5
lines per mm viewing resolution and seen it argued that 6 or even 8
lines per mm should be used in this equation. The fact of the matter
is that substituting those constants makes no appreciable difference
in the real world. |
References for the mathematically inclined
Applied Depth of Field, by Alfred A. Blaker, Focal Press
ISBN 024051730X
 Subscribe to
Vivid Light
Subscribe to
Vivid Light
Photography by email
Tell
Us What You Think
|
