|
|
|
|
|
|
| They Touch the Heavens!
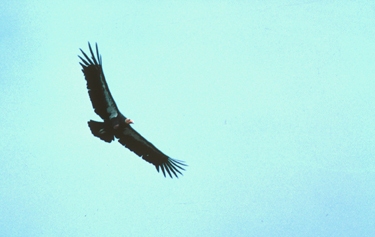
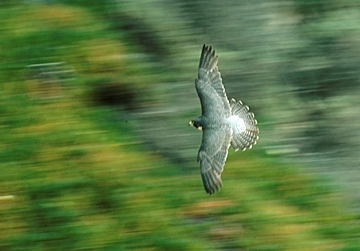
This was my first summer to be a nest watcher for the Peregrine Fund and participate in the photographic survey of California Condors. Neither of these birds sits still, let alone perches anywhere in the neighborhood where you can photograph them. My challenge was to photograph one of the fastest and one of the largest birds in sky. The only way I was going to photograph them was on the wing!
What I know about flight photography was founded that summer. The basics of flight photography are still the same today as they were yesterday, although we have some better toys to play with now. But no matter how old or how new your gear happens to be, flight photography is still flight photography! You MUST have the fundamentals down before you can expect consistent great bird flight photographs. These fundamentals are what you build on with time and lots of practice until you have the confidence of knowing that no flight image is beyond your skills. Fundamentals that CANNOT Be Overlooked The next important technique is Panning. Again, you can find numerous passages I've written in past articles about panning in the archives of Vividlight. Stop here and search on Panning and read them before proceeding. The next fundamental is one I've not touched on for Vividlight readers and that's AF sensor selection. You have three options when shooting horizontal images, the left, center or right AF sensor (speaking of the Nikon system specifically here but Canon and Minolta users can easily translate for their systems). The problem for most photographers comes in selecting the right sensor for the subject at hand. (Naturally, the motordrive and AF Mode are both set to continuous. That goes without saying.) Here's my rule of thumb. When the bird fills the frame, which means it fills approximately ½ the frame, I use the center AF sensor. No, this will not center the subject in the frame because I'm always focusing on the EYE of the subject. By using the center AF sensor and focusing on the eye, the majority of the bird will be either left or right of center and only the head will be dead center. When it comes to flight photography, this is the easiest. When the subject is large, the center sensor is the easiest for photographers to work with so it generates the highest percentage of successful images.
When the birds are smaller than ½ the frame, this is when the photography gets more difficult but the results can be much more pleasing IMHO. When the bird is smaller in the frame, you have a lot more options for composition and incorporating other elements to make a more interesting flight shot. This is where selecting either the right or left AF sensor comes into play. Which one to select? My rule of thumb is: if the bird is going left to right in the frame, the left sensor; when it's going right to left, the right sensor. The reason is simple, the last thing I want are CENTERED subjects! Selecting either the right or left sensor in these scenarios forces me to COMPOSE the flying bird in the frame. Yes, this is more difficult but it creates more drama in the photo and requires more skill as a photographer. These are the fundamentals for flight photography: a steady platform for your camera, the ability to properly pan and knowing which AF sensor to select. How do these fundamentals become second nature? Practice, practice and practice! Here are two ways to practice, photograph the house pet or gulls. Practicing on your dog fetching a ball is great practice to start with. Gulls though are really the best teacher. Head to your local bird pond with a friend and some unbuttered popcorn. Have your friend throw up the popcorn while you try to photograph the action. This will get you whipped into shape really fast!
Lens Selection I also shoot flight with the 600mm straight or with either the 1.4x or 2x attached. I typically have the 300mm on a second body on my shoulder, but shooting flight shots with the long lens can be just as successful if you have the fundamentals as second nature! So then what is the best lens for flight photography? I normally don't say point blank which lenses are best, but in this case I think it's pretty cut and dry. In all honesty a 400mm straight lens is the preferred focal length. When it comes to AF or AFS, Nikon offers the wildlife photographer nothing in this range as a straight lens (and that's a crime IMHO!). The 300f4 AFS works perfectly on the D1 Family where the CCD crop down effect yields the proper focal length. The 80-400VR just simply doesn't work for action photography. If you own this lens and really get serious about flight photography, you'll find yourself getting frustrated the vast majority of the time because of the slow focus function of the 80-400. Nikon does have a beautiful manual focus lens, the 400f5.6EDIF, which is outstanding, but like I said, it's manual focus. If you're a Canon shooter, you have two killer options. The 400f5.6 Ultra Sonic and the 100-400IS are both outstanding for flight photography! There's no doubt that Canon has it all over Nikon with these two beautiful lenses, period! Why am I not listing long lenses like 500 or 600mm? There are many reasons, the main one being that I've never seen someone able to pick up a long lens attached to a tripod and focus on a bird flying overhead. Yeah, sure, I photograph plenty of birds with my 600mm, but most are shot with the 300mm handheld. You'll have to look at your own photography and determine which works best for you!
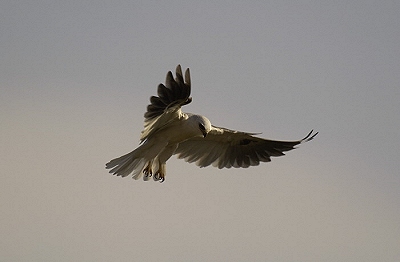
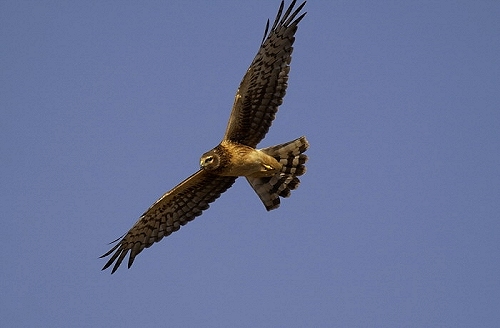
Circling Raptors Photographing the circling bird is not really that difficult if you just think it through. It starts with understanding how the bird is circling, clockwise or counter-clockwise. Why is this important, light! There are two things we're looking to capture when photographing a ringing raptor (a more biological term for circling raptor), composition and light under the wings. As the raptor makes its circle, at some point in that circle it will be banking, which allows the underside of its wings to be lit by the sun. This is when you want to shoot as long as that is also when the raptor is head first rather than butt oriented in the frame. This means that not every circling raptor should be photographed! Back to clockwise or counter-clockwise, why is understanding this important? You need to follow the ringing raptor and if it's ringing clockwise you need to select the left AF sensor. If it's ringing counter-clockwise, you need to select the right AF sensor. This forces you and enables you to photograph raptors as they are coming into the frame compositionally correct hopefully when they are banking into the sun. The real trick to photographing ringing raptors is knowing when you SHOULD NOT be photographing them! This must include when the skies are overcast! Overcast skies while great for photographing subjects on the ground, totally sucks for birds in flight. I know, some of you will ignore this rule and go and photograph birds in flight on overcast days. When you get the film back you'll ask, "What happened, they suck?" You might say something like, "I dialed in compensation but still the bird is just an outline, there is no detail in it!" There is no light lighting up the underside of a ringing bird so the range between shadows and the overcast sky is so great, all you have is yuck. Save yourself, don't do it! Lighting
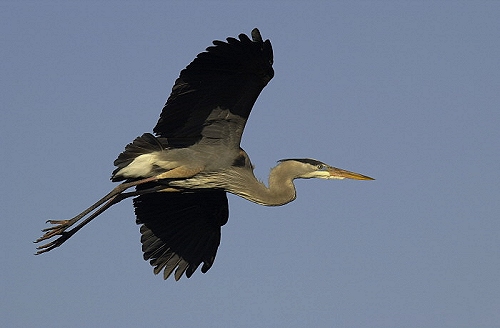
While not truly lighting, in my own mind I equate the background to lighting. Some photographers will only photograph birds in flight when the background is pure blue sky. On the other hand I prefer to photograph birds in flight when there is some type of atmospheric character, clouds! We're not talking about overcast skies, but actual puffy clouds. It's just me, but when I see a bird against a solid blue sky, I have the feeling they are hanging there by a wire. Yeah, I take these shots, there isn't much I pass up, but it's not my preferred background. The point though is to be selective! Just throwing your lens up and blasting and capturing a sharp image is not the key to flight photography success! Just like any facet of wildlife photography, a lot of elements must be combined in one frame to be successful. Vertical Shooting Placing Them in the Heavens There are so many variables when it comes to placing the bird in the frame. First is the image size, next the background and lastly the lighting. Since these three variables are constantly in flux, you'll begin to understand that capturing birds in flight takes more than just getting the subject sharp. I've found that I've had the most success in capturing birds in flight by allowing my heart and soul to be swept away with the bird. This just naturally sets the stage for your eye, mind and firing finger to come together in creating the image!
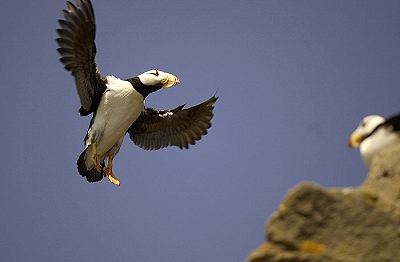
Birds have wings for a reason, to fill them with air! This is what makes birds special, unique and how they can so easily capture our imaginations. To do them justice, we need to use our skills and imaginations in photographing them in flight. I've provided you with the basics here; it's up to you to practice and practice them until they become second nature. Once they are second nature, you can strive to place the perfect bird in the perfect place in the frame with the perfect light to create the perfect flight photo. When all the elements come together in one frame, you'll have no doubt because when you view that bird you've captured in flight, you'll know what I mean when I say, They Touch the Heavens! |
|
|
|
|
|
|
|
|
|
|
 In
the summer of 1981, I was as green as they come to wildlife photography. I
understood photography, but not how to combine it with biology. With an
F3P and 400f5.6 EDIF, I was ready to dive in. But like so many things in
my life, I was about to get a crash course on one very important aspect of
wildlife photography.
In
the summer of 1981, I was as green as they come to wildlife photography. I
understood photography, but not how to combine it with biology. With an
F3P and 400f5.6 EDIF, I was ready to dive in. But like so many things in
my life, I was about to get a crash course on one very important aspect of
wildlife photography.