The Composition Within the
Composition: Using Photoshop to improve your
creative eye
by Gary W. Stanley
Here you are, shooting the Tetons for the
very first time. The light is changing fast so you don't have much time to
think. You begin shooting some standard compositions. It's not that you
aren't willing to try new things, it's just that the light was changing
fast, you were busy getting the tripod set up, and checking to make sure
you put film in the camera.
You quite naturally resort to the instincts that you have developed
over time. You're running through that mental checklist that keeps you
from going home empty handed. You're not alone here; I do it all the time.
It's usually when I begin writing an article that I actually take the time
to ponder over what it was I did during those frantic few minutes of
shooting. I have learned over the years how to mentally log in the
information important to me. That comes from a lot of shooting, or
repetition if you will.
Whether it's wildlife or landscapes it only seems natural to shoot
first and ask questions later. How often have you taken several frantic
shots of a wildlife subject, or a landscape in fast changing light, and
then as you begin to relax a little you start to concentrate more on what
you are doing? Oops! I never tightened the legs on my tripod. Darn! I
forgot to put my ND grad filters in my vest. I wonder if that horizon line
was really straight? Why didn't I shoot that vertical? Sound familiar? No,
I'm not psychic I'm just human. I make the same mistakes you do. I'd like
to think that experience has helped me keep from making them as often, but on
some days…
I have found a way to improve my creative eye, and better prepare me
for those moments when I'm chasing the light. Often it comes after the
fact, when I have more time to examine my images. I can do it during the
editing process on the light table, or most often I will do it when I scan
the image into the computer. Let me show you what I do.
 First
of all I scan the image into Photoshop. Versions 6.0 and 7.0 work the best
to do what I do, but you can use older versions as well, it just works a
little differently. You can use any image that you want. An image that you
would like to improve upon is okay, but I usually use a favorite image,
one with a composition that I think is very good. This helps me to
appreciate more the value of working your composition and your subject,
and helps me to realize the composition within the composition. First
of all I scan the image into Photoshop. Versions 6.0 and 7.0 work the best
to do what I do, but you can use older versions as well, it just works a
little differently. You can use any image that you want. An image that you
would like to improve upon is okay, but I usually use a favorite image,
one with a composition that I think is very good. This helps me to
appreciate more the value of working your composition and your subject,
and helps me to realize the composition within the composition.
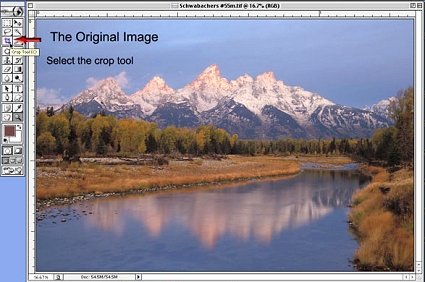
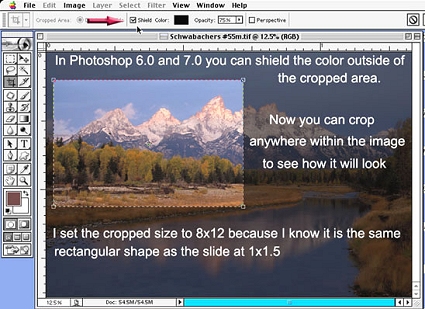 Open
the image that you have chosen, and make it large enough on the monitor so
that you can view the difference comfortably. Now select the cropping tool
on the left menu bar and for now, size the image to the same proportion as
the original. You can make it say, 8"high by 12"wide or 8x12.
Now drag the cropping tool across the image to create a rectangular box.
Don't make it cover the entire image, only make it about half that size. Open
the image that you have chosen, and make it large enough on the monitor so
that you can view the difference comfortably. Now select the cropping tool
on the left menu bar and for now, size the image to the same proportion as
the original. You can make it say, 8"high by 12"wide or 8x12.
Now drag the cropping tool across the image to create a rectangular box.
Don't make it cover the entire image, only make it about half that size.
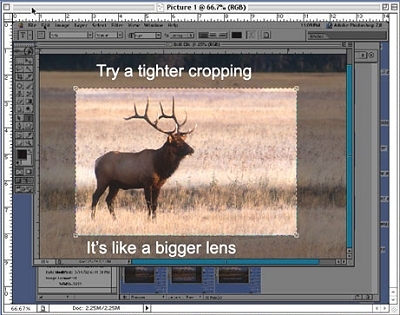
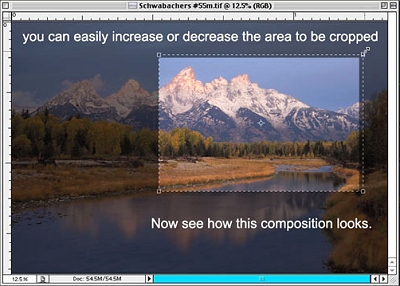 Now
you can drag that cropping box over any part of the image, to see what
your image would have looked like if that had been all you included. With
the later versions, 6.0 and 7.0 of Photoshop, you can shield or darken the
color outside the cropped area just by clicking on the box above, as shown
in photo #3. Try it several times in different areas of the original
composition. Soon you'll realize that there were in fact many more
excellent images that could have been made from that one spot alone. No,
Fuji and Kodak did not put me up to this! Now
you can drag that cropping box over any part of the image, to see what
your image would have looked like if that had been all you included. With
the later versions, 6.0 and 7.0 of Photoshop, you can shield or darken the
color outside the cropped area just by clicking on the box above, as shown
in photo #3. Try it several times in different areas of the original
composition. Soon you'll realize that there were in fact many more
excellent images that could have been made from that one spot alone. No,
Fuji and Kodak did not put me up to this!
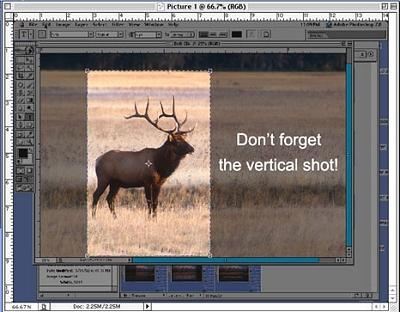
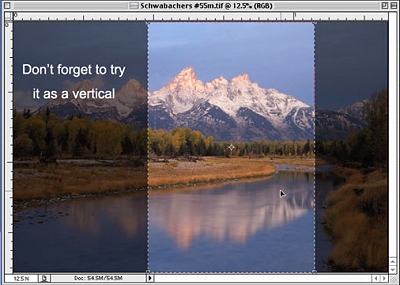
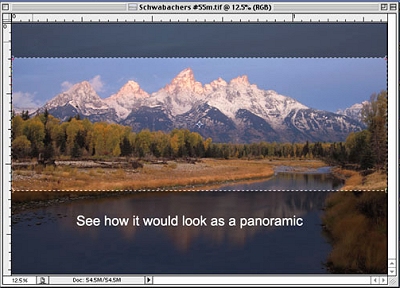 Next,
try a panoramic of that same image and see if that works. Ask yourself,
how does it look with less sky? Does it simplify the original composition
or not? What if you now select the cropping tool to crop it as a vertical?
How many different vertical compositions are there in the one image? Now
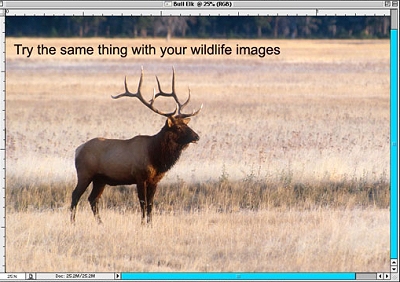
try the same process using a wildlife image (Photos 6-8). Next,
try a panoramic of that same image and see if that works. Ask yourself,
how does it look with less sky? Does it simplify the original composition
or not? What if you now select the cropping tool to crop it as a vertical?
How many different vertical compositions are there in the one image? Now
try the same process using a wildlife image (Photos 6-8).
All
of a sudden you begin to realize the learning potential of just this one
exercise, using just one or two images. I find it gets my creative juices
going, and helps me to mentally prepare for the next time I'm faced with a
similar shooting situation.
 If you intend to print this image, and the image is sharp, why not try
printing some of these cropped images as well? If you do this and like the
results, remember to do a Save As of the cropped image. If you don't plan
on making any prints, and you have finished this exercise, remember to
cancel the crop and don't save it. If you intend to print this image, and the image is sharp, why not try
printing some of these cropped images as well? If you do this and like the
results, remember to do a Save As of the cropped image. If you don't plan
on making any prints, and you have finished this exercise, remember to
cancel the crop and don't save it.
There may be some of you out there who have found other ways to help
your creativity, but I happen to like this one, and the added visual that
helps as well. Why not give it a try, maybe it will help you the way it
helped me to see "The Composition Within The Composition."
 Subscribe to
Vivid Light
Subscribe to
Vivid Light
Photography by email
Tell
Us What You Think
|