|
|
|
|
|
|
|
Unsharp Mask I’m often asked if I
do much in the way of manipulation in Photoshop when working with my
images. My typical response
is that usually all I am trying to do is get my images to look as good as
my slides. Yes I play with
some images, and yes I try new techniques and experiment a little.
The problem that I have, and it’s a good problem, is that if I
make or improve an image so that it looks different or even better than my
original, my work becomes suspect when I put on a slide program.
“Hey! These slides Gary’s showing aren’t as good as the stuff
I saw in his article” “Fake!
The guy’s a Fake.” Well, it’s not as bad as all that, but you do have
to be careful. Sharpening is
one of those areas where people assume that you are improving the image
that wasn’t sharp in the first place.
This is not necessarily so. Again,
as I stated in the beginning, I want the image that I see on the monitor
to look as good as my original slide.
Obviously, when teaching comes into play, there are times when my
original did not look as good as I would have liked.
For illustration purposes, or for printing, I will make adjustments
to the image that will help make a point or improve my final printed
product. A filter like Unsharp Mask can be a tremendous tool
to do all of the above. “Great
Gary, but I see four different sharpening filters in that menu selection: Sharpen,
Sharpen More, Sharpen Edges, and Unsharp Mask.”
Okay, you’re right, there are several choices.
However, trust me on this one, Unsharp Mask is the only one
you’ll need. The others are
preset filters, and are not as versatile nor as flexible as Unsharp Mask. The term Unsharp Mask, corresponds to the
reproduction of an image, say for offset printing, where a soft, lighter
negative was sandwiched with the original positive during exposure to
increase edge sharpness. It
served as an Unsharp Mask to help sharpen the original, and the term has
carried over to Photoshop. All that said, let’s learn how to use it. Question? Do
all of my images need to be sharpened?
The answer is, it depends. For
the most part, they all need a little sharpening in order for them to look
good on your monitor, with your monitor being the only means with which
you have to judge relative sharpness before printing or whatever. Question? Should
I sharpen the image when I scan? No!
If at all possible leave the sharpening until last.
Use Unsharp Mask after you have made all the other adjustments to
your image, i.e. color, brightness, curves and levels, hue and saturation
and so forth, then perform Unsharp Mask. Why? Because
Unsharp Mask creates lighter and darker pixels, and sharpening can
introduce objects or things into the image that you may not want, such as
noise, grain or contrast. Once
the image is sharpened and saved, it is permanent.
If you have degraded the image, all other adjustments will be
affected by that sharpening. So
I recommend that you save your file as your ‘Master File’ just prior
to the sharpening, then, if it’s not quite right, you can go back and
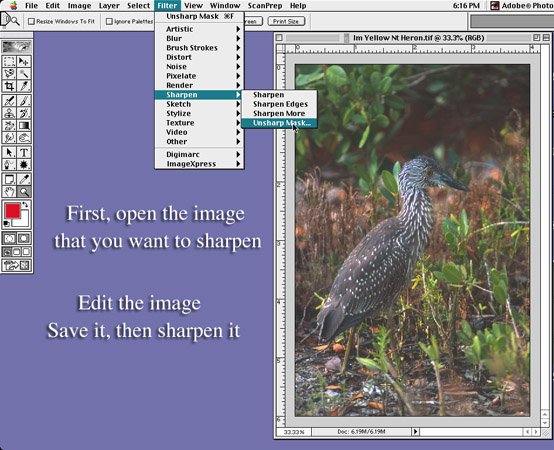
make adjustments without starting from scratch. Open an image that you would like to sharpen. Make sure that you are happy with all the other areas of the image, and that all other picture editing is complete before continuing. Now let’s go across the menu bar and select Filter, Sharpen and then Unsharp Mask.
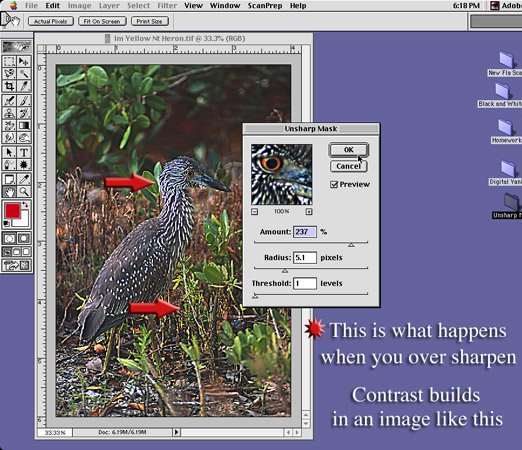
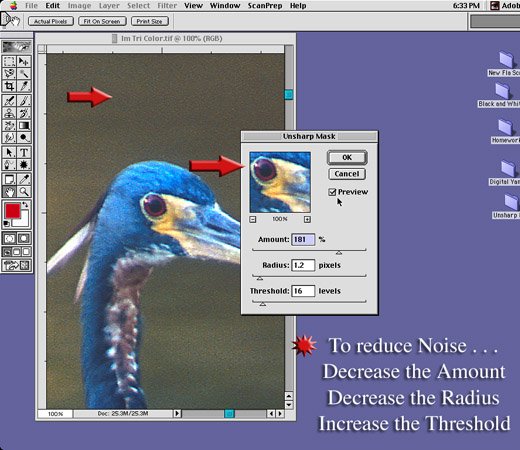
Next I’m going to over sharpen this Immature Yellow Crowned Night Heron to show you what not to do.
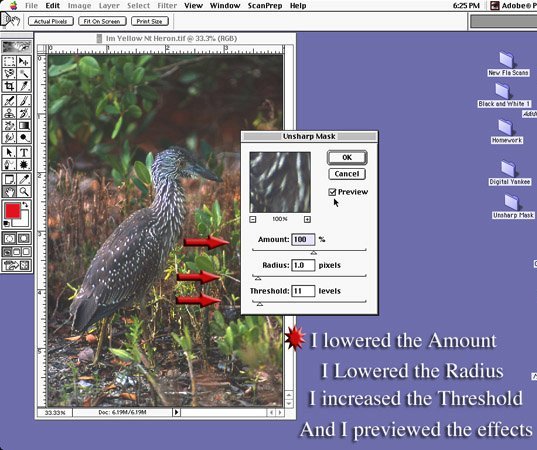
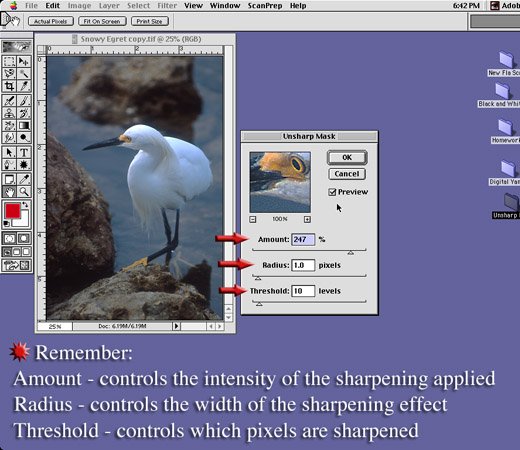
Because there is a fair amount of contrast in this image, over-sharpening becomes very obvious. The white and brown areas on the bird’s neck really begin to fight each other for attention. I lowered the Radius because it controls the width of the sharpening effect. I increased the Threshold setting because it controls which pixels are sharpened based on how they compare in brightness from their neighboring pixels. Then I backed off the Amount of the sharpening effect, because it controls the intensity of the sharpness that you apply. Finally I previewed to compare the difference. A good starting point for sharpening most images is
to set your Radius at 1.0
pixels, your Threshold at 1,
then you can move the Amount
percentage back and forth between 100% and 250%.
These are only starting points, the same way you might look at
exposure compensation in basic photography.
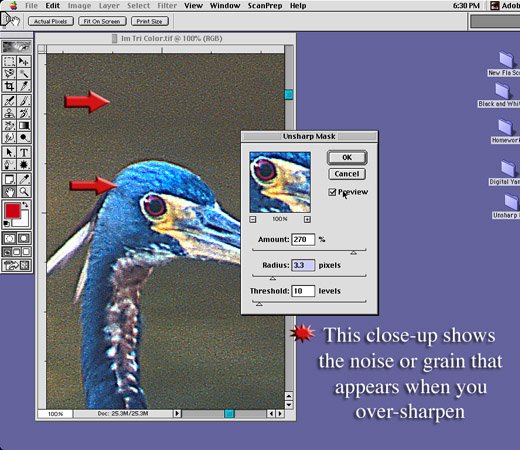
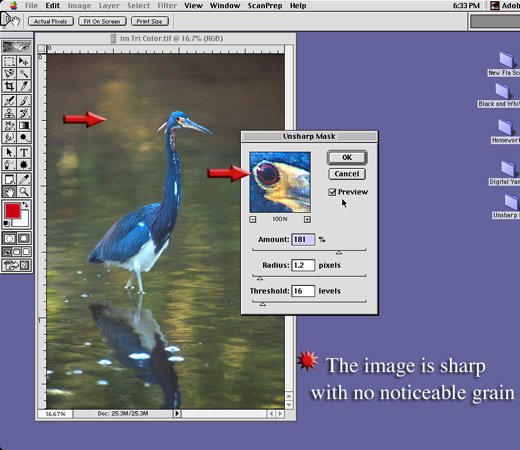
It will depend on the image that you are working with. This time we’ll work with an image that does not have all the distracting elements and contrast of the previous example. First look at the noise or grain that I have created by over-sharpening.
The solution is to reduce the Radius, increase the Threshold, and reduce the Amount.
Now the final full-framed shot of the Tricolored Heron looks like my original transparency.
Okay, by way of review: As Radius is increased, the edges of the pixels are more pronounced as you widen the Radius range of pixels. When you adjust or reduce the Threshold levels, you sharpen edge contrast without increasing noise or grain. Then you can adjust the Amount or percentage of these settings. I’d like to be able to tell you the exact settings in Unsharp Mask that you will need for each and every image you work with, but obviously I can’t. There is a learning curve to any new tool used here in Photoshop. Some are easier to master than others. Unsharp Mask is not really that difficult. As you work with more and more images you will begin to recognize the ones that need more attention than the others. You’ll know just by looking at an image, where to start the sharpening process. “Yeah, this image is a little contrasty. I should be careful not to over-sharpen.” “I’ll need to pay attention to my Radius and Threshold settings, or the image will begin to look grainy.” That kind of thinking will become almost automatic. “Let’s see, do I add light, or take away light, when metering for snow?” Hmmm! |
|
|
|
|
|
|
|
|
|