Setting Up A Home Darkroom
by Chuck McKern
Even with digital technology becoming more and more popular, there are
still a lot of people looking to set up traditional chemical darkrooms at
home. There are several things that need to be planned out and decided on
before setting up. Careful consideration needs to be given to location,
equipment you need and/or want, and what kind of printing and developing
you want to do. Most people start with a black and white darkroom since it
is the easiest to set up and start with. Learning color techniques is much
easier if you've first mastered black and white.
Choosing the Right Spot
The first thing to think about is location. You'll need access to a couple
of things in your darkroom. One is electricity. You will need power for:
enlarger(s), timers, safelights, possibly motor driven agitators,
temperature baths, etc. If you think you will get into color printing, a
refrigerator will be required as color-printing papers should be
refrigerated to maintain their freshness (this is also a good place to
keep those pro films that need refrigeration). Its also a good place to
keep some cold drinks. A small fridge will be fine for most people.
You'll need running water. Utility rooms work well as darkrooms
provided there is enough space. The water is needed for mixing chemicals,
rinsing film, and washing prints, as well as cleaning up. If you don't
have a room with running water see if there is a room that shares a common
wall with one that does. If you're handy it should be relatively easy to
tap into those pipes to put a faucet and drain into your new darkroom.
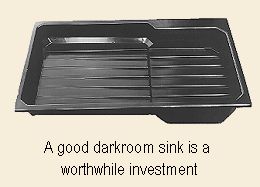
It's worth considering a specially designed darkroom sink. These sinks
allow you to have a wet workspace for laying out your trays. These make
chemical splashes easy to clean up and prevent spills from ruining a table
or counter top.
 While
you're thinking about darkroom sinks and counter tops, it's a good time to
start thinking about what size prints you want to make. If you are going
to do tray processing (for black and white), you will need room to spread
out at least three trays and a water bath. The trays will need to be big
enough to immerse your prints. Most people will only want to do up to 8x10
or 11x14 prints. If you want to do 16x20 or bigger prints, think about
using print drums with an agitator base instead of trays. This way you
will only need a tray large enough to wash the prints. We will talk about
the print drums and agitators a little later. While
you're thinking about darkroom sinks and counter tops, it's a good time to
start thinking about what size prints you want to make. If you are going
to do tray processing (for black and white), you will need room to spread
out at least three trays and a water bath. The trays will need to be big
enough to immerse your prints. Most people will only want to do up to 8x10
or 11x14 prints. If you want to do 16x20 or bigger prints, think about
using print drums with an agitator base instead of trays. This way you
will only need a tray large enough to wash the prints. We will talk about
the print drums and agitators a little later.
Your darkroom will need good ventilation. The chemical fumes from basic
darkroom chemicals aren't all that bad but once you close the door to the
darkroom and you're in there for a while, the air can tend to get a little
heavy and the lack of fresh air can give you a slight headache. If the
room doesn't have enough air circulation vents and electric fans can be
installed in a wall or door to provide better air circulation. Just make
sure you look for vent fans designed for darkroom use. They'll have a
light damper to prevent stray light from entering the room.
You'll also want to consider the humidity in your dark room. Dry air
will make it harder to control dust in your darkroom. If the room is dry a
humidifier will keep moisture in the air and dust down.
Next you'll need to check the room for light tightness. If the room
with a window don't get out the hammer and plywood just yet! There is a
material available from your photo suppliers to black out windows in a
darkroom, called simply black out material. It can be removed easily, so
you don't have to loose daylight all the time. Check the door(s) to the
room. You may need to get some weather seal to line the doorway to make
the door light tight. You may also be surprised to find out that the
corners of a room are not necessarily light tight. In these cases, it may
be as simple as taking black gaffers tape and taping the corners of the
room. The easiest way to check for the light tightness of the room, is to
go in the room on a sunny day and temporarily block out the window (if
there is one), and wait a couple of minutes for your eyes to adjust. If
you see any light coming in you'll need to find a way to block it out.
Equipment
Now that you have the location for your darkroom and you've made it light
tight, its time to think about what equipment you'll need. You can break
darkroom equipment down into three categories: film developing, printing,
and print processing. I'll assume that you're starting out with black and
white developing and printing and then I'll explain what you'll need to
add or change to do color.
Film Developing
In order to develop you the film into negatives for printing, you will
need a developing tank and reels, bottles for the chemicals, clips to hang
the film for drying, scissors, negative sleeves, graduated cylinders, and
a thermometer.
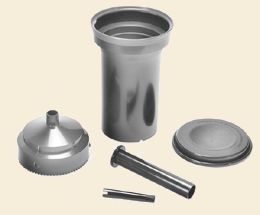 The
most common type of developing tank is a plastic tank that can hold two
35mm rolls. The reels for these tanks are usually adjustable so that
you're able to use the same reel for 120 film also (if you do that, you
will only be able to develop one roll in that tank). After you screw on
the lid, there is a tight slip on cap that will allow you access to pour
in/out the chemicals. I find plastic tanks work well for black and white
developing. If you are doing color film developing, stainless steel tanks
are better because its easier to control the temperature of the chemicals
in the tank. This is critical for color developers. Unlike most black and
white developers, which are used at or near room temperture, color
developers are used closer to 100 degrees Fahrenheit. Most color
developers only have a temperature tolerance of ½ of a degree in either
direction and temperatures can drop pretty quickly in a plastic tank. The
most common type of developing tank is a plastic tank that can hold two
35mm rolls. The reels for these tanks are usually adjustable so that
you're able to use the same reel for 120 film also (if you do that, you
will only be able to develop one roll in that tank). After you screw on
the lid, there is a tight slip on cap that will allow you access to pour
in/out the chemicals. I find plastic tanks work well for black and white
developing. If you are doing color film developing, stainless steel tanks
are better because its easier to control the temperature of the chemicals
in the tank. This is critical for color developers. Unlike most black and
white developers, which are used at or near room temperture, color
developers are used closer to 100 degrees Fahrenheit. Most color
developers only have a temperature tolerance of ½ of a degree in either
direction and temperatures can drop pretty quickly in a plastic tank.
Chemical storage bottles will be needed for storing your chemicals.
Most of the chemicals that you will use will be diluted from a stock
solution that you mix from a concentrate. This stock solution should be
stored in a bottle that is not transparent. This helps prolong the life of
the chemicals. Plastic bottles are fine for most photographic chemicals
and I recommend them because they will not shatter like glass if they're
dropped. Most chemical bottles designed for darkroom use have special
areas on them where you can use a pencil to write the name of the
chemical, date it was mixed, dilution ratio, and any other notes needed
for that particular chemical.
A good thermometer is important to determine the temperature of your
developer prior to immersing your film. This is important because the
developing time varies on film based on the developer temperature and when
mixing chemicals, some solutions will not dissolve properly unless mixed
at the proper temperatures. I recommend a stainless steel dial
thermometer. They don't break easily and they usually have a clip to hang
from the side of a graduated cylinder.
Graduated cylinders are important to accurately measure the chemicals.
I keep one just for use with my developing tank. My tank holds 20 ounces
and my graduate is 24 ounces. I use a much larger graduate for mixing my
stock solutions. Finally you'll need stirring rods to ensure that
chemicals are mixed thoroughly.
When it comes to drying the film, I ran a piece of clothesline across
one end of my darkroom to hang film to dry. There are special clips made
for use in darkrooms to hang film or prints. I find that clothespins work
fine for film.
After the film is dry, it is a good idea to cut the negatives and put
them into negative sleeves. I recommend sleeves that will fit in any
standard three ring binder. This will provide a good place for storage.
After you have cut the negs it's a good idea to make contact sheets, punch
them with a three hole punch, and put in the binder with the negatives.
This will make it a lot easier to find an individual image later on.
 Printing Printing
You'll need a safelight large enough to provide enough illumination to
move around and work safely. A safelight for color printing isn't
practical. The safelight filter for color paper is so dark that it's a
waste of your money. You might as well just work in the dark. You will
also need a timer or possibly two timers. A good timer for your enlarger
is a must. Any darkroom timer that works in whole seconds that you can
plug your enlarger into will work. If you are going to be doing color
printing, you want to make sure that you will be able to set your timer
for tenths of seconds. If your budget allows for it get a second timer
with a large face to use as a process timer. This can be used for film
developing as well as timing the print developing.
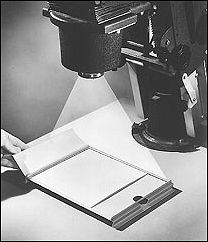
Easels are great for holding your paper flat under the enlarger during
exposure. They are available with and without borders and many are
adjustable to cover several different print sizes.
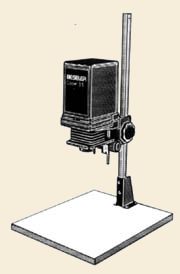 Probably
the most important piece of equipment is the enlarger. There are several
things to consider when deciding on an enlarger. The first is the size
prints you want to make and what format films you'll be shooting. Not all
enlargers can handle medium and large format negatives. Limiting yourself
to 35mm will help keep your cost down. Larger formats usually mean a more
expensive enlarger, more negative carriers and lenses. I also recommend
getting an enlarger that can handle sizes larger than you intend to print.
If you want to print 8x10s an enlarger that can do 11x14 will make life a
little easier. An 8x10 enlarger usually only allows for 8x10s with no
cropping. If you have the capability to do 11x14, you will have plenty of
room to crop those 8x10s to the way you want them. If you see color
printing in you future, make sure that your enlarger will be able to add a
color head. A color head has all the color filters built into the color
head that will allow you to dial in the correct filter pack. Not all black
and white enlargers are convertible to color. Probably
the most important piece of equipment is the enlarger. There are several
things to consider when deciding on an enlarger. The first is the size
prints you want to make and what format films you'll be shooting. Not all
enlargers can handle medium and large format negatives. Limiting yourself
to 35mm will help keep your cost down. Larger formats usually mean a more
expensive enlarger, more negative carriers and lenses. I also recommend
getting an enlarger that can handle sizes larger than you intend to print.
If you want to print 8x10s an enlarger that can do 11x14 will make life a
little easier. An 8x10 enlarger usually only allows for 8x10s with no
cropping. If you have the capability to do 11x14, you will have plenty of
room to crop those 8x10s to the way you want them. If you see color
printing in you future, make sure that your enlarger will be able to add a
color head. A color head has all the color filters built into the color
head that will allow you to dial in the correct filter pack. Not all black
and white enlargers are convertible to color.
Print Processing
For basic black and white prints, you'll need at least three trays and
one large tray for a water bath. The water bath tray is a special tray
designed with a water intake that will attach to a faucet, and a drain to
keep fresh water constantly circulating through the tray. As I mentioned
earlier, if you are going to print big prints such as 16x20 or larger, you
may want to use print drums for processing the prints. These drums are
similar to film developing tanks in that you would put your exposed paper
in the drum, put a cap on the end of the drum and turn on the light. At
that point you would be able to add and drain the chemicals in normal room
light. A motorized agitator base will allow you to keep agitation
consistent and even.
You may want to use print tongs for handling the prints while going
through the process. Some people prefer to use surgical style gloves for
the hands-on touch. These gloves are available in most pharmacies.
 There are several ways to dry prints at home. The simplest and least
expensive is a blotter book. Blotter books are spiral bound books that
have absorbent pages to soak up the water. These books are slow to dry and
can leave lint behind. You can also get drying racks to stack prints to
air dry. If you are using fiber-based papers, you can buy electric dryers
that have a curved aluminum center that heats up and has hinged canvas
cover that will hold the print to the metal. These are a little more
expensive but can dry fiber-based papers quickly. If you are using
resin-coated papers, you can also use film clips to hang them on that
clothesline that you use to hang film to dry. There are several ways to dry prints at home. The simplest and least
expensive is a blotter book. Blotter books are spiral bound books that
have absorbent pages to soak up the water. These books are slow to dry and
can leave lint behind. You can also get drying racks to stack prints to
air dry. If you are using fiber-based papers, you can buy electric dryers
that have a curved aluminum center that heats up and has hinged canvas
cover that will hold the print to the metal. These are a little more
expensive but can dry fiber-based papers quickly. If you are using
resin-coated papers, you can also use film clips to hang them on that
clothesline that you use to hang film to dry.
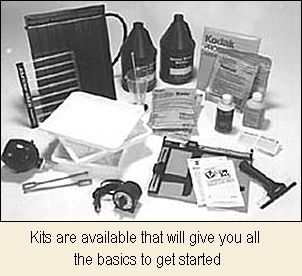
These
items represent a basic starting point that will let you start developing
and printing. There are plenty of other accessories that can be used in
your darkroom for special types of printing that can be added as you want
or need them.
In my next darkroom article I'll help you through deciding which
developers and chemicals to use as well as the difference between papers
and how to decide which papers are right for you.
Two great sources online for
darkroom supplies:
B&H Photo & Video @ www.bhphoto.com
Porters Camera Store @ www.porters.com
 Subscribe to
Vivid Light
Subscribe to
Vivid Light
Photography by email
Tell
Us What You Think
|

