Family Time:
Seeing What Your Camera Sees
by Bill Hartley
 What
we see isn't always what we get. Think about all those times we've
witnessed beautiful landscapes, bountiful flowers, or our children playing…
We want to capture these moments on film and take what we anticipate to be
good photographs, only to be humbled by the resulting images. What
we see isn't always what we get. Think about all those times we've
witnessed beautiful landscapes, bountiful flowers, or our children playing…
We want to capture these moments on film and take what we anticipate to be
good photographs, only to be humbled by the resulting images.
Most of what I am going to discuss here may seem very basic but I find
that we stumble upon the same problems time and time again. This is a good
opportunity to address some of them.
Do you see what I see?
Why can't we capture what we see on film? First of all, we need to
keep in mind that the camera sees differently than we do. Every camera has
a little rectangular opening that goes from the back through to the front.
This hole, technically referred to as a "port", is called, a
viewfinder. The camera's viewfinder is what you look through to "view
or find" the subject you wish to photograph.
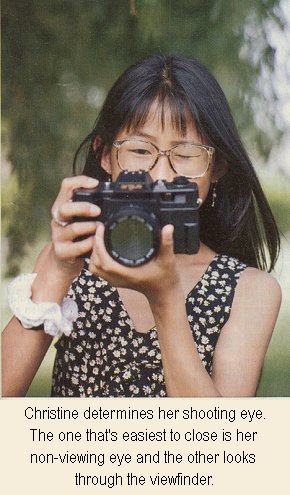
Because there is only one viewing port in a camera, you need to learn
how to use only one eye to compose a photograph. My father, who is now
seventy, still uses both eyes to look through cameras viewfinder, and
wonders why his pictures don't reflect what he thinks he saw.
 Yes, it is possible to photograph with both eyes open. Some
professional photographers do. However, for most people the non-viewing
eye causes distractions. When utilizing both eyes to look through your
viewfinder, you see what your camera sees and a whole lot more. The whole
lot more often ends up as an unwanted part of a photograph and a portion
of what was desired goes amiss. So for most of us it would be best to use
only one eye to photograph with. Yes, it is possible to photograph with both eyes open. Some
professional photographers do. However, for most people the non-viewing
eye causes distractions. When utilizing both eyes to look through your
viewfinder, you see what your camera sees and a whole lot more. The whole
lot more often ends up as an unwanted part of a photograph and a portion
of what was desired goes amiss. So for most of us it would be best to use
only one eye to photograph with.
Let's find out which eye you should use to look through your
viewfinder. First, shut your left eye, then your right. One will be easier
and more natural to close than the other. The eye that is easiest for you
to close should become the non-viewing eye. The other eye is the one you
should use to look through the viewfinder. For me, my right eye is easiest
to close. Therefore, I use my left eye to look through my camera's
viewfinder.
The viewfinder
There are two different types of camera viewfinders: one that allows
you to look through a camera's lens and one that allows you to look
parallel to the lens. A through-the-lens viewfinder is found in more
advanced camera systems, commonly referred to as single lens reflex (SLR)
cameras. This type of viewing allows you to see exactly what you are
photographing. Most of today's point and shoot cameras have parallel
viewfinders. These types of viewfinders do not allow you to look directly
or indirectly through your camera's lens.
To find out what kind of viewfinder your camera has, place your hand
over your camera lens. Make sure your hand tightly covers the lens only.
Look through your viewfinder. If everything is dark, you have
through-the-lens viewing. If you can still see something, then you have
parallel viewing.
If you have a camera with parallel viewing, keep in mind that you could
be looking at a subject, thinking it's okay to photograph, only to have
something blocking your lens. For example, your finger, camera strap or
even lens cap could be covering the lens, or somebody could be standing
just in front of you, and you might not know it. With a parallel viewing
camera you should quickly look with both eyes to make sure there is
nothing between you and your subject, just before photographing.
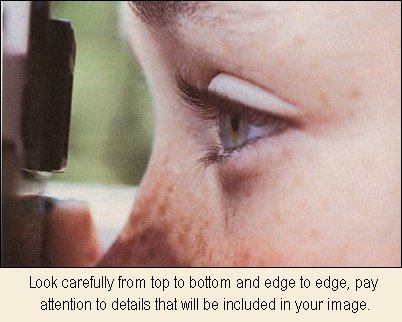
Heads, hands, knees and toes
Now that you know how to look through a camera's viewfinder, you need
to know how to apply that information. When looking through the
viewfinder, you should be able to see what you want to photograph. If you
do not see your subject in the viewfinder, it will not end up on the film.
 Have you ever seen a photograph with someone's head cut off? I have,
and not because they were beheaded. How about one with arms and hands
missing? These are common errors that could have been avoided. Too often
we look only at the center and think that everything else we want in the
photo will be there when it's really not. If you don't see it, it won't be
in your photograph. For example, you are taking a picture of your favorite
person - carefully check to see what is inside the total viewfinder area
(note: some cameras have "brackets" in the viewfinder which
depict the picture size.) Look at the top edge of the finder and ask
yourself: Do I see the top of their head? If not, you need to reposition
your camera until you do. Look at the sides: Do I see everything I want in
my photo? Is there something there I do not want, i.e., another person,
car, etc? Move your camera around until the unwanted objects cannot be
seen. Or if you cannot see everything you want through your viewfinder,
move back a little, until it all appears. If there is more than you want
that appears in your viewfinder, step forward until you see only what it
is you want to have in your photo. For those who have telephoto lenses,
zoom in and out to move forward or backward. By lifting and lowering your
camera and by moving backward, forward, side-to-side or by changing how
you hold your camera (horizontal or vertical), you are creating the image
you want and have taken control over what and how you are photographing. Have you ever seen a photograph with someone's head cut off? I have,
and not because they were beheaded. How about one with arms and hands
missing? These are common errors that could have been avoided. Too often
we look only at the center and think that everything else we want in the
photo will be there when it's really not. If you don't see it, it won't be
in your photograph. For example, you are taking a picture of your favorite
person - carefully check to see what is inside the total viewfinder area
(note: some cameras have "brackets" in the viewfinder which
depict the picture size.) Look at the top edge of the finder and ask
yourself: Do I see the top of their head? If not, you need to reposition
your camera until you do. Look at the sides: Do I see everything I want in
my photo? Is there something there I do not want, i.e., another person,
car, etc? Move your camera around until the unwanted objects cannot be
seen. Or if you cannot see everything you want through your viewfinder,
move back a little, until it all appears. If there is more than you want
that appears in your viewfinder, step forward until you see only what it
is you want to have in your photo. For those who have telephoto lenses,
zoom in and out to move forward or backward. By lifting and lowering your
camera and by moving backward, forward, side-to-side or by changing how
you hold your camera (horizontal or vertical), you are creating the image
you want and have taken control over what and how you are photographing.
Learning from our mistakes
Go through old family photos and find some images that have missing
body parts or cut off heads, look for those images that include more
items/things you intended, and for those that have less. If we're honest
with ourselves there are probably more of these than we would like.
Most of these errors could have been avoided, if we would have paid a
little more attention to the details while taking the picture. Keeping in
mind that what we see is not necessarily what the camera sees. Simply put,
if you don't see it in the viewfinder it will not be in the photograph.
Conversely if it's in the viewfinder it will be on the film. Concentrate
on what it is you are about to photograph and make no assumptions. · Look
through your viewfinder with only one eye. · Make sure there are no
distractions at the edges or in the corners. · Move in and out, either
with your feet or with your zoom lens, until you have only what you want
in the picture.
When the camera and you "see" what it is you wish to
photograph in full, take the picture.
 Subscribe to
Vivid Light
Subscribe to
Vivid Light
Photography by email
Tell
Us What You Think
|
