|
|
|
|
|
|
| Minolta Dimage Scan Multi II by Vivid Light Staff
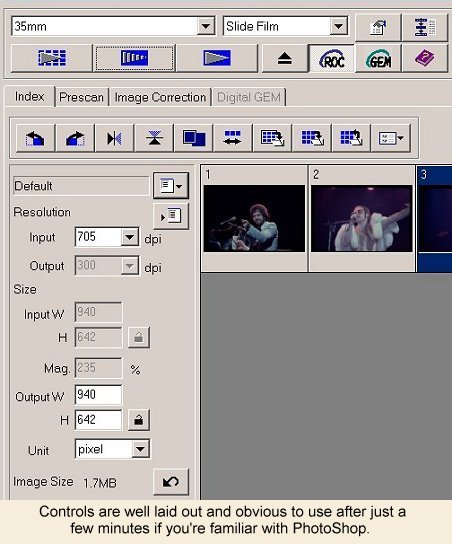
There is a certain amount of art, and a definite learning curve to scanning. It is a skill just like photography is a skill. However there is pronounced difference between cameras and scanners. A good photographer can get great images from mediocre equipment provided he knows it's limits. But it is a struggle to get really high quality scans from mediocre scanners and the results will never match what can be achieved with a higher quality scanner. No matter how good you are in PhotoShop, doing major color correction, dodging, burning, touching up dirt & scratches, and then sharpening - all just to get an image that matches your original slide to use as a starting point is a terrible waste of time. Yet that's exactly to corner that a mediocre scanner paints you into. Buy a high end scanner, like the Scan Multi II and not only do you save a tremendous amount of time, but you will tackle projects that you'd not have thought to try otherwise. The Dimage Scan Multi II, which we've taken to calling the Scan Multi because it's such a mouthful, is a great starting point for the serious photographer who has both medium format and 35mm slides. It's less expensive sibling the Dimage Scan Elite is the better, and less expensive, choice if you only shoot 35mm. Skip the techie details - how did it perform! Details The scanner is something of a monster. It weighs in over 13 lbs and takes up some serious real estate on your desk at 7.8 inches wide by 4.9 inches high and a whopping 16 inches deep. The first task was wrestling it into place on a crowded desk. That is if you can get it onto your desk. The scanner ships with a short 3 foot SCSI cable that necessitated placing the scanner on top of the CPU temporarily since the cable wasn't long enough to reach up to the desk. A six foot cable would make more sense. Installation of the SCSI card, and scanner software was straight forward and we were ready to scan our first images. Resolution on the Scan Multi is 2820 dpi optical resolution for 35mm film and 1128 optical and 2820 interpolated for medium format and other film types. It supports quite a variety of film types. obviously 120/220 film is supported with auto cropping for popular formats (6x4.5, 6x6, 6x7, 6x8, 6x9, APS, and 16mm). TEM (Transmission Electron Microscope) format films are supported with an optional UH-M1 (around $400). Also available is an auto slide feeder with a 50 slide capacity (street price around $600). The Scan Multi supports sRGB, Apple RGB, SMPTEC-C, and PAL/SECAM color spaces (among others) so even the most demanding desktop editors should be satisfied. You can access the scanner through a PhotoShop plug-in, the Scan Multi is a TWAIN compliant device, or through a stand alone scanner application. Other significant scanner features include multi-sample scanning to improve detail and reduce noise in shadow areas (2x, 4x, 8x, & 16x). Point auto focusing, which allows the user to choose and area of critical focus and instruct the scanning to autofocus on that point. AE area lock, which allows the operator to choose and area of the image to use for auto exposure and then apply that exposure setting to the entire image. The equivalent of spot metering in a camera. Auto cropping which detects and removes the slide holder from the scan - a real time saver when scanning a lot of images, and HSL (Hue, Saturation, Lightness) controls in addition to the RGB (Red, Green, Blue) controls found on most other scanners. Scan times are relative but we found that inn general scan times were much faster than on our in-house LS-2000 scanner. In some cases surprisingly so when scanning 35mm slides and negatives. Scan times are extended when applying Digital ROC or GEM, and are extended significantly when using multi-sample scanning as the scanner must make multiple passes on the image. Click here to see an explanation of how Digital ROC and GEM work. In short ROC is a color correction function that restores the color to old or faded slides and negatives. GEM defocuses film grain to provide a more pleasing image. No matter what size image you're scanning you'll have to place it into a tray before feeding it into the scanner. For 35mm film strips there is a try that holds up to six images per strip that allows you to preview and scan all six at a time. For mounted 35mm slides there is a tray that holds four mounted slides at a time. For all other film sizes there is third tray that is used with a variety of masks. Choose the mask that fits your film format, insert your film into the mask, and snap the mask into the tray. This system insures that no light leaks past the tray and illuminates the slide or negative from behind - ruining the scan. The Scan Multi is an autofocus, auto exposure scanner, but as a user you can choose an individual part of a scene to use to set your exposure or to use as your focus point. There is always a learning curve required to get up to speed on a new scanner, it's software, and it's habits and the Scan Multi was no different. However we found that it's software was considerably easier to use and learn than that of some other scanners we've tried. In less than an hour we were making and tweaking scans as if we'd been using the Scan Multi for months.
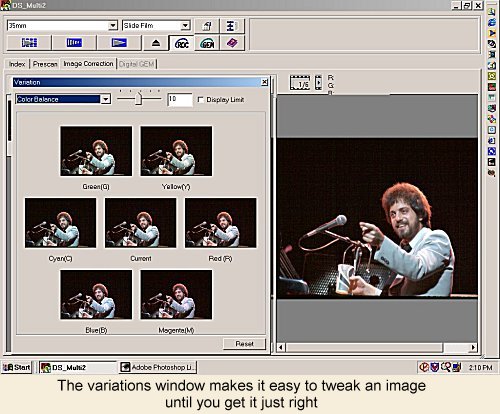
Minolta makes good use of screen space, and the software quickly seemed intuitive. Some small things that really make a difference are features such as auto cropping (that eliminate anything outside the frame) and variation correction. This tool is similar to the same tool in PhotoShop in that it allows you to add or subtract RGB or CMY (red, green, blue, cyan, magenta, or yellow) to the image while previewing the difference in both thumbnails and a preview window.
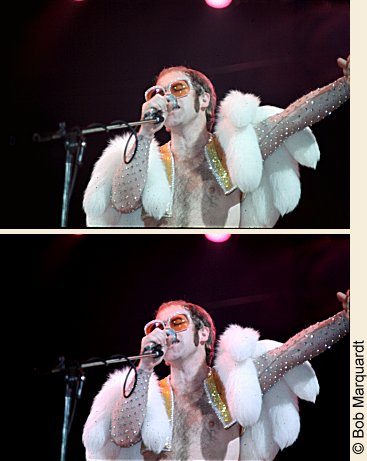
For those of you more comfortable using curves and levels, Minolta gives you the ability to manipulate the curves directly or any of the RGB channels individually to get the desired effect. Minolta uses the concept of image correction job files to store a group of presets that you can apply when scanning multiple images from the same roll. For example we scanned a bunch of fall images that had been show on Kodak 100SW. To do this we scanned an original image and dialed in the color. Those settings were saved into a job file call 100SW and were than applied to another image later in the roll. Some slight tweaking to that image and an update to the job file and we were now able to scan the rest of the roll without the need to tweak individual images. We just applied that job file to each image. To test out Digital GEM and Digital ROC we pulled some images out of the files that we knew would be a challenge. First we pulled an image recorded on Royal Gold 400 several years ago. Royal Gold was noticeably grainier then and I've developed a set approach to printing this image in order to soften the grain. GEM was able to do most of the work for me while retaining more detail in the sky than with my approach of using softening filters. But GEM is not a cure all. It can't recover image information that's not there to begin with but it can and does eliminate the rough feeling associated with the faster films of a few years ago. The price you pay for GEM is significantly longer post processing time on your scan. To test out Digital ROC we borrowed some old Ektachrome concert shots from the early 70's. While these were well preserved images some were showing some signs of fading. The side by side shots below show the results. Digital ROC was successful at restoring more saturated colors back into the images. Again the price you pay for using it is in longer processing times after the image is scanned. Our only complaint with the Scan Multi is that while Minolta implemented Digital ROC and GEM they didn't implement Digital ICE for removing scratches and dust from images. True, PhotoShop (and some of it's competitors) offer a filter that can remove dust and scratches. But we've found that the filters are never as accurate as using Digital ICE. That means more time spent cleaning up small details after the image is scanned. But all in all Minolta has hit the mark with this scanner. For the professional photographer or the serious amateur it provides one of the easiest interfaces we've seen to date, and an interface that will immediately be comfortable to PhotoShop users. No matter what format, or formats, you shoot you can be productive quickly with this scanner, and if you have a library of older images the Scan Multi can help you not only bring them into the digital world, but it will help you return them to their previous glory as well. Priced at over $1,500 this is definitely a pro-level tool. Take the time to master it and you won't be disappointed.
Billy Joel, Philadelphia Spectrum 1977 The color and skin tones in the original scan are flat. Grain in the original Ektachrome image is noticeable. With GEM and ROC skin tones are restored and grain has been minimized.
Elton John, Philadelphia Spectrum 1974 The color and skin tones in the original have a greenish cast, grain is pronounced. With GEM and ROC skin tones have gone slightly reddish due to the red light shining on Elton. Grain has been minimized.
Special thanks to Bob Marquardt for providing |
|
|
|
|
|
|
|
|
|
|
 Overview