|
|
|
|
|
|
| Fine Tuning Your Photographs by Gary W. Stanley
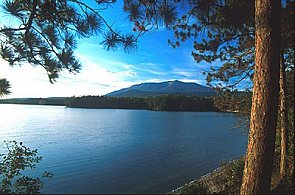
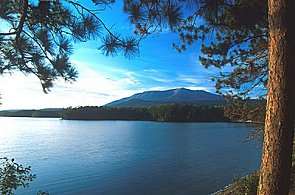
Well guess what? When it comes to fine tuning your photographs, the same stuff still applies. Just because you're past that beginner stage doesn't mean you can leave your tripod home. It doesn't mean you can close your eyes and point the camera like a divining rod in the vicinity of your subject, and it will detect the perfect composition for you. It still involves some conscious effort. Feel free to go back and review that article from time to time as needed. Nothing changes here except that now we want to take it to the next level. You feel you've reached the point now that naturally invites you to dig even deeper into the creative techniques and skills held by noted photographers like John Shaw, David Muench, Art Wolfe and others. These are the photographers with photographs that make us long to go to the places they go, equipped with the skill and vision that they have. While nothing will replace experience itself, a better understanding of how to fine tune your technical and artistic skills will make a big difference in your own photography. I'll try to show you by example different ways to look at a particular composition and determine what it will take to get your own vision down on film. While seeing it with your mind's eye is one thing, exercising good technical skills each time will be just as important. Fine-tuning your photographs is like practicing the basics without any mistakes. It's seeing great light and knowing what to do with it, or recognizing poor light and returning another day. It can be frustrating to photograph a subject even under ideal circumstances, only to later discover your horizon line is tilted (Photo #2A corrected in 2B).
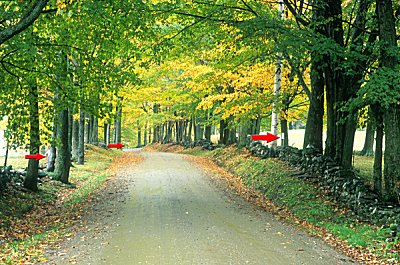
You didn't see those road signs in the frame, and it looks like there's a tree sticking directly out of the top of your subject's head! Other than fixing all of this in Photoshop, you're dead in the water! Basically you have to practice more than just 'looking' through the viewfinder: you need to begin 'seeing' before you press the shutter (photo below - three distractions).
This is not easy when the light is changing fast, or when you are using a wide-angle lens. Remember wide-angle lenses expand the apparent distance between objects, so it's harder to see things in your composition that shouldn't be there. But with practice this will come automatically. This is one of the biggest reasons for using a tripod. It affords you the opportunity to scrutinize everything in your composition before you press the shutter. One other little trick I use whenever possible, I always take my best friend along with me because when I ask her to take a look through my viewfinder, nine times out of ten she'll say: Did you want that old plastic Clorox bottle to be in your shot? All kidding aside, a second set of eyes never hurts. Another aspect to consider has to do with the composition itself and what we choose to include. The old adage is to keep it simple and clean, try not to include too much in the composition. It will make for a much stronger photograph and has more of an impact on the viewer. However, when I photograph the Maine coast for a calendar shot, I may need to tell more of a story than a shot of single lobster boat or a gull on a lobster trap. I may want to show several boats in the harbor on a foggy day with a vague outline of a dock and the village in the background. Besides keeping it simple, it's now telling a story or conveying a thought. It makes the viewer wish he or she was there to experience it first-hand.
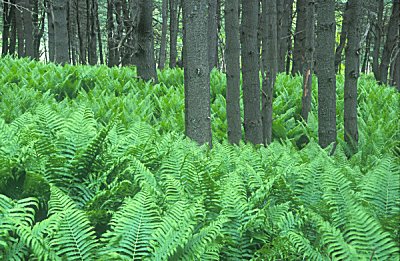
As you begin to master this thought process, you begin to have fun, and the challenge to come up with something a little bit different from the run-of-the-mill shot becomes greater. Now it's time to learn how to successfully work your subject. Working your subject means more than just jumping out of your car and snapping a shot of Portland Head Light shoulder to shoulder with twenty-five other photographers. I may shoot the "classic" shot as well, but then my little voice says, "Hey! Gary, if those same twenty-five people are submitting to the same calendar company as you, what advantages do you have?" Working your subject means moving around, shoot high, shoot low, shoot horizontals, shoot verticals. Try different times of day, or different times of year. If I never sold another photograph, I would still do this because that's how I approach my composition. The three different fern shots illustrated here will give you an idea just how I work my subject (photo #5,6+7).
Look for a foreground subject to compliment the scene or your main subject, flowers, rocks, trees, people, etc. Use it as an anchor to your photograph or to balance the overall shot, leading your eye comfortably through the composition.
Try also framing your subject with a tree branch or a rock outcropping, or move close and use flowers to start your way into the photograph.
Remember, you'll need to stop your lens down for maximum depth of field. Once again the 'Back To Basics' article talks about the important compositional elements of line, shape, texture, and form. Fine tuning your photographs may involve using several of these compositional techniques in one photograph.
Finally don't ever overlook the value of lighting. Great light is everything in a photograph, but nothing if you don't know what to do with it. This beam of light that broke through the clouds only lasted an instant.
It is just as important to know when not to take a photograph as it is to know when.
Potentially great shots will only be average if the light is average. You simply cannot force a great shot! First you have to be there, and then you can begin working your subject using your own creative eye, and your own good technique. Then, and only then, will you begin to get the results that you are looking for.
Here are a few review questions to ask yourself each an every time you take a photograph:
When you are confident enough to say yes to the above questions, you are well on your way to 'Fine Tuning Your Photographs'. |
|
|
|
|
|
|
|
|
|
|
 In
the August issue article 'Back To Basics' I talked about some of the basic
techniques needed to take good photographs. I stressed the importance of
balance between your mechanical skills and your artistic skills. I also
mentioned the basic equipment needs like a camera with a cable release and
depth-of-field preview button. Quality fine-grained film along with the
best lenses and filters you can afford is of course important. Oh yes!
Don't forget that all-important tool, the 'Tripod'.
In
the August issue article 'Back To Basics' I talked about some of the basic
techniques needed to take good photographs. I stressed the importance of
balance between your mechanical skills and your artistic skills. I also
mentioned the basic equipment needs like a camera with a cable release and
depth-of-field preview button. Quality fine-grained film along with the
best lenses and filters you can afford is of course important. Oh yes!
Don't forget that all-important tool, the 'Tripod'.